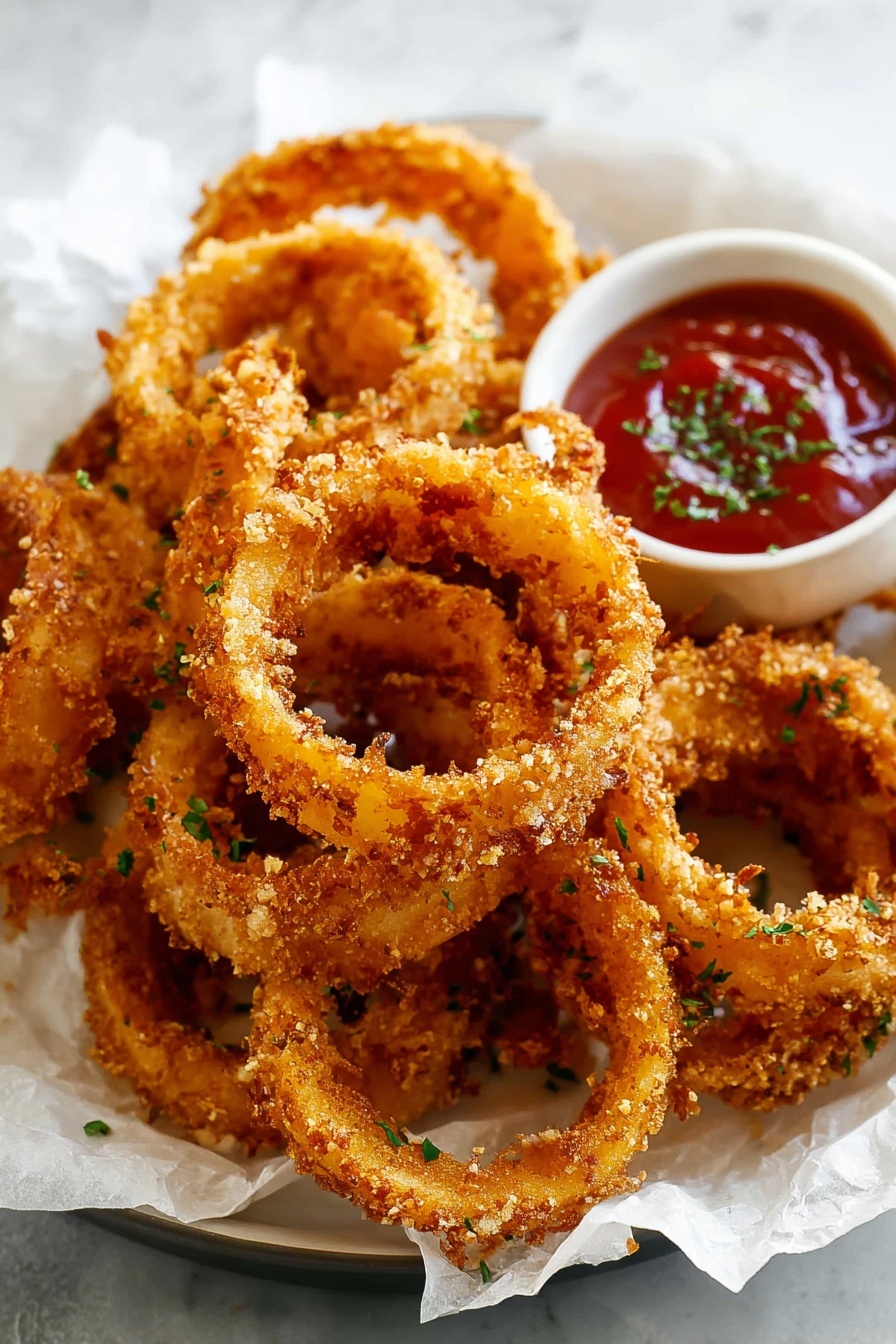
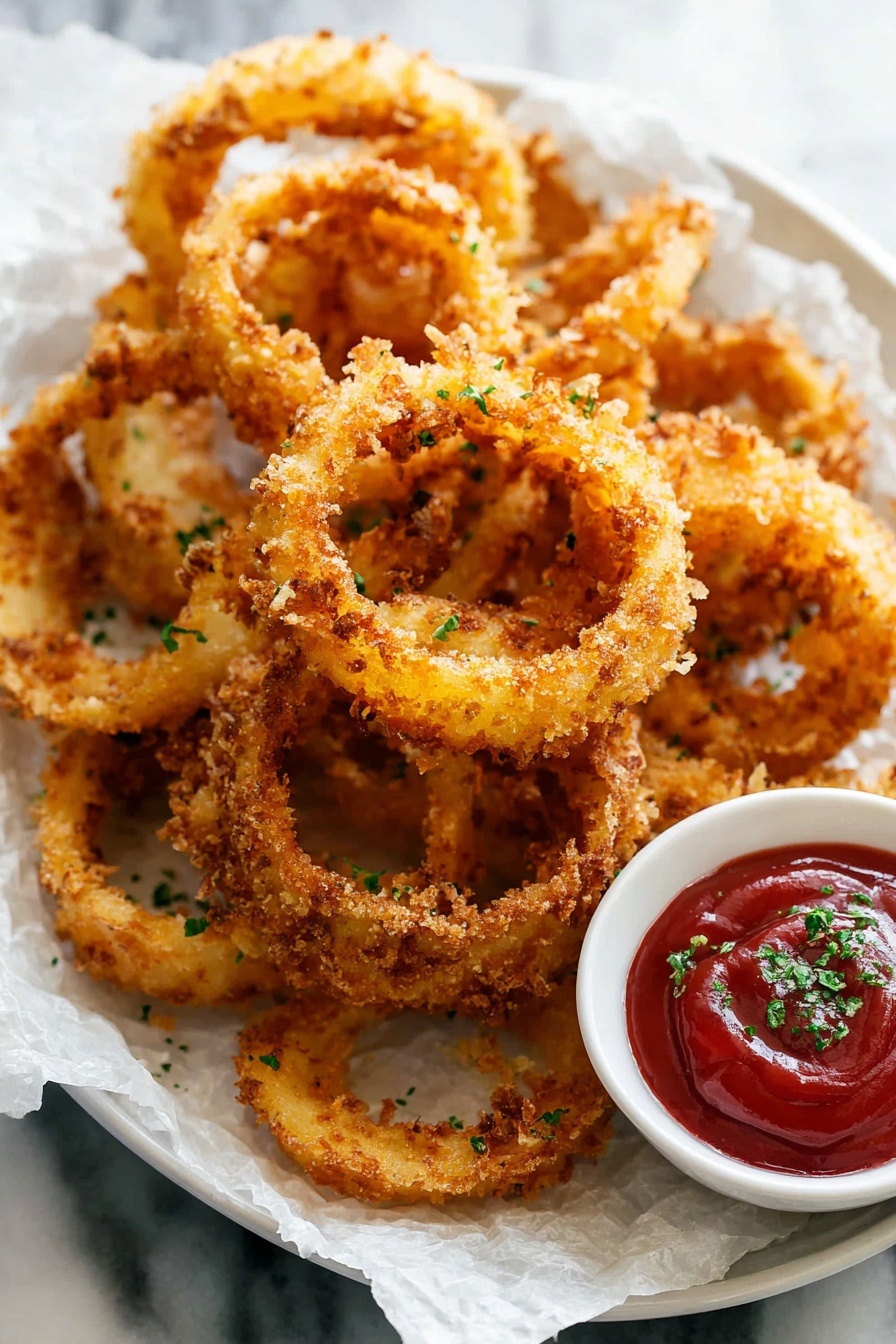
There's something truly irresistible about the crunch and flavor of homemade onion rings, especially when they're perfectly golden and super crisp. This Crispy Onion Rings Recipe is my go-to for achieving that satisfyingly crunchy texture while keeping them light and flavorful — trust me, once you make these, store-bought just won’t cut it anymore.

Jump to:
Why You'll Love This Recipe
I still remember the first time I tried making onion rings at home that rivaled my favorite diner — crispy, flavorful, and impossibly addictive. This recipe nails that perfect crunch by using panko and Parmesan cheese in the coating, so every bite is bursting with texture and savory goodness.
- Perfect Crunch: Thanks to the combination of panko breadcrumbs and Parmesan, these onion rings have incredible texture that stays crisp.
- Simple Ingredients: You probably already have everything in your pantry, making it an easy anytime snack or side.
- Versatile Cooking: Whether you fry or bake them, they come out crispy and delicious.
- Customizable Flavors: Easy to tweak with spices or add your favorite dips for a personalized twist.
Ingredients & Why They Work
Each ingredient in this crispy onion rings recipe plays a crucial role to ensure maximum crunch, great flavor, and ease of preparation. Here's why I pick these staples and some tips on getting the best results.
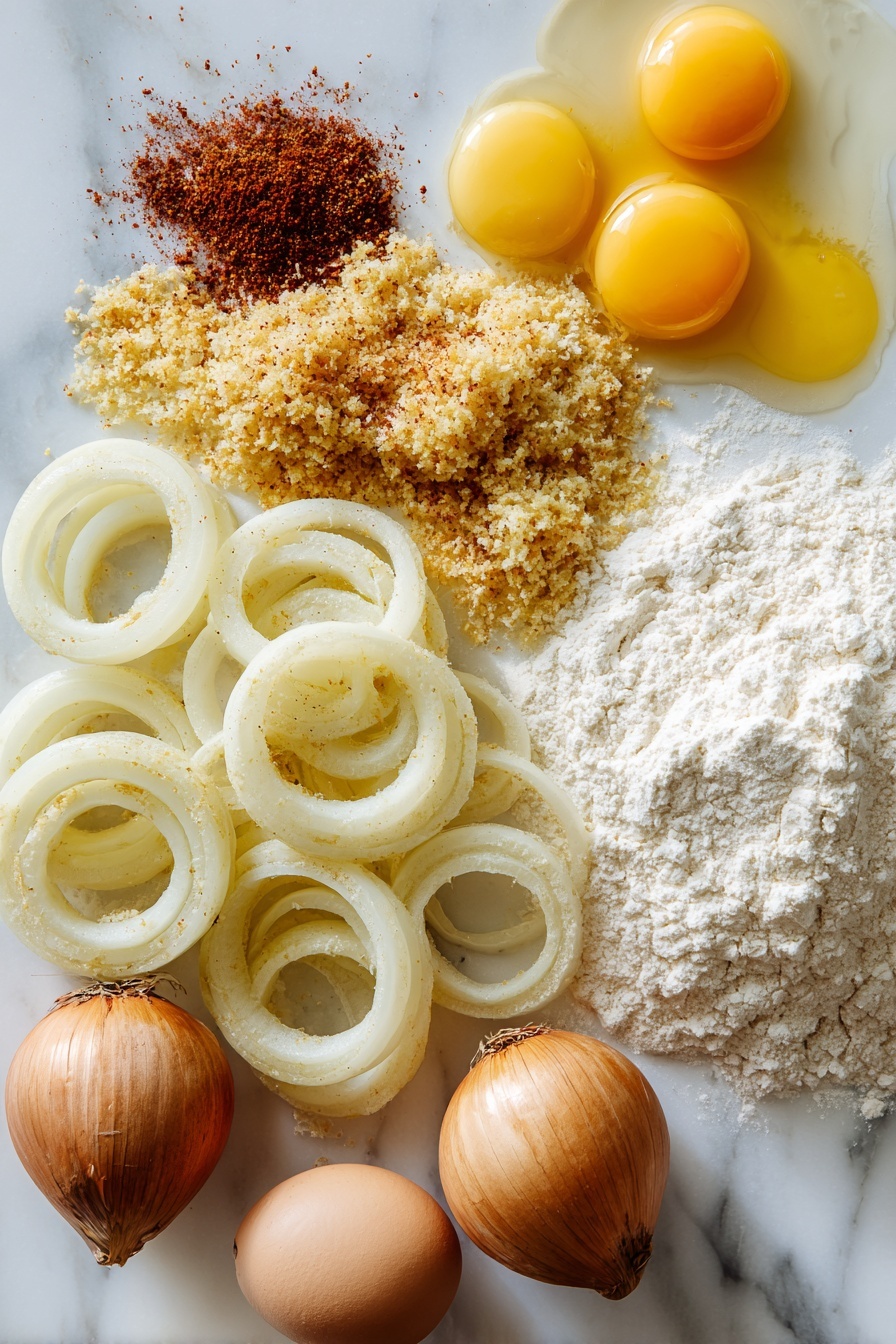
- Oil for frying: Use a neutral oil with a high smoke point like canola or vegetable oil to get that perfect golden color without burning.
- Large onions: Sweet varieties like Vidalia or yellow onions work beautifully here because they caramelize lightly and add natural sweetness.
- All-purpose flour: This is the base for the dry coating — it helps the egg stick and gives a light, even crust while frying.
- Baking powder: Adding this to the flour creates a subtle lift in the batter, helping the coating stay nice and crispy.
- Large eggs: Eggs act as the binder, holding the flour and breadcrumbs together so the coating doesn't fall off during frying.
- Panko breadcrumbs: These Japanese-style breadcrumbs are coarser and flakier than regular, which is the secret to that extra crunch.
- Grated Parmesan cheese: It adds a lovely, savory depth that elevates the flavor beyond just salty breadcrumbs.
- Paprika: This brings a gentle smoky warmth and a hint of color to the coating.
- Garlic powder: Garlic enhances the umami and pairs perfectly with the sweetness of onions.
Make It Your Way
I love to spice these up a bit depending on my mood — you'll find that this recipe is a blank canvas begging for your own touches.
- Variation: Sometimes I add a pinch of cayenne pepper or smoked paprika to give the onion rings a little kick — it’s a total crowd-pleaser at parties!
- Gluten-Free Option: Swap the all-purpose flour and panko with gluten-free alternatives, and you’re good to go without sacrificing texture.
- Baked version: When I want a lighter treat, I bake them at 450°F for about 10-15 minutes — they turn out crispy and delicious, especially with a spray of cooking oil before baking.
Step-by-Step: How I Make Crispy Onion Rings Recipe
Step 1: Preparing the Onions for Maximum Crunch
First things first: slice your onions into even ¼-inch thick rings. Consistency is key here, so each ring fries evenly. If your rings stick together, gently separate them with your fingers—trust me, it makes a huge difference. After slicing, pat them dry with paper towels to remove excess moisture; this helps the coating stick better and avoids sogginess.
Step 2: Setting Up Your Coating Stations
You'll want three separate bowls: one with the flour and baking powder mixture, one with whisked eggs, and one with the panko, Parmesan, paprika, and garlic powder combined. I like arranging them side by side on the counter—like an assembly line—so dipping each ring is quick and mess-free.
Step 3: Coating the Onion Rings with Care
Dip each onion ring first into the flour mixture, coating lightly but completely. Then dunk it in the egg wash to help the breadcrumbs stick, and finally press it firmly into the panko mix. Don’t rush this step—gently pressing the crumbs ensures a thick, crunchy layer later on. Pro tip: set each coated ring on a wire rack while you prep the rest to avoid soggy bottoms.
Step 4: Frying to Golden Perfection
Heat your oil in a medium skillet until it's shimmering hot at 375°F (medium-high). Fry the onion rings in small batches so the oil temp stays steady, and cook each ring for about 2-3 minutes or until golden brown. Use a slotted spoon to transfer them to a paper towel-lined plate to drain extra oil. Trying to fry too many at once is a common trap that leads to greasy, limp rings — I’ve been there!
Top Tip
After countless batches of onion rings, these are the little tricks that truly elevate your crispy onion rings recipe from good to unforgettable:
- Oil Temperature Matters: I use a thermometer every time to maintain consistent 375°F; too low and rings absorb oil, too high and the coating burns.
- Patience with Coating: Press your panko mixture firmly into each ring — this keeps the crust intact and crispy through frying.
- Drain Properly: Let the rings rest on paper towels or a wire rack to avoid oily sogginess.
- Don’t Crowd the Pan: I learned the hard way that frying in batches prevents temperature drops and achieves perfect crunch.
How to Serve Crispy Onion Rings Recipe
Garnishes
I like to finish my onion rings with a sprinkle of flaky sea salt and a dash of freshly cracked black pepper to elevate the flavors. Sometimes, a light dusting of chopped fresh parsley adds a pop of color and fresh herbiness without overpowering. A squeeze of fresh lemon over the top also works wonders if you’re going for a zesty touch.
Side Dishes
These crispy onion rings go perfectly alongside juicy burgers, BBQ ribs, or even as part of a platter with chicken wings. I’ve also served them next to a crunchy coleslaw or a fresh green salad to balance the rich crunch with some crisp freshness.
Creative Ways to Present
For parties, I love stacking the onion rings in a tall glass or a rustic basket lined with parchment — it invites guests to dig in and makes for a fun, casual appetizer. I've even served them with a trio of dipping sauces on the side (spicy aioli, ranch dressing, and a smoky BBQ sauce), which always sparks conversation and delight.
Make Ahead and Storage
Storing Leftovers
Leftover onion rings can be stored in an airtight container in the refrigerator for up to 2 days. I recommend placing a paper towel in the container to absorb any moisture and help keep the rings from getting soggy. They’re great for a quick snack the next day.
Freezing
I’ve had good results freezing the coated, uncooked onion rings in a single layer on a baking sheet, then transferring them to a freezer bag. When ready, fry or bake them straight from frozen — this keeps the coating intact and the inside perfectly tender.
Reheating
To reheat and regain crunch, I pop leftover onion rings in a 375°F oven on a wire rack for about 5-7 minutes. Microwaving just makes them soggy, so avoiding that is key. If you have an air fryer, it works even better!
Frequently Asked Questions:
Absolutely! While panko breadcrumbs provide the best crunch due to their coarser texture, you can use regular breadcrumbs in a pinch, though the onion rings might be less crispy. For gluten-free versions, there are great alternatives available that work just as well.
Sweet onions like Vidalia or yellow onions are your best bet — they have a natural sweetness that balances the savory, crunchy coating perfectly. Avoid overly pungent onions, which can overpower the flavor.
Yes! Baking at 450°F for 10-15 minutes on parchment-lined baking sheets yields crispy rings with less oil. I recommend spraying them lightly with cooking oil before baking to help with browning and crunch. The texture is slightly different but still delicious.
Make sure to pat your onion rings dry before coating and follow the three-step dipping process carefully: flour, then egg, then panko mixture. Press the breadcrumbs firmly onto each ring and avoid overcrowding when frying. Resting them briefly on a wire rack before frying helped me keep the coating intact.
Final Thoughts
This crispy onion rings recipe holds a special place in my kitchen — it’s one of those comfort foods that brings friends and family together every time. The balance of crunchy, cheesy, and lightly spiced coating with naturally sweet onions is just pure joy on a plate. I hope you enjoy making and sharing these onion rings as much as I do—they're sure to become a new favorite in your home too!
Print
Crispy Onion Rings Recipe
- Prep Time: 15 minutes
- Cook Time: 15 minutes
- Total Time: 30 minutes
- Yield: 6 servings
- Category: Appetizer
- Method: Frying
- Cuisine: American
Description
This recipe for Crispy Onion Rings delivers golden, crunchy onion rings perfect for a snack or side dish. Coated in a seasoned panko and parmesan mixture and fried to perfection, these onion rings are sure to satisfy your craving for a tasty and crispy treat. The recipe also includes an option for baking for a healthier version.
Ingredients
For Frying
- Oil for frying, enough to fill skillet ½ inch deep
- 2 large onions, sliced into ¼ inch thick rings
Batter and Coating
- 1 ¼ cup all-purpose flour
- 1 teaspoon baking powder
- 3 large eggs
- 2 cups panko breadcrumbs
- ½ cup grated parmesan cheese
- 1 teaspoon paprika
- ½ teaspoon garlic powder
Instructions
- Heat Oil: In a medium-sized skillet, add oil to fill ½ inch up the sides and heat over medium-high heat until it reaches 375 degrees Fahrenheit.
- Slice Onions: Peel and slice 2 large onions into rings that are ¼ inch thick.
- Prepare Coatings: In one bowl, mix 1 ¼ cup all-purpose flour with 1 teaspoon baking powder. In a second bowl, whisk together 3 large eggs. In a third bowl, combine 2 cups panko, ½ cup grated parmesan cheese, 1 teaspoon paprika, and ½ teaspoon garlic powder.
- Coat Onion Rings: Dip each onion ring first into the flour mixture, then into the egg mixture, and finally into the panko mixture, ensuring they are fully coated.
- Fry Onion Rings: Carefully add coated onion rings to hot oil and fry until golden brown and crispy. Remove and place on a plate lined with paper towels to drain excess oil.
- Serve: Serve hot with your favorite dipping sauce.
- Optional Baking Method: Preheat oven to 450 degrees Fahrenheit. After coating, place onion rings on a parchment-lined baking sheet and bake for 15 minutes or until golden and crispy.
Notes
- For extra crispiness, double dip onion rings by repeating the egg and panko coating steps.
- If baking, flipping the onion rings halfway through baking helps achieve an even crisp.
- Use sweet onions like Vidalia for a milder, sweeter flavor.
- Ensure oil temperature is steady at 375 degrees Fahrenheit to avoid greasy or burnt rings.
- Use freshly grated parmesan for better flavor compared to pre-grated options.
- Panko breadcrumbs are key for extra crunch; avoid using regular breadcrumbs.
Nutrition
- Serving Size: 1 serving
- Calories: 250 kcal
- Sugar: 3 g
- Sodium: 400 mg
- Fat: 15 g
- Saturated Fat: 4 g
- Unsaturated Fat: 9 g
- Trans Fat: 0 g
- Carbohydrates: 22 g
- Fiber: 2 g
- Protein: 6 g
- Cholesterol: 110 mg


Leave a Reply