There’s just something soul-warming about comfort food that’s easy to make and downright delicious. This Baked Kielbasa Pierogi Casserole Recipe brings together crispy, cheesy pierogies with savory kielbasa in a creamy sauce that’s pure comfort heaven. Trust me, it’s a total crowd-pleaser and perfect for busy weeknights or casual get-togethers.

Jump to:
Why You'll Love This Recipe
This Baked Kielbasa Pierogi Casserole Recipe is one of those dishes that feels indulgent but comes together with minimal fuss. What I adore most is how it balances bold flavors with creamy richness, all baked into a bubbly, golden crust. Every time I make it, it disappears in minutes!
- Simple Prep: It uses frozen pierogies and sliced kielbasa, so you throw it together quickly without sacrificing flavor.
- Flavor-Packed: The combination of cream cheese, sour cream, and cheeses creates a luscious sauce that’s just right.
- Family Friendly: Kids and adults alike love the cheesy, savory layers that make this casserole so satisfying.
- Versatile and Hearty: Great as a main dish with salad or veggies, or even as a special brunch treat.

Ingredients & Why They Work
Every ingredient in this Baked Kielbasa Pierogi Casserole Recipe plays a role in creating layers of texture and flavor—from the smoky kielbasa to the creamy cheeses. I always suggest using quality kielbasa and fresh cheeses for the best results.
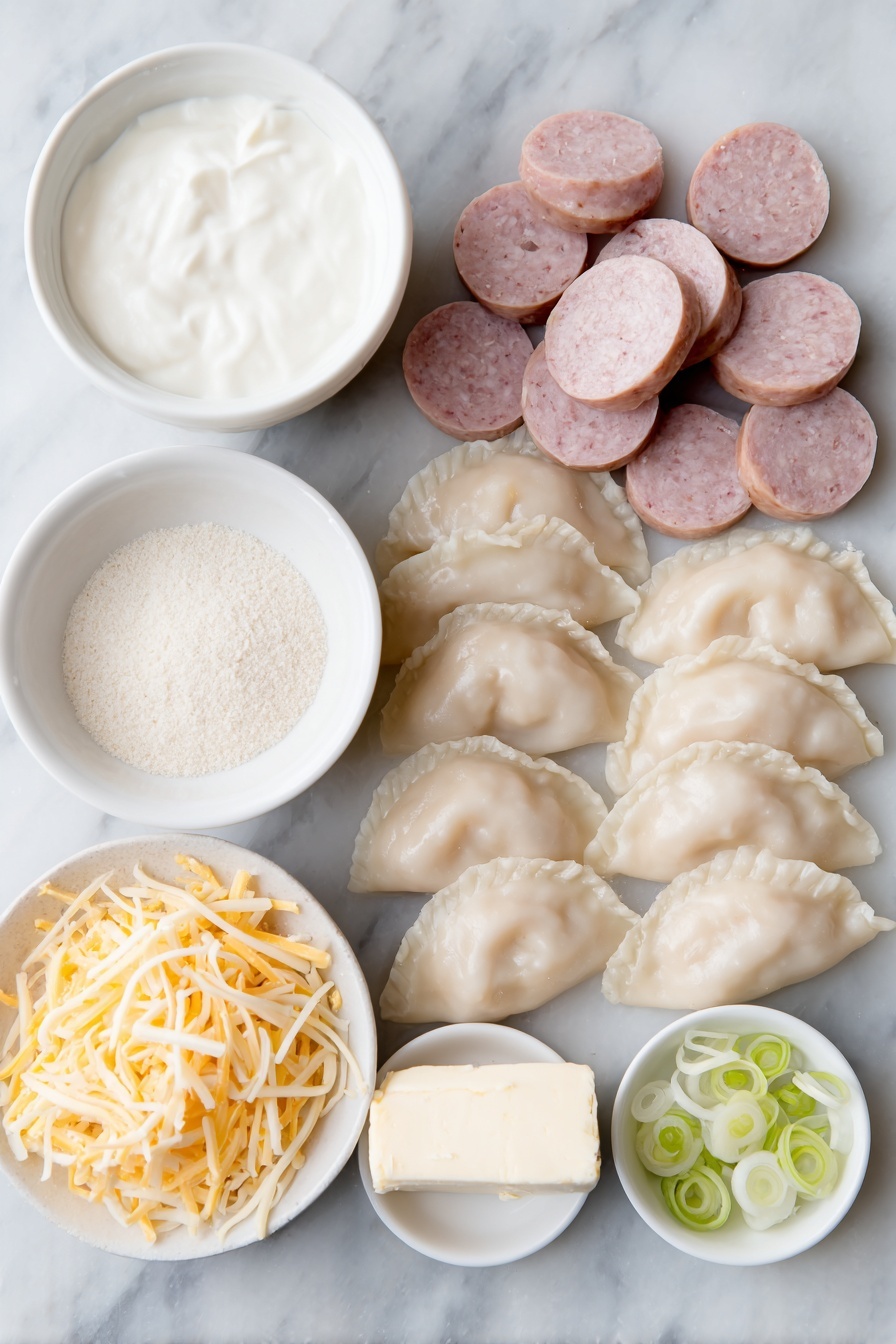
- Kielbasa sausage: Adds smoky, savory depth and a meaty bite that pairs perfectly with pierogies.
- Frozen pierogies: Convenient and tender, they soak up all the creamy goodness while maintaining their texture.
- Cream cheese: Softens the sauce and adds a rich, tangy creaminess.
- Sour cream: Brightens the sauce with subtle tartness and smoothness.
- Chicken broth: Thins out the sauce slightly, making it perfect for coating all the ingredients.
- Onion powder & garlic powder: Bring savory background flavors without overpowering.
- Salt & pepper: Essential seasonings that enhance every layer of taste.
- Cheddar cheese: Sharp and melty, lending that irresistible golden crust and extra flavor kick.
- Mozzarella cheese: Provides gooey stretchiness and balances the cheddar’s sharpness.
- Green onions: Fresh garnish that adds color and a little bite to finish.
Make It Your Way
I love how flexible this Baked Kielbasa Pierogi Casserole Recipe is—add veggies, swap out cheeses, or even try different meats! That’s the fun part; it’s easy to tweak it based on what you have or your family’s preferences.
- Vegetable boost: I sometimes toss in sautéed mushrooms or bell peppers for extra color and nutrition without sacrificing flavor.
- Swap the kielbasa: Turkey kielbasa or a smoky sausage can keep things lighter while still packing a punch.
- Cheese tweak: Pepper jack instead of cheddar adds a gentle heat that my friends absolutely love.
- Make it spicy: A pinch of red pepper flakes in the sauce kicks it up a notch for those who like some heat.
Step-by-Step: How I Make Baked Kielbasa Pierogi Casserole Recipe
Step 1: Prep and Layer the Base
First, preheat your oven to 375°F and lightly spray a 9×13-inch baking dish to prevent sticking. Then arrange the sliced kielbasa (about ¼-inch thick) evenly in the dish, followed by the frozen pierogies right on top. This layering helps the flavors meld beautifully as it bakes.
Step 2: Whip Up the Creamy Sauce
Grab a bowl and beat together the softened cream cheese and sour cream until silky smooth—using a hand mixer here works wonders. Then blend in the chicken broth, onion powder, garlic powder, salt, pepper, and half of each cheese (cheddar and mozzarella). This sauce is where the magic happens, coating every piece for that creamy texture you’re after.
Step 3: Combine and Top
Pour the cheese sauce over the sausage and pierogies, gently stirring to make sure everything gets nicely coated. Sprinkle the remaining cheddar and mozzarella cheese evenly over the casserole—this will give you that irresistible golden, bubbly topping.
Step 4: Bake to Perfection
Cover the casserole with foil and pop it in the oven for 30 minutes. This lets everything steam and meld without drying out. Then remove the foil and bake for another 10 minutes to brown up the top. You’re looking for a bubbly, golden finish—don’t rush this step or you’ll miss that perfect crust!
Step 5: Rest and Garnish
Once it’s out of the oven, give it a few minutes to cool down so the sauce sets nicely. Just before serving, sprinkle sliced green onions over the top for a fresh pop of color and subtle bite.
Top Tip
From my many times making this Baked Kielbasa Pierogi Casserole Recipe, I've learned a few tricks that can really elevate your dish and make it foolproof every time.
- Cheese Distribution: Mixing half of the cheese into the sauce ensures every bite is creamy, while topping the casserole with the rest gives you that irresistible melt and golden crust.
- Don’t Skip the Rest: Letting the casserole cool just a few minutes helps the sauce thicken so it doesn't slide right off when you serve.
- Use a Hand Mixer: It makes the sauce ultra-smooth, avoiding any lumps from the cream cheese.
- Keep an Eye on the Oven: Baking times may vary—once the cheese bubbles and browns, it's time to take it out to avoid dryness.
How to Serve Baked Kielbasa Pierogi Casserole Recipe

Garnishes
I always top mine with chopped green onions—they add a bright, fresh contrast that cuts through the richness perfectly. Sometimes, I’ll add a dollop of sour cream on the side, which feels like the cherry on top. Fresh cracked pepper over the whole dish is my little finishing touch too.
Side Dishes
This casserole pairs wonderfully with a crisp green salad dressed lightly with vinaigrette to balance the creaminess. Roasted Brussels sprouts or steamed green beans are also my go-to sides—they add texture and keep the meal well rounded.
Creative Ways to Present
For a casual brunch, I like to serve this casserole in individual ramekins topped with microgreens and a sprinkle of paprika. It instantly dresses up the dish and makes guests feel special. Another fun idea is to make mini versions in muffin tins—it’s perfect for party bites and looks adorable on a buffet table.
Make Ahead and Storage
Storing Leftovers
I keep leftovers covered tightly in the fridge for up to 3 days. Reheating in the oven or air fryer helps keep the top crispy; microwaving makes it a bit softer but still tasty. Just make sure to store it with a little ventilation to prevent sogginess.
Freezing
This casserole freezes really well! I let it cool completely, then portion it into airtight containers or freezer bags. When I’m ready, I thaw it overnight in the fridge and reheat in the oven to keep that baked texture intact.
Reheating
Oven reheating is my favorite—about 20 minutes at 350°F, uncovered, brings back that melty cheese goodness and just-baked feel. For quick meals, the microwave works fine but expect softer edges. If you want to refresh the crust, a quick broil for a couple of minutes on top does wonders!
Frequently Asked Questions:
Yes! Fresh pierogies will work great, though the baking time might be a little less since they don’t need as much thawing. Keep an eye on the casserole to avoid overcooking.
This recipe is generally mild, highlighting the savory and creamy flavors. You can easily add some red pepper flakes or spicy sausage if you prefer a kick.
Absolutely! You can assemble the casserole a day in advance, cover it, and refrigerate. Just add a little extra baking time if it’s cold from the fridge when you put it in the oven.
Using reduced-fat cream cheese and sour cream, along with lean turkey kielbasa instead of regular, cuts down on richness without sacrificing flavor. Adding more veggies also helps balance the dish.
Final Thoughts
This Baked Kielbasa Pierogi Casserole Recipe is one I keep coming back to because it’s comforting without a lot of work, and it feels like a warm hug on a plate. Sharing it with family and friends always brings smiles—and isn't that what cooking is all about? Go ahead, try it out soon; I think you’ll love it as much as I do!
Print
Baked Kielbasa Pierogi Casserole Recipe
- Prep Time: 10 minutes
- Cook Time: 40 minutes
- Total Time: 50 minutes
- Yield: 6 servings
- Category: Main Course
- Method: Baking
- Cuisine: Polish-American
Description
This Baked Kielbasa Pierogi Casserole is a hearty and comforting dish featuring tender pierogies and sliced kielbasa sausage smothered in a creamy cheese sauce with cheddar and mozzarella. Baked to perfection until bubbly and golden, it's garnished with fresh green onions for a flavorful finish, making it a perfect easy weeknight dinner.
Ingredients
Main Ingredients
- 14 ounces sliced kielbasa sausage, ¼-inch thick
- 32 ounces frozen pierogies
Sauce Ingredients
- 1 (8-ounce) block softened cream cheese
- ½ cup sour cream
- ½ cup chicken broth
- 1 teaspoon onion powder
- 1 teaspoon garlic powder
- ½ teaspoon salt
- ½ teaspoon pepper
- 1 cup shredded cheddar cheese, divided
- 1 cup shredded mozzarella cheese, divided
Garnish
- Sliced green onions for garnish
Instructions
- Preheat Oven and Prepare Dish: Preheat your oven to 375 degrees Fahrenheit and spray a 9×13-inch baking dish with non-stick cooking spray to prevent sticking.
- Add Kielbasa and Pierogies: Place the 14 ounces of sliced kielbasa sausage and the 32 ounces of frozen pierogies evenly in the prepared baking dish.
- Make the Sauce: In a bowl, use a hand mixer to whisk together the softened 8-ounce block of cream cheese and ½ cup sour cream until smooth. Then add ½ cup chicken broth, 1 teaspoon onion powder, 1 teaspoon garlic powder, ½ teaspoon salt, ½ teaspoon pepper, half of the shredded cheddar cheese, and half of the shredded mozzarella cheese. Whisk until well combined and creamy.
- Combine Pierogies and Sauce: Pour the cheese sauce over the pierogies and sausage in the baking dish. Mix gently to coat everything thoroughly with the sauce.
- Add Cheese Topping: Sprinkle the remaining half of the cheddar cheese and mozzarella cheese evenly on top of the casserole.
- Bake Covered: Cover the baking dish with foil and bake in the preheated oven for 30 minutes to heat through and meld flavors.
- Bake Uncovered: Remove the foil and bake for an additional 10 minutes, or until the top is bubbly and golden brown.
- Cool and Garnish: Remove the casserole from the oven and let it cool for a few minutes. Garnish with sliced green onions before serving to add a fresh, bright flavor.
Notes
- Use thawed pierogies if you want to reduce the baking time slightly.
- Sour cream can be substituted with Greek yogurt for a tangier taste and added protein.
- Feel free to add vegetables like sautéed onions or peppers for extra flavor and nutrition.
- If you prefer milder sausage, opt for turkey kielbasa.
- To make this dish gluten free, ensure the pierogies used are gluten free.
Nutrition
- Serving Size: 1 serving
- Calories: 550 kcal
- Sugar: 3 g
- Sodium: 900 mg
- Fat: 34 g
- Saturated Fat: 15 g
- Unsaturated Fat: 15 g
- Trans Fat: 0 g
- Carbohydrates: 35 g
- Fiber: 2 g
- Protein: 22 g
- Cholesterol: 75 mg


Leave a Reply