There's something incredibly comforting about the warm aroma of fresh-baked bread mingling with herbs, garlic, and melted cheese. This Cheese and Herb Garlic Quick Bread Recipe is my go-to when I want a flavorful, savory treat that comes together fast and impresses everyone at the table.

Jump to:
- Why You'll Love This Recipe
- Ingredients & Why They Work
- Make It Your Way
- Step-by-Step: How I Make Cheese and Herb Garlic Quick Bread Recipe
- Top Tip
- How to Serve Cheese and Herb Garlic Quick Bread Recipe
- Make Ahead and Storage
- Frequently Asked Questions:
- Final Thoughts
- Cheese and Herb Garlic Quick Bread Recipe
Why You'll Love This Recipe
Honestly, this Cheese and Herb Garlic Quick Bread Recipe has quickly become a staple in my kitchen because it’s so easy and rewarding. The layers of garlic, herbs, and cheese create a taste explosion that feels homemade and fancy without the fuss.
- Speedy and Simple: It uses baking soda instead of yeast, so you don’t have to wait to let the dough rise.
- Flavor-Packed Layers: The garlic and herb swirl combined with pockets of melty cheese create a gorgeous layered surprise inside.
- Versatile and Adaptable: You can easily switch up herbs or cheeses to match your mood or what’s in the fridge.
- Impressive Presentation: The swirls and cheese ribbons poking out make it look rustic but elegant, perfect for any casual or special meal.

Ingredients & Why They Work
This bread balances fresh herbs, garlic, and cheese bathed in a tender quick bread batter. Each ingredient plays a part: the cheese adds gooey richness, the herbs bring fragrance and brightness, and the garlic ties it all together with a punch.

- Cheddar or Tasty Cheese: I like slicing it thick to get those delightful cheese ribbons inside; it melts beautifully and adds a savory depth.
- Fresh Rosemary & Parsley: They provide fresh, green notes that brighten the bread and contrast the cheese well.
- Dried Oregano & Thyme: These dried herbs boost the savory elements and add complexity without overpowering.
- Garlic Cloves: Fresh crushed garlic is non-negotiable here—its pungency really lifts those herb flavors.
- Plain Flour & Baking Soda: Essential for the quick bread texture, baking soda ensures a light crumb without the wait.
- Plain Yogurt & Milk: Yogurt keeps the crumb wonderfully moist and tender, while milk adds richness.
- Eggs & Butter: Eggs help bind everything and add tender structure; butter lends a buttery flavor that complements the cheese perfectly.
- Extra Virgin Olive Oil: Used in the herb swirl and batter, it adds fruitiness and richness to the overall flavor.
Make It Your Way
One thing I love about this Cheese and Herb Garlic Quick Bread Recipe is how easy it is to play with. You can switch in your favorite herbs, try different cheeses, or even add a little chili for heat. It’s all about making it uniquely yours!
- Cheese Variations: I’ve tried adding sharp gouda or a bit of Parmesan for extra funk—I still get the melty ribbons but with new flavor notes.
- Herb Swaps: Basil or thyme both work beautifully if rosemary isn’t handy, or go crazy and use a homemade pesto swirl instead of chopped herbs.
- Garlic Intensity: If you prefer milder garlic flavor, reduce the cloves or roast them beforehand for a sweeter taste.
- Gluten-Free Option: I haven’t tested it extensively, but swapping regular flour for a good gluten-free blend should work—just keep the baking soda baking powder ratio in mind.
Step-by-Step: How I Make Cheese and Herb Garlic Quick Bread Recipe
Step 1: Mix the Herb and Garlic Swirl
I start by finely chopping fresh rosemary and parsley, then mixing them with dried oregano, thyme, crushed garlic, olive oil, and salt. I aim for a thick, dollop-able paste that I'll swirl into the bread batter later. Pro tip: crushing the garlic cloves with a press brings out more aroma than slicing.
Step 2: Whisk Dry and Wet Ingredients Separately
In one bowl, I whisk together the plain flour, baking soda, and salt—not missing that baking soda because it's the magic leavener here. In another bowl, I beat the milk, yogurt, eggs, melted butter, olive oil, and extra garlic until smooth. Separating them helps avoid overmixing later, which keeps the bread tender.
Step 3: Combine and Layer the Batter
I make a little well in the dry ingredients, pour in the wet, and gently fold until just combined—no overmixing! Then comes the fun part: pouring a third of the batter into the lined loaf pan, dolloping a third of the herb swirl on top, and using a knife to create swirls by dragging up and down. Next, I push in some slices of cheese—half buried, half poking out for that rustic look.
I repeat this layering two more times, which gives pockets of juicy herbs and melted cheese throughout the bread. It looks messy but trust me, that’s exactly what you want.
Step 4: Bake and Cool
Bake at 180°C (350°F) for 30 minutes uncovered until golden, then cover loosely with foil and bake a further 20 minutes. The two-stage bake ensures the top doesn’t burn while the center cooks through. I always check with a skewer in the middle—it should come out clean. After baking, I let it sit in the tin for 5 minutes, then turn it out to cool completely on a rack before slicing thick pieces.
Top Tip
After making this bread dozens of times, I’ve learned a few simple tricks that make all the difference in the flavor and texture:
- Cheese Thickness Matters: Cutting the cheese slices about 3mm thick creates beautiful ribbons rather than just little pockets, making every bite cheesy.
- Don’t Overmix Batter: Stir just until combined; overmixing activates gluten too much and leaves the bread tough, not soft and tender.
- Swirl with Confidence: Use a knife or skewer in long strokes going up and down and slightly turning it helps get a beautiful marbled pattern.
- Cover Midway: Placing foil on top after the first 30 minutes stops the top from overbrowning while the inside finishes baking perfectly.
How to Serve Cheese and Herb Garlic Quick Bread Recipe

Garnishes
I like to sprinkle a little flaky sea salt on top of warm slices right before serving—that extra crunch pairs perfectly with the savory herbs and cheese. Sometimes, a light brush of melted butter on freshly sliced bread just ups the indulgence.
Side Dishes
This bread shines alongside a steaming bowl of tomato soup or teamed with a crisp green salad for a quick lunch. It’s also fantastic as a side for pasta dishes or roasted chicken—kind of like the ultimate savory companion!
Creative Ways to Present
For gatherings, I like to slice the bread thickly and arrange it in a fan on a wooden board with bowls of dipping olive oil and balsamic vinegar. Adding a scattering of fresh herbs and perhaps some olives makes it feel fancy and festive with minimal effort.
Make Ahead and Storage
Storing Leftovers
After it’s fully cooled, I wrap leftover bread tightly in plastic wrap or store it in an airtight container at room temperature for up to 4 days. The bread retains its softness really well without drying out too fast.
Freezing
This bread freezes beautifully. I slice it first, then separate slices with parchment paper and pop them into a freezer bag. When you want some, just take out a few slices and thaw or toast directly from frozen.
Reheating
To reheat, I prefer to toast slices lightly or warm them in a 160°C (320°F) oven for about 5-7 minutes until warmed through and crispy on the outside—just like freshly baked.
Frequently Asked Questions:
Yes! You can substitute 2 cups (about 200g) of shredded cheese instead of the sliced ribbons. Just gently fold the shredded cheese into the batter right before pouring it into the loaf pan. The texture won’t be exactly the same as with ribbons, but it still gives a delicious cheesy flavor throughout.
No worries! You can use dried herbs as a replacement—about 1 tablespoon of mixed dried rosemary, parsley, oregano, and thyme will work well. Mix them with the garlic and olive oil to create the swirl. Fresh herbs bring a brighter flavor, but dried herbs make a great, convenient alternative.
After the initial 30 minutes baking uncovered, cover with foil and bake another 20 minutes. The best test is to insert a skewer or toothpick into the center of the bread. If it comes out clean without wet batter, it’s done. The top should be a golden brown, and the bread will spring back lightly when pressed.
While the recipe calls for butter, yogurt, and cheese, you can experiment with dairy-free alternatives like vegan butter, plant-based yogurt, and dairy-free cheese. Keep in mind that the texture and flavor might shift slightly, but it should still be tasty! Adjust moisture levels as needed.
Final Thoughts
This Cheese and Herb Garlic Quick Bread Recipe is one of those gems that's easy enough for a weeknight but special enough to serve guests—and it never fails to get compliments. I genuinely love the way the layers of garlic, herbs, and cheese come together in every slice, making it comforting and exciting at the same time. I hope you enjoy baking and sharing it as much as I do. Seriously, slice it thick, slather on some butter, and savor every bite like you just pulled it from the oven yourself!
Print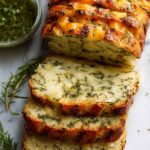
Cheese and Herb Garlic Quick Bread Recipe
- Prep Time: 15 minutes
- Cook Time: 50 minutes
- Total Time: 1 hour 20 minutes
- Yield: 8 servings
- Category: Bread
- Method: Baking
- Cuisine: Western
- Diet: Vegetarian
Description
This Cheese, Garlic and Herb Quick Bread is a flavorful and aromatic loaf perfect for snacking or serving alongside meals. Featuring layers of cheddar cheese and a fresh herb and garlic swirl, this quick bread combines savory ingredients with a tender crumb. Ready in just over an hour, it's an easy-to-make bread that adds a homemade touch to any table.
Ingredients
Cheese
- 7 oz / 200g block of cheddar or tasty cheese, cut into 3mm thick slices with varied widths for ribbons
Herb and Garlic Swirl
- 2 tablespoon fresh rosemary, finely chopped
- 2 tablespoon fresh parsley leaves, finely chopped
- 1 teaspoon dried oregano
- ½ teaspoon dried thyme
- 2 garlic cloves, crushed or finely grated
- 3 tablespoon extra virgin olive oil
- ½ teaspoon cooking salt or kosher salt (halve for table salt)
Dry Ingredients
- 2 ¼ cups plain flour (all-purpose flour)
- 1 teaspoon baking soda (or substitute 3 ½ teaspoon baking powder)
- ¾ teaspoon cooking salt or kosher salt (halve for table salt)
Wet Ingredients
- ½ cup plain yogurt (Greek or regular, full fat, unsweetened)
- ¾ cup milk (full fat preferred, low fat acceptable)
- 2 large eggs (50-55g each)
- 3 ½ tablespoon (50g) unsalted butter, melted
- 2 tablespoon olive oil
- 2 small garlic cloves, crushed or grated
Instructions
- Preheat Oven: Set your oven to 180°C/350°F (both fan and standard ovens).
- Prepare Loaf Pan: Lightly grease a 21 x 11 x 7 cm loaf pan with butter or oil spray, then line it with baking paper (parchment paper).
- Make Herb and Garlic Swirl: Combine rosemary, parsley, oregano, thyme, garlic, olive oil, and salt in a small bowl until a thick, dollop-able mixture forms.
- Mix Dry Ingredients: Whisk together the flour, baking soda, and salt in a separate large bowl.
- Mix Wet Ingredients: In another bowl, whisk together yogurt, milk, eggs, melted butter, olive oil, and crushed garlic until combined.
- Combine Wet and Dry: Make a well in the center of the dry ingredients and pour in the wet mixture. Stir gently until just combined without overmixing.
- Layer Batter, Herbs, and Cheese - First Layer: Pour one third of the batter into the loaf pan. Dollop one third of the herb mixture on top and use a knife to swirl it through the batter. Add one third of the cheese slices, pushing some fully into the batter and some sticking out.
- Repeat Layers: Repeat the swirling and cheese layering two more times with remaining batter, herb mixture, and cheese slices, creating three layers total.
- Bake Bread: Bake the loaf for 30 minutes or until the top is golden brown. Remove from oven, cover loosely with foil, and bake for an additional 20 minutes (total baking time 50 minutes).
- Check Doneness: Insert a skewer into the center; it should come out clean when bread is fully cooked.
- Cool Bread: Let the bread cool in the pan for 5 minutes, then transfer to a cooling rack. Allow to cool at least 10 more minutes before slicing.
- Serve: Cut thick slices and optionally serve with butter for extra richness.
Notes
- Cheese: Pre-sliced cheese can be used but the ribbons won’t be as visible after baking. For a shredded cheese substitution, use 2 cups tightly packed (200g) shredded cheese and mix it into the batter before layering.
- Herbs: Feel free to experiment with different fresh or dried herb combinations. If using all dried herbs, use about 1 tablespoon total.
- Blending Herbs: For a finer herb texture, blitz fresh herbs with oil using a stick blender; do not blitz garlic whole as it’s harder to blend. May require extra tablespoon of oil to loosen the mix.
- Loaf Pan Size: Using a larger pan will yield a flatter loaf but will still work well.
- Storage: Keeps up to 4 days in an airtight container at room temperature. After that, refrigerate and toast slices to freshen.
Nutrition
- Serving Size: 1 slice
- Calories: 250 kcal
- Sugar: 2 g
- Sodium: 350 mg
- Fat: 15 g
- Saturated Fat: 8 g
- Unsaturated Fat: 6 g
- Trans Fat: 0 g
- Carbohydrates: 20 g
- Fiber: 1 g
- Protein: 8 g
- Cholesterol: 60 mg


Leave a Reply