If you love a pie that’s both stunning and bursting with flavor, this Cherry Pie with Lattice Crust Recipe is going to be your new favorite. Tart cherries, warm spices, and a golden buttery crust come together in a show-stopping classic dessert.

Jump to:
Why You'll Love This Recipe
I’m always excited to share this recipe because it nails that perfect balance of tart and sweet, with a lattice crust that’s as fun to make as it is beautiful to look at. It’s a pie that feels special yet approachable.
- Perfectly Balanced Filling: The tartness of frozen cherries pairs beautifully with warm cinnamon, ginger, and almond extract for depth of flavor.
- Lattice Crust Elegance: The classic woven crust adds a rustic charm and lets the cherry filling peek through beautifully.
- Make Ahead Friendly: You can prepare the filling and dough a day or two in advance, making entertaining a breeze.
- Year-Round Availability: Using frozen tart cherries means you don’t have to wait for cherry season to enjoy this pie.
Ingredients & Why They Work
This pie starts with good quality frozen tart cherries — that perfect balance of tart and sweet is key. The spices and almond extract add warmth and a hint of unexpected depth. And of course, you can’t skip a well-chilled, buttery pie crust for that flaky, golden finish.
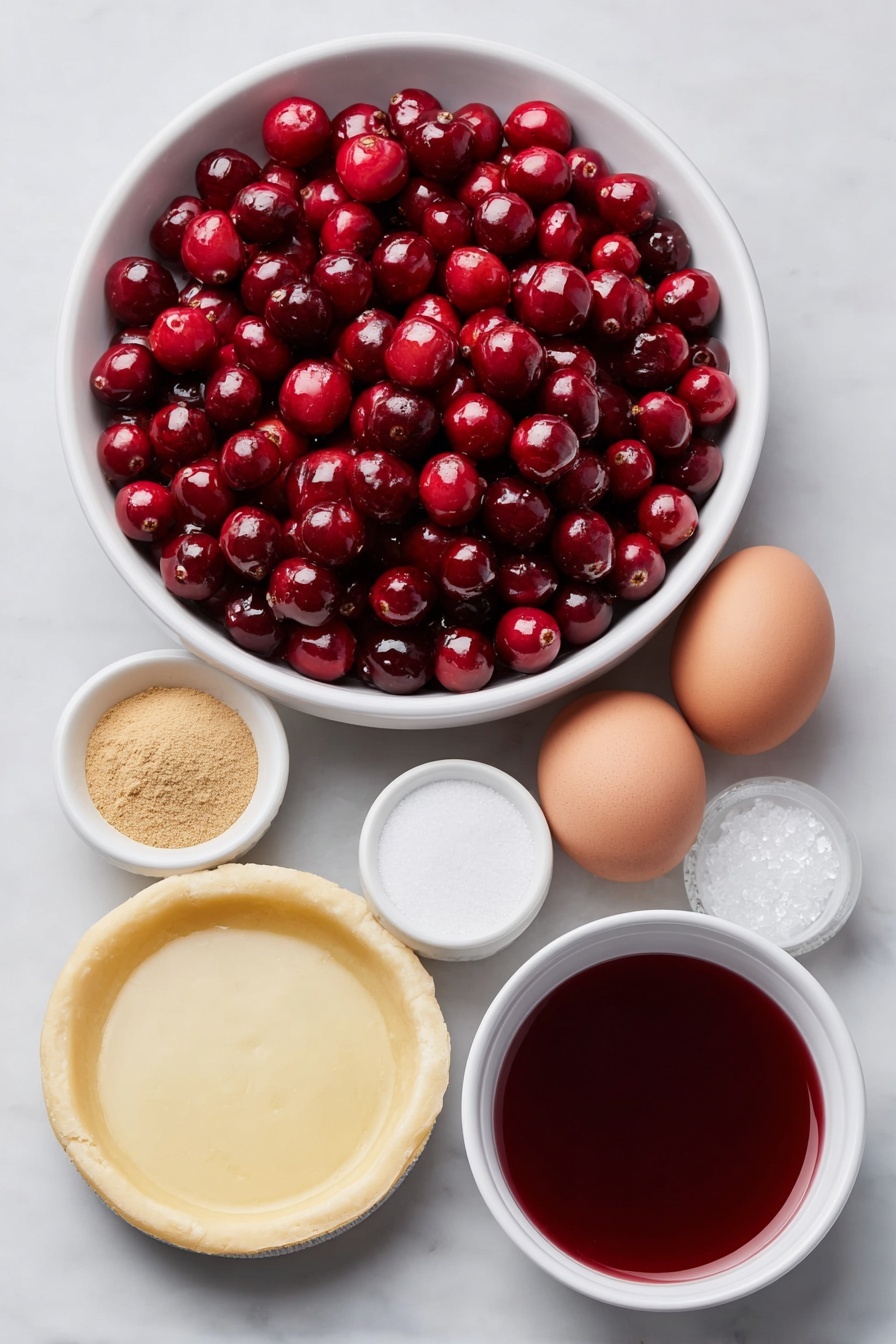
- Frozen pitted tart cherries: I rely on these year-round for consistent tartness and flavor—thaw fully and reserve those juices.
- Cornstarch: Thickens the filling to a luscious, glossy finish without altering flavor.
- Water: Used to create the cornstarch slurry and to whisk with the egg for brushing the crust.
- Cane sugar: Adds natural sweetness that balances the tart cherries perfectly.
- Cinnamon: A classic warming spice that enhances fruit flavor.
- Ground ginger: Adds subtle spice and complexity.
- Almond extract: A touch of this extract brings out the cherry’s natural nuttiness.
- Salt: Just a pinch enhances all the flavors.
- Pie Crust: Use your favorite homemade or store-bought chilled pie dough to create that buttery crispy base and lattice top.
- Large egg: Whisked with water, it gives the lattice crust a gorgeous golden shine.
- Coarse sugar (optional): Sprinkled on top for a subtle sparkle and crunch.
- Vanilla ice cream: The ideal cooling companion when serving this warm, fragrant pie.
Make It Your Way
One of the best things about this Cherry Pie with Lattice Crust Recipe is how wonderfully customizable it is. Whether you want to tweak the filling flavors or adjust the crust for a different texture, there's plenty of room to make it truly your own.
- Variation: I’ve tried adding a splash of fresh lemon juice to the filling to brighten the tartness balance, and it really lifts the flavors beautifully. Using fresh cherries instead of frozen also adds a slightly juicier texture, perfect for peak cherry season.
- Dietary alternative: For a dairy-free crust, substitute butter with coconut oil or a plant-based margarine. The lattice design still looks stunning and holds up well during baking.
- Spice it up: Sometimes, I add a pinch of nutmeg along with cinnamon and ginger for an extra layer of warmth—especially comforting as summer evenings turn cooler.
- Sweetener swap: Cane sugar works perfectly, but experimenting with coconut sugar or maple syrup can deepen the flavor profile and add nuance.
- Decorate the lattice: Sprinkle coarse sugar as suggested for that irresistible sparkle and crunch, or omit it for a softer crust if you prefer.
Step-by-Step: How I Make Cherry Pie with Lattice Crust Recipe
Step 1: Separate Cherries and Save Their Juices
Start by straining your thawed cherries over a bowl to catch every drop of the delicious juice. Aim to measure exactly 1 cup of this juice—you'll use it to create a luscious filling. If you don't quite have a full cup, simply microwave the cherries in quick 15-second bursts until you hit the right amount. Transfer the cherries into a large bowl where they’ll wait patiently for their turn to shine inside the pie.
Step 2: Whisk Up a Smooth Cornstarch Slurry
To thicken the cherry filling perfectly, blend ¼ cup cornstarch with ¼ cup water in a small bowl until smooth and lump-free. This slurry is essential—it transforms the cherry juice into a glossy, rich sauce that clings to every fruit bite.
Step 3: Cook the Cherry Filling to Perfection
Pour the reserved 1 cup cherry juice into a small saucepan and bring it to a boil over medium heat. Stir in ¾ cup cane sugar and wait for it to dissolve fully. Now stir in your cornstarch slurry, cooking constantly as the juices thicken and turn clear and glossy—usually just a minute or two. Remove from heat, then fold in the fragrant spices: ½ teaspoon cinnamon, ½ teaspoon ginger, ¼ teaspoon almond extract, and a pinch of salt. Let this filling cool completely before you fill your crust—patience here ensures an intact, beautiful pie.
Step 4: Roll Out and Chill Your Pie Crusts
Roll out the bottom crust with a ½-inch overhang and fit it into a 9- or 9.5-inch pie plate. Loosely cover with plastic wrap and chill for at least 30 minutes; this helps the crust hold its shape during baking. Meanwhile, preheat your oven to 425°F and place a baking sheet on the bottom rack—this catches any drips for an easy cleanup. Roll out the remaining dough for the lattice top and keep it refrigerated until ready to assemble.
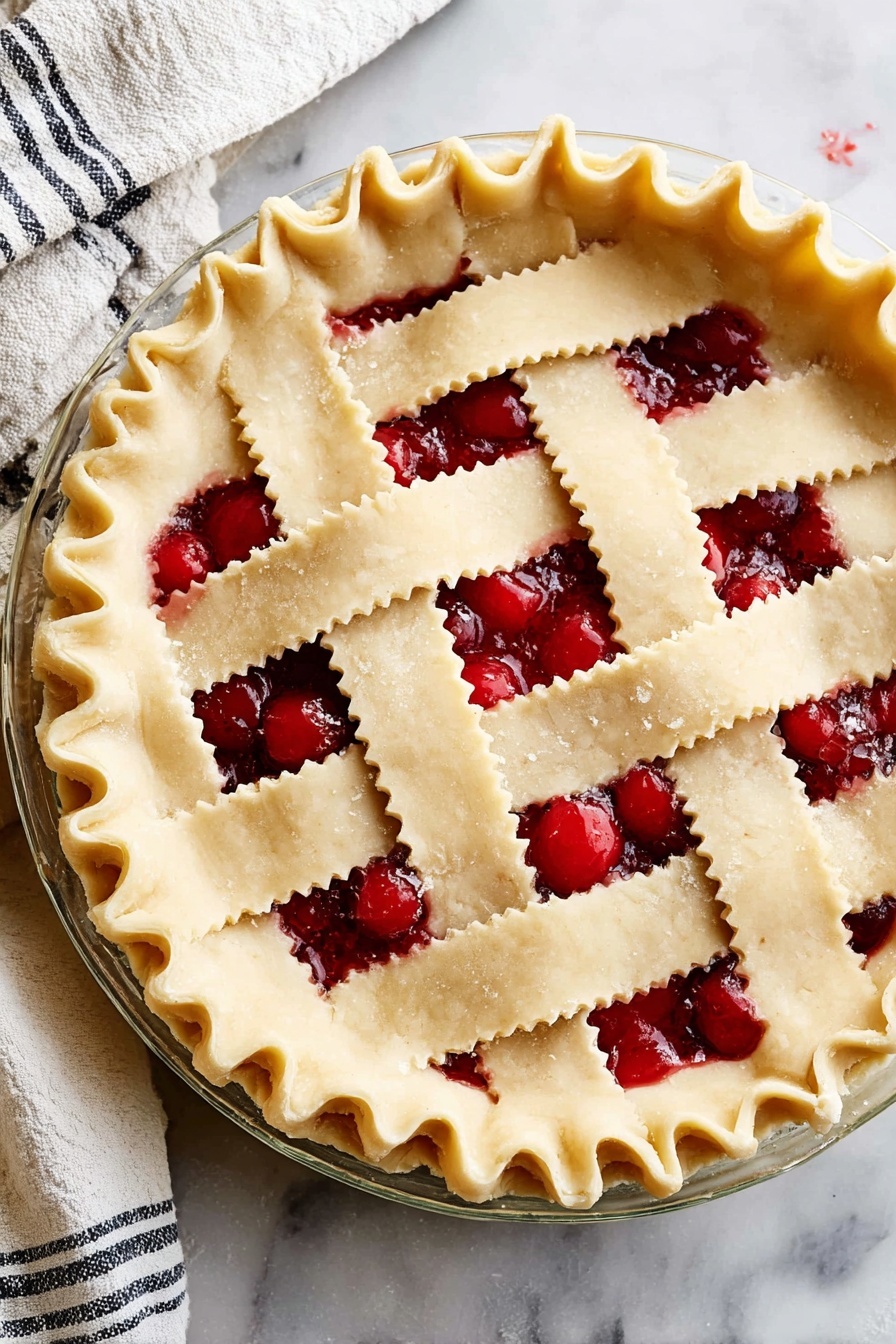
Step 5: Assemble the Pie with a Classic Lattice
Beat together 1 large egg with 1 tablespoon water to make an egg wash—this helps your lattice brown to golden perfection. Pour the cooled cherry filling into the chilled bottom crust. Lay out your top crust dough and cut into 1-inch wide strips using a sharp knife or pizza cutter. Weave 4 to 5 strips horizontally across the pie, then carefully weave 4 to 5 vertical strips in and out to create that beautiful lattice pattern. Trim any excess dough, then fold and crimp the edges to seal everything together.
Step 6: Bake Until Bubbly and Golden
Brush the lattice crust with your egg wash, and sprinkle coarse sugar if you like a sparkling finish. Place the pie on the preheated baking sheet inside the oven. Bake at 425°F for 20 minutes, then lower the heat to 375°F and continue baking for 40 to 50 minutes. Keep an eye on the edges—if they brown too quickly, tent with foil to prevent burning while the filling bubbles away. This bubbling is a sign your pie is perfectly cooked inside.
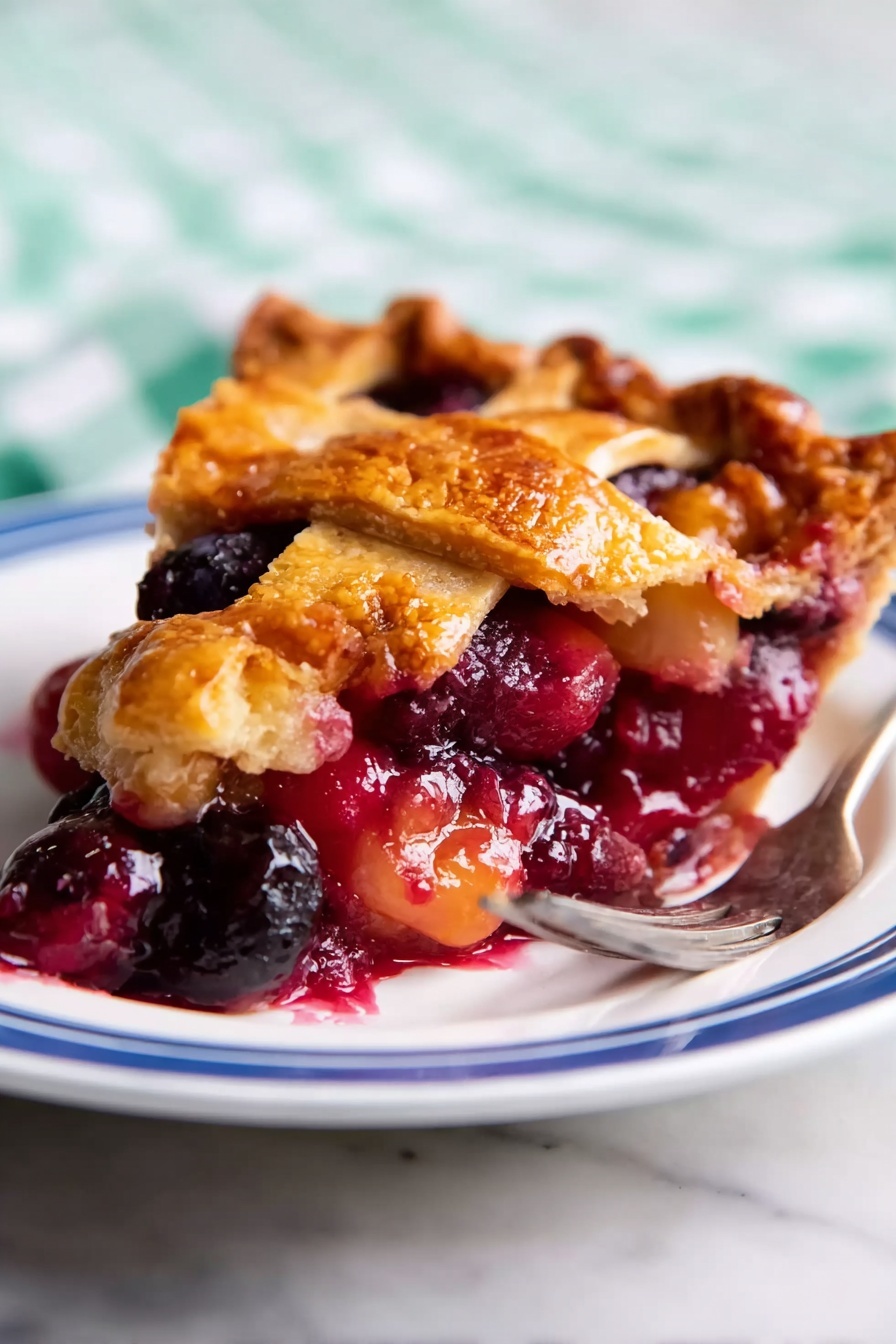
Step 7: Cool and Serve with a Smile
Resist the urge to slice it too soon! Cooling the pie for about 4 hours helps the filling set beautifully, making each slice neat and luscious. Serve warm or at room temperature—best accompanied by a generous scoop of vanilla ice cream for that classic summer dessert experience.
Top Tip
These tips come from hands-on experience baking this Cherry Pie with Lattice Crust Recipe, helping to get stunning results every time and avoid common pitfalls.
- Chill Your Dough: Keeping the pie crust chilled for at least 2 hours before rolling makes it so much easier to handle and helps achieve that flaky, buttery texture we all love.
- Reserve Cherry Juice: Straining and reserving 1 cup of cherry juice before adding it to the filling is key. If you don’t have enough, gently microwave the cherries in short bursts to coax more juice out, ensuring your filling thickens perfectly without watery spots.
- Weave Your Lattice with Care: Take your time weaving the lattice strips. Pulling back alternating strips to interweave ensures a beautiful, even pattern that crisps up nicely in the oven.
- Protect Your Crust Edges: Tent the pie edges with foil if they begin browning too early, so the crust doesn’t burn while the filling bubbles to perfection underneath.
How to Serve Cherry Pie with Lattice Crust Recipe
Garnishes
A scoop of creamy vanilla ice cream is the classic accompaniment, melting into the warm, tart cherry filling. For a fresh, bright note, sprinkle freshly chopped toasted almonds on top, or add a small dollop of lightly whipped cream with a hint of cinnamon. A dusting of powdered sugar over the lattice crust looks pretty too!
Side Dishes
Keep it simple with some fresh fruit salad or a light green salad with a citrus vinaigrette to balance the richness. For a cozy dessert spread, add a few cheese selections and buttery crackers for contrast, or serve alongside a cup of hot coffee or black tea to round out the moment.
Make Ahead and Storage
Storing Leftovers
Once completely cooled (about 4 hours), cover the pie loosely with plastic wrap or foil and store it in the refrigerator. It will keep beautifully for up to 3 days, preserving that tender lattice crust and luscious filling.
Freezing
You can freeze the cherry pie before baking by wrapping it tightly in plastic wrap and then foil for up to 3 months. When ready to bake, thaw in the refrigerator overnight and proceed with the recipe’s baking instructions. Alternatively, freeze leftover baked slices wrapped individually for easy single servings.
Reheating
To warm leftover pie slices, place them on a baking sheet and heat at 350°F for about 10-15 minutes until warmed through and the crust regains its flaky texture. Avoid the microwave to keep the crust crisp and the filling perfectly luscious.
Frequently Asked Questions:
Yes! Fresh tart cherries work wonderfully when they're in season. Just pit them and proceed with the recipe the same way. If fresh cherries are watery, you might want to drain some juice and reserve 1 cup for the filling.
Brushing the lattice with egg wash before baking helps create a golden, crisp crust. Also, baking the pie on a preheated baking sheet in the oven’s lower rack helps the crust bake evenly and prevents sogginess.
Make sure you measure 1 cup of cherry juice accurately for the cornstarch slurry to work perfectly. If it’s still too runny, extra cooking time during the filling step or a bit more cornstarch slurry (mixed in water) can help thicken it up.
Absolutely! The pie dough can be made and chilled for up to 2 days ahead, which makes assembling the Cherry Pie with Lattice Crust Recipe much easier and less rushed.
Final Thoughts
There's something truly special about a homemade cherry pie with a lattice crust — the way those bright, tart cherries contrast with warm spices and the crisp, buttery crust is pure joy. Whether you make it as a celebration dessert or just a cozy weekend treat, this recipe is sure to become a cherished favorite. Don’t forget to give it plenty of time to cool so every slice holds its shape and flavor perfectly. Serve it with vanilla ice cream, and you're all set for smiles around the table!
Print
Cherry Pie with Lattice Crust Recipe
- Prep Time: 2 hours
- Cooling Time: 4 hours
- Cook Time: 1 hour
- Total Time: 3 hours
- Yield: 8 servings
- Category: Dessert
- Method: Baking
- Cuisine: American
- Diet: Vegetarian
Description
This classic Cherry Pie features a tart cherry filling thickened with cornstarch and flavored with cinnamon, ginger, and almond extract, all encased in a buttery pie crust with a beautiful lattice top. Perfect for summer using fresh or frozen cherries, it's an elegant dessert served best with a scoop of vanilla ice cream.
Ingredients
Filling
- 2 pounds frozen pitted tart cherries, thawed, juices reserved
- ¼ cup cornstarch
- ¼ cup plus 1 tablespoon water
- ¾ cup cane sugar
- ½ teaspoon cinnamon
- ½ teaspoon ground ginger
- ¼ teaspoon almond extract
- Pinch salt
Pie Crust
- 1 recipe Pie Crust, chilled at least 2 hours
For Assembly
- 1 large egg
- Coarse sugar, optional, for sprinkling
To Serve
- Vanilla ice cream
Instructions
- Prepare cherries and juice: Place the thawed cherries in a strainer set over a bowl to collect juices. Measure 1 cup of reserved cherry juice, saving extra for another use. Transfer cherries to a large bowl.
- Make cornstarch slurry: In a small bowl, stir cornstarch and ¼ cup water until smooth. Set aside.
- Cook filling: In a small saucepan, bring 1 cup cherry juice to a boil. Stir in sugar and return to a boil until sugar dissolves. Add cornstarch slurry and cook, stirring constantly, until juices thicken and become clear and glossy. Remove from heat, pour over cherries, then stir in cinnamon, ginger, almond extract, and salt. Allow filling to cool completely.
- Prepare bottom crust: Roll out the chilled bottom pie crust with a ½-inch overhang and fit into a 9- or 9.5-inch pie plate. Loosely cover with plastic wrap and chill for 30 minutes. Meanwhile, position oven rack in the bottom third and place a baking sheet inside the oven; preheat oven to 425°F with the sheet inside.
- Prepare top crust: Roll out remaining pie dough, place on a baking sheet, loosely cover, and refrigerate until bottom crust is chilled.
- Whisk egg wash: In a small bowl, whisk together the egg and remaining 1 tablespoon water. Set aside.
- Assemble pie: Remove bottom crust from fridge and pour in cooled cherry filling. Transfer top crust to a cutting board and cut into 1-inch strips. Lay 4 to 5 strips crosswise over the filling. Weave another 4 to 5 strips through to create a lattice pattern, pulling back strips as needed. Trim edges and fold bottom crust edges over lattice, crimping to seal.
- Apply egg wash and sugar: Brush the lattice with egg wash and sprinkle coarse sugar on top if desired.
- Bake pie: Place pie on the hot baking sheet in the oven. Bake at 425°F for 20 minutes, then reduce heat to 375°F and bake an additional 40 to 50 minutes, or until crust is golden brown and filling bubbles. Tent edges with foil if they brown too quickly.
- Cool and serve: Allow pie to cool completely, about 4 hours, before slicing. Serve with vanilla ice cream.
Notes
- If you don’t have 1 cup of cherry juice, microwave cherries in 15-second increments until you achieve 1 cup of juice. Save any extra juice for another use.
- Chilling the dough at least 2 hours is important for easier handling and flakier crust.
- Use frozen tart cherries for year-round availability; just thaw completely before use.
- Coarse sugar on the lattice adds a decorative crunch but is optional.
- To prevent burning, tent the pie edges with foil if they brown before the filling bubbles.
- Allow pie to cool fully for the filling to set properly, improving slicing.
Nutrition
- Serving Size: 1 slice (⅛ pie)
- Calories: 340 kcal
- Sugar: 28 g
- Sodium: 160 mg
- Fat: 15 g
- Saturated Fat: 6 g
- Unsaturated Fat: 7 g
- Trans Fat: 0.2 g
- Carbohydrates: 46 g
- Fiber: 3 g
- Protein: 3 g
- Cholesterol: 40 mg


Leave a Reply