There’s something truly magical about the blend of rich chocolate and refreshing mint that just hits the spot every time. That’s exactly why I’m excited to share this Chocolate Andes Mint Cookies Recipe with you—it’s got that perfect chewy texture with little bursts of cool mintiness made from real Andes mints. Trust me, once you try these, they’ll become an instant favorite.

Jump to:
Why You'll Love This Recipe
This cookie recipe is one of my all-time favorites because it captures that perfect balance between fudgy chocolate and mint without being too overpowering. I love how the Andes mint pieces melt slightly but still give texture with every bite.
- Mint-Chocolate combo: Using real Andes mints means authentic mint flavor mingling with rich chocolate, way beyond the usual mint extract.
- Chill Time Magic: Letting the dough chill for hours means thicker, chewier cookies that bake up just right.
- Easy to make: The method is straightforward, even if you’re not a baker by nature—plus, it’s a great one to make with friends or kids!
- Gourmet Look: Pressing a whole Andes mint on top adds a beautiful swirl and a classy finish that’s impressive at any get-together.
Ingredients & Why They Work
Every ingredient here plays a crucial role—especially since the texture and taste of chocolate mint treats can be tricky to balance. I like to emphasize quality butter and fresh eggs for moisture and flavor plus chopped Andes mints that melt into gooey pockets.
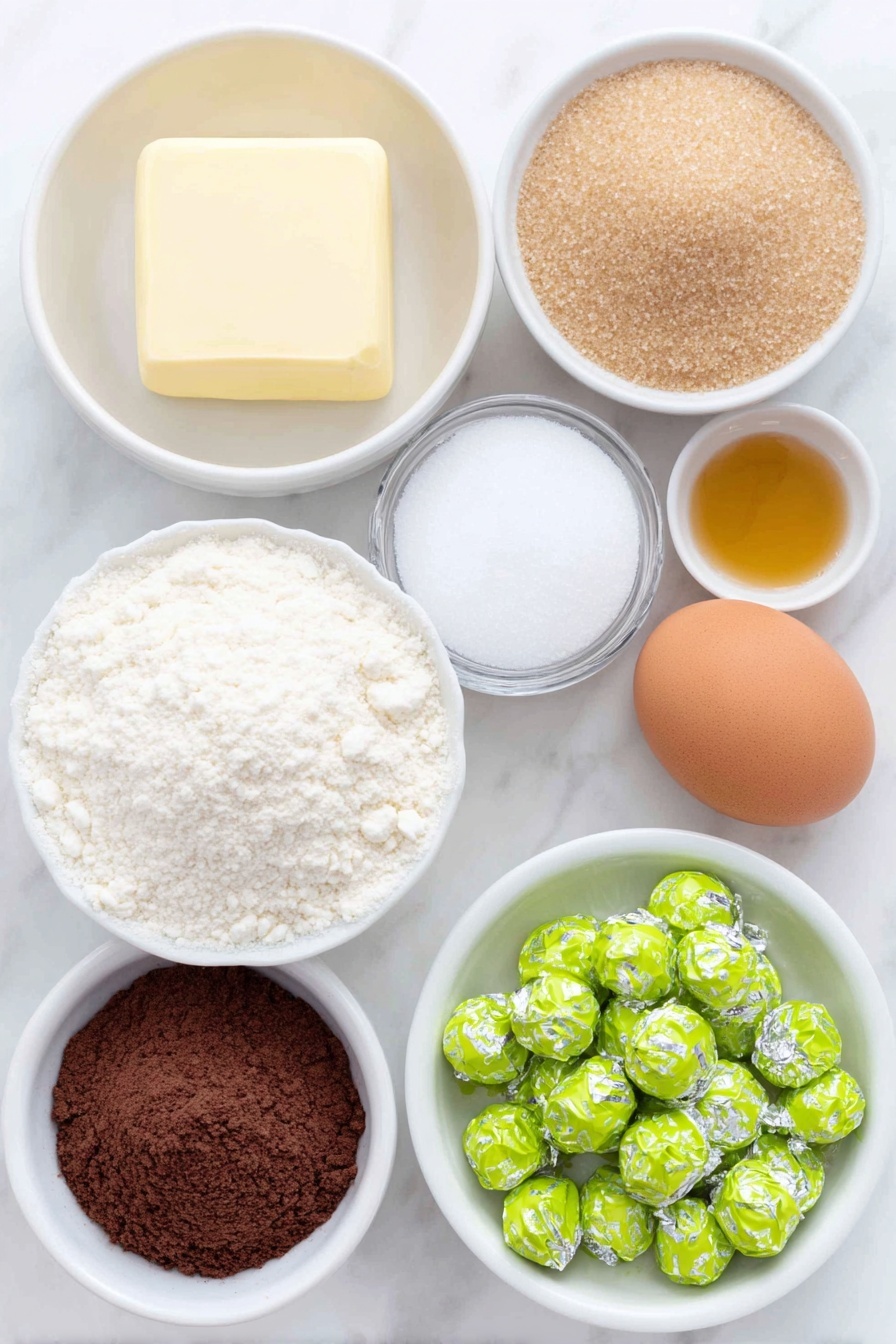
- Butter: Using softened butter ensures the dough creams nicely with sugars to create a tender crumb.
- Granulated and light brown sugar: The combo adds sweetness plus a bit of chewiness from the brown sugar molasses.
- Egg: Room temperature eggs help bind and add moisture, making cookies soft and not crumbly.
- Vanilla extract: Just a splash to enrich the chocolate flavor and round out the sweetness.
- All-purpose flour: The basic structure of the cookie. Be sure to spoon and level for best results.
- Unsweetened cocoa powder: Gives deep chocolate taste without adding moisture.
- Baking soda: Helps cookies rise and spread just right.
- Salt: Balances sweetness and intensifies the chocolate and mint.
- Chopped Andes mints: These magical morsels soften and melt inside, creating little bursts of minty joy.
- Whole Andes mints: Pressed on top after baking for that signature swirl and decorative touch.
Make It Your Way
I like to play with the mint ratio depending on the occasion — sometimes extra chopped Andes mints inside, sometimes more whole mints topping for show. Feel free to tweak the cocoa powder for deeper chocolate if that’s your jam.
- Mint Lovers’ Boost: I once doubled the chopped Andes mints and wow, the cookies were bursting with minty goodness without getting overpowering.
- Dairy-Free Option: Swapping butter for vegan margarine works surprisingly well if you’re avoiding dairy, just don’t skip chilling.
- Sturdier Cookies: Want crisper edges? Bake a bit longer but watch carefully to avoid baking too hard.
Step-by-Step: How I Make Chocolate Andes Mint Cookies Recipe
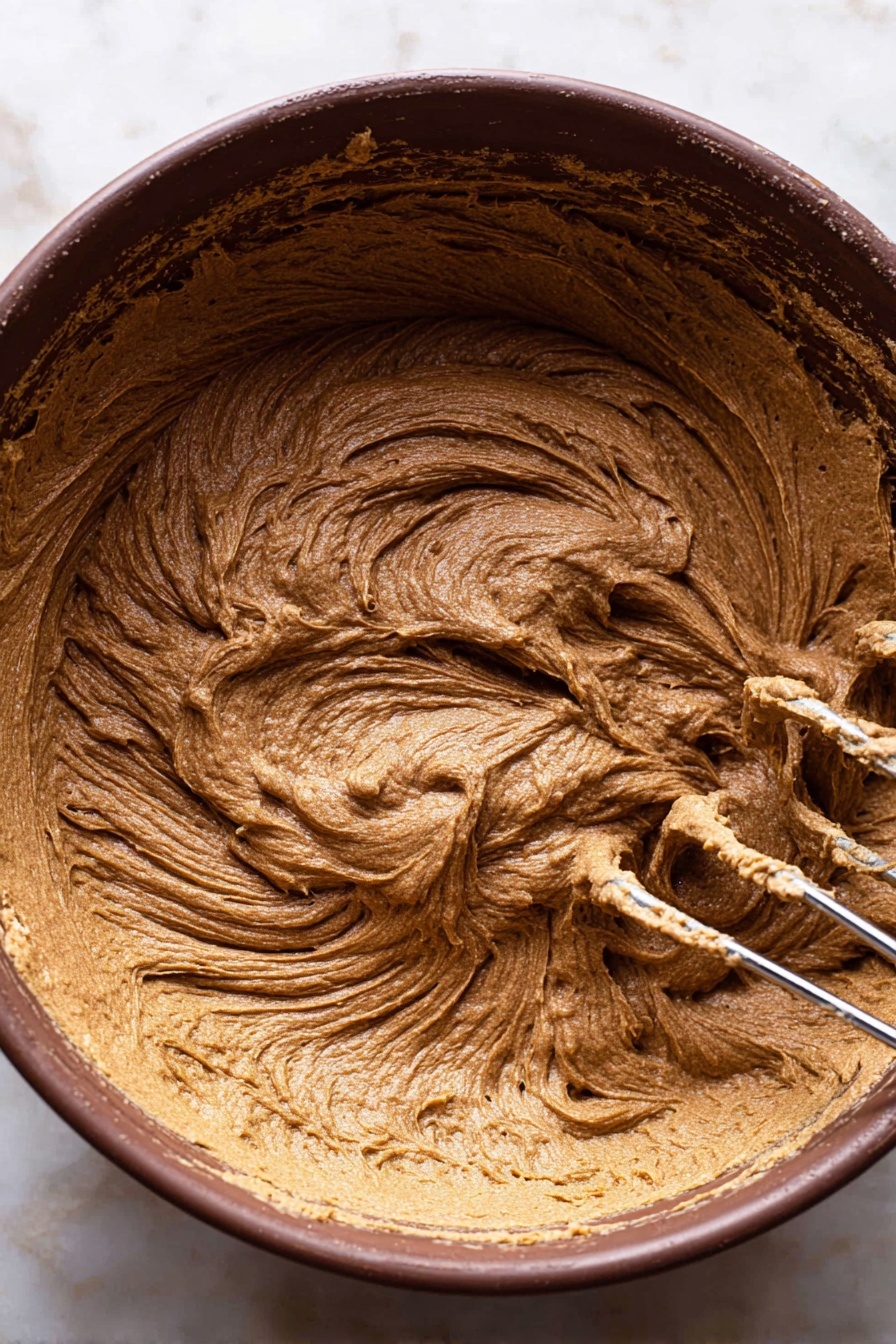
Step 1: Cream the Butter and Sugars
Start by beating the softened butter with both granulated and brown sugar on medium-high speed for about 3 minutes. You want it light, fluffy, and almost pale in color—that’s the secret for that soft, tender crumb. Then add the egg and vanilla while mixing continuously, scraping the bowl’s sides so nothing gets left behind.
Step 2: Whisk Dry Ingredients Together
In a separate bowl, whisk the all-purpose flour, cocoa powder, baking soda, and salt until evenly combined. This step ensures no clumps and helps distribute leavening agents perfectly throughout your dough.
Step 3: Mix Dry Into Wet Ingredients Slowly
Turn your mixer to low and gradually add the dry mix to the wet mix. This avoids a flour cloud all over your kitchen and helps the dough come together smoothly. Once combined, fold the chopped Andes mints in gently with a spatula.
Step 4: Chill That Dough
This is the most important step to get that thick, chewy texture. Cover your dough tightly in plastic wrap and chill it for at least 3 hours or up to 3 days. The longer it chills, the better the dough will behave in the oven, and trust me, it’s worth the wait.
Step 5: Scoop, Bake, and Add the Magical Mint Swirl
Preheat your oven to 350°F and line baking sheets with parchment paper. Take your chilled dough out—if it’s been chilling for more than a day, let it sit 30 minutes at room temp for easier scooping. Use a large cookie scoop to space dough balls about 2-3 inches apart. Bake for 10-12 minutes until edges are set but centers remain slightly soft.
Right as the cookies come out, press a whole Andes mint into the center of each warm cookie. Let it melt for a few minutes, then take a toothpick and swirl it around to create that signature glossy, minty swirl effect. If your cookies spread a bit too much, gently press down the edges with a glass rim to restore a perfect circle.
Top Tip
From making this Chocolate Andes Mint Cookies Recipe multiple times, I’ve learned these little tricks can make a huge difference in your final cookie success.
- Softened Butter is Non-Negotiable: I once tried starting with cold butter, and the texture just didn’t come out right—always make sure your butter is soft but not melted.
- Don’t Skip Chilling: This dough needs the rest. It’s tempting to bake right away but the chilling step transforms texture and flavor.
- Swirl While Warm: Pressing the whole Andes mint while the cookie is hot lets it melt perfectly and creates that dreamy swirl effect I adore.
- Use Parchment Paper: It prevents sticking and helps cookies bake evenly without burning on the bottom.
How to Serve Chocolate Andes Mint Cookies Recipe

Garnishes
I keep it simple with these cookies but sometimes sprinkle a tiny pinch of flaky sea salt on a few before baking—it brings out the chocolate flavor beautifully. I also love to dust them lightly with powdered sugar for an elegant finish when serving to guests.
Side Dishes
Pair these cookies with a cold glass of milk or a cup of hot coffee or mint tea for a real treat. If it’s a party, I like to serve them alongside mini cheesecakes or a simple chocolate mousse for a rich dessert spread.
Creative Ways to Present
A great way to impress is to stack the cookies on a pretty cake stand, alternating layers with some fresh mint leaves for color and aroma. For holiday treats, I’ve also wrapped several in festive cellophane tied with a ribbon—great for gifting or taking to potlucks.
Make Ahead and Storage
Storing Leftovers
Store these cookies in an airtight container at room temperature for up to 5 days. I like to layer them with parchment paper to prevent sticking and keep their delightful soft texture intact.
Freezing
I’ve found that unbaked dough freezes beautifully—just scoop balls onto a tray, freeze until solid, then transfer to a zip-top bag. You can bake from frozen by adding an extra minute or two to the bake time. Baked cookies also freeze well wrapped tightly and thawed at room temp.
Reheating
Warm cookies for about 10 seconds in the microwave before serving, or pop them in a 300°F oven for 5 minutes to refresh that soft, gooey texture and perk up the melted Andes mint.
Frequently Asked Questions:
You certainly can! While Andes mints give a distinctive fresh mint flavor and melt perfectly, other mint chocolates like peppermint bark or chopped starlight mints can work as backups. Just keep in mind the flavor and melting behavior might differ slightly.
Chilling allows the butter to firm up and the flour to fully hydrate, resulting in thicker, chewier cookies with better flavor depth. Skipping this step usually leads to flatter, less satisfying cookies.
Absolutely! Substitute the all-purpose flour with a gluten-free blend that includes xanthan gum. Make sure the blend is suitable for baking cookies (check package instructions). The texture might vary slightly, but the flavor remains delightful.
An airtight container at room temperature is ideal for up to 5 days. Layer cookies with parchment paper to avoid sticking. For longer storage, freeze either the dough or baked cookies using airtight packaging.
Final Thoughts
This Chocolate Andes Mint Cookies Recipe holds a special place in my kitchen because it’s an easy crowd-pleaser that feels a little fancy but requires no intimidating techniques. I hope you have as much fun making and munching on these as I do—there’s nothing like sharing a warm, minty chocolate cookie fresh from the oven with friends or family. Give it a try and see how something so simple can turn into an unforgettable treat!
Print
Chocolate Andes Mint Cookies Recipe
- Prep Time: 15 minutes
- Cook Time: 12 minutes
- Total Time: 3 hours 27 minutes
- Yield: 18 cookies
- Category: Dessert
- Method: Baking
- Cuisine: American
Description
Delight in these rich and chewy Chocolate Andes Mint Cookies, infused with the perfect balance of smooth cocoa and refreshing mint from chopped Andes mints. Each cookie is topped with a whole Andes mint that melts beautifully and swirls into the warm cookie for a visually striking and flavorful finish. Perfect for mint chocolate lovers and a great treat for any occasion.
Ingredients
Wet Ingredients
- ½ cup butter softened to room temperature
- ¼ cup granulated sugar
- ¾ cup light brown sugar packed
- 1 large egg room temperature
- 1 teaspoon vanilla extract
Dry Ingredients
- 1 ⅓ cups all-purpose flour
- ½ cup unsweetened cocoa powder
- 1 teaspoon baking soda
- ½ teaspoon salt
Add-ins
- 1 cup chopped Andes mints
- 18-20 whole Andes mints for topping
Instructions
- Mix wet ingredients: In a large bowl, use a hand-held or stand mixer fitted with a paddle attachment to beat the softened butter, granulated sugar, and light brown sugar on medium-high speed for 3 minutes until light and fluffy. Then, with the mixer running, add the egg and vanilla extract while scraping down the bowl sides as needed.
- Combine dry ingredients: In a separate bowl, whisk together the all-purpose flour, unsweetened cocoa powder, baking soda, and salt until evenly mixed.
- Incorporate dry mixture: Reduce the mixer speed to low and slowly add the dry ingredients to the wet ingredients to prevent flour from dispersing into the air. Mix until just combined.
- Add chopped Andes mints and chill dough: Fold in the chopped Andes mints using a rubber spatula. Cover the dough tightly with plastic wrap and chill in the refrigerator for at least 3 hours, or up to 3 days, to ensure the dough firms up for better cookie shape.
- Prepare for baking: When ready to bake, preheat the oven to 350°F. Line two large baking sheets with parchment paper. If the dough has chilled for longer than one day, let it sit at room temperature for 30 minutes to soften slightly.
- Scoop and bake cookies: Use a large cookie scoop to portion the dough onto the prepared baking sheets, spacing cookies 2-3 inches apart. Bake for 12 minutes, or until the edges are set and the tops remain slightly soft.
- Top with whole Andes mints and swirl: Immediately after removing from the oven, press one whole Andes mint into the center of each warm cookie. Allow the mint to melt slightly, then use a toothpick to swirl the melted chocolate for a decorative effect. If cookies spread unevenly, press a wide-mouthed cup around each cookie to restore a perfect circle shape.
Notes
- Chilling the dough is essential for thicker and chewier cookies; do not skip this step.
- If the dough is very cold and hard, allow it to warm at room temperature for 30 minutes before scooping.
- You can substitute Andes mints with other mint chocolates if preferred for similar flavor.
- To prevent cookies from spreading too much, ensure your butter is properly softened but not melted.
- Store baked cookies in an airtight container at room temperature for up to 5 days for best freshness.
Nutrition
- Serving Size: 1 cookie
- Calories: 180 kcal
- Sugar: 14 g
- Sodium: 120 mg
- Fat: 9 g
- Saturated Fat: 5 g
- Unsaturated Fat: 3 g
- Trans Fat: 0 g
- Carbohydrates: 23 g
- Fiber: 2 g
- Protein: 2 g
- Cholesterol: 25 mg


Leave a Reply