Nothing says love quite like a homemade treat—and this Chocolate Heart Fudge Recipe is just that, with layers of creamy white chocolate tinted a romantic red and crowned with adorable heart sprinkles. Perfect for Valentine’s or anytime you want a little sweetness in your life!

Jump to:
Why You'll Love This Recipe
I first made this Valentine Hearts Fudge on a whim and was hooked instantly—the color pops, the texture melts in your mouth, and the whole process feels so fun and festive. Plus, it’s surprisingly simple to whip up, even if fudge usually seems intimidating.
- Easy microwave prep: No stovetop or candy thermometer necessary—just quick bursts and stirring.
- Lovely layered look: Three gorgeous layers that make these treats look fancy, but they’re really straightforward.
- Perfect bite-sized gifts: Cut into hearts and topped with cute sprinkles, these are ideal for sharing your love.
- Make ahead and store well: Keep them chilled for up to two weeks or freeze for longer enjoyment.
Ingredients & Why They Work
When it comes to fudge, the quality of your ingredients truly shines through. Here, using good white chocolate chips and the right condensed milk really guarantees a smooth, creamy texture—plus the secret splash of red food coloring brings that Valentine’s cheer alive.
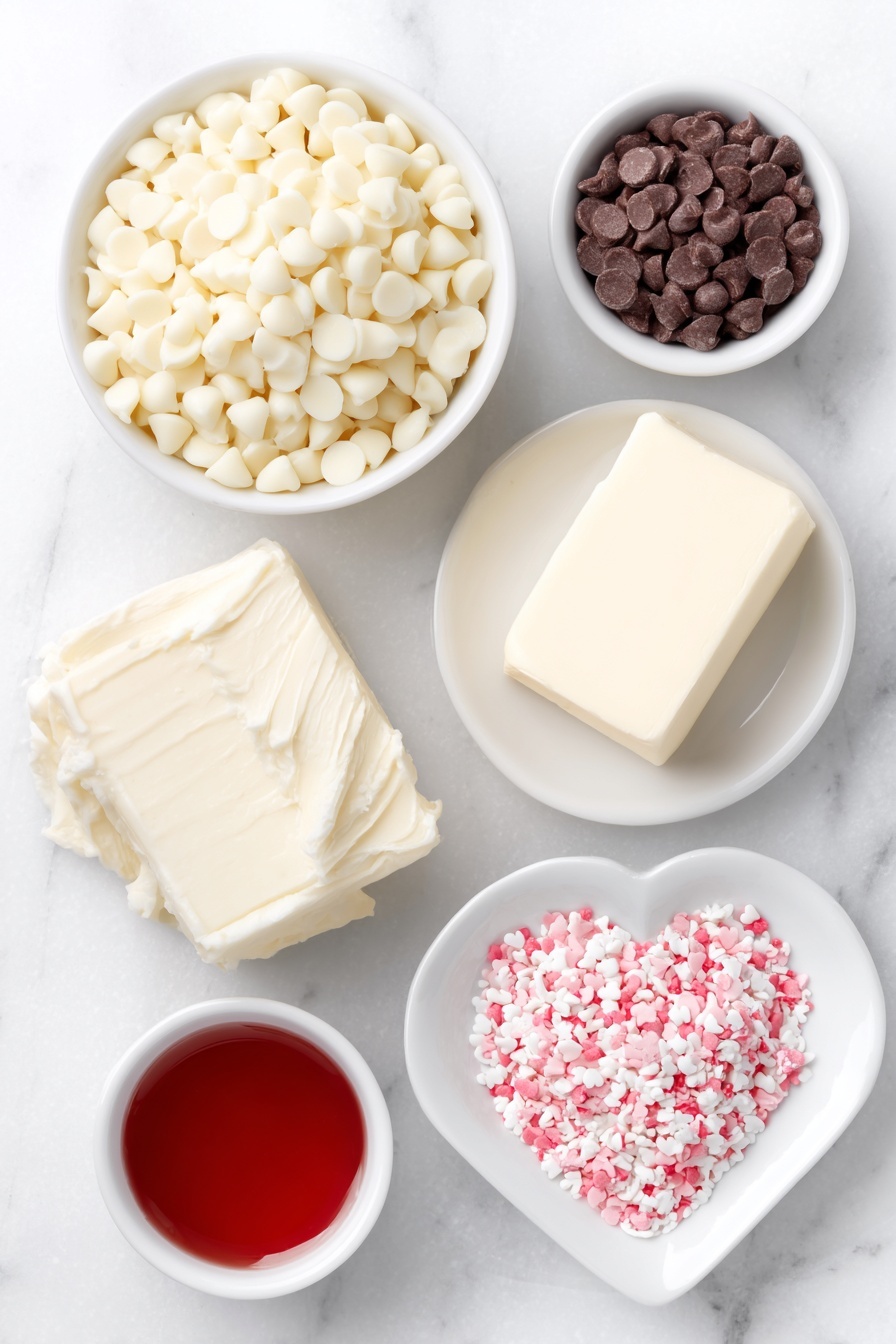
- White chocolate chips: Use a good-quality brand for smooth melting and a creamy finish that tastes luxurious.
- Sweetened condensed milk: This is the magic that thickens and sweetens your fudge—don’t swap with evaporated milk!
- Unsalted butter: Adds richness and helps create that silky fudge texture.
- Red food coloring: The perfect way to give your fudge that festive, Valentine’s pop of color.
- Heart-shaped sprinkles: Adds a fun, decorative touch that turns simple fudge into a special gift.
Make It Your Way
One of the best things about this Chocolate Heart Fudge Recipe is how easy it is to customize and make your own. Whether you want to tweak the colors, add a surprise flavor, or switch up the toppings, it’s simple to put your personal spin on this sweet treat.
- Variation: I love swapping the red food coloring for a natural beet powder when I want a more subtle, earthy hue and a hint of real berry flavor. It keeps the fudge creamy white but with a gorgeous pink tint—a perfect Valentine’s twist that feels a little fresher.
- Dietary twist: For a dairy-free version, try using vegan white chocolate chips and a coconut condensed milk alternative. The texture will be slightly different, but still delectably creamy and smooth.
- Seasonal flair: Swap heart sprinkles for crushed peppermint candies around the holidays for a festive punch, or use edible gold glitter for an elegant touch on special occasions like anniversaries.
Step-by-Step: How I Make Chocolate Heart Fudge Recipe
Step 1: Get Your Pan Ready for the Magic
First things first: line an 8x8 inch square pan with parchment paper or lightly sprayed aluminum foil. This setup makes it so much easier to lift the fudge out for cutting later on — no sticky mess! I like to make sure the paper hangs slightly over the edges for a handy “handle.”
Step 2: Craft the Vibrant Red Fudge Base
In a microwave-safe bowl, combine 2 ¼ cups of white chocolate chips, ⅔ of a can of sweetened condensed milk, and 2 tablespoons of unsalted butter. Microwave in 20-second intervals, stirring well after each burst to ensure even melting and prevent scorching — expect it to take just about 2 minutes total. Once silky-smooth, stir in 10 drops of red food coloring until the color is beautifully even.
Step 3: Form the First Layer and Chill
Using a spoon, spread half of your red fudge mixture into the prepared pan. Smooth it out gently — it’s thick and sticky, but a steady hand helps the layer look pretty and even. Pop the pan in the freezer for a few minutes to firm up the base. Meanwhile, wrap the bowl holding the remaining red fudge in towels to keep it warm and soft for later.
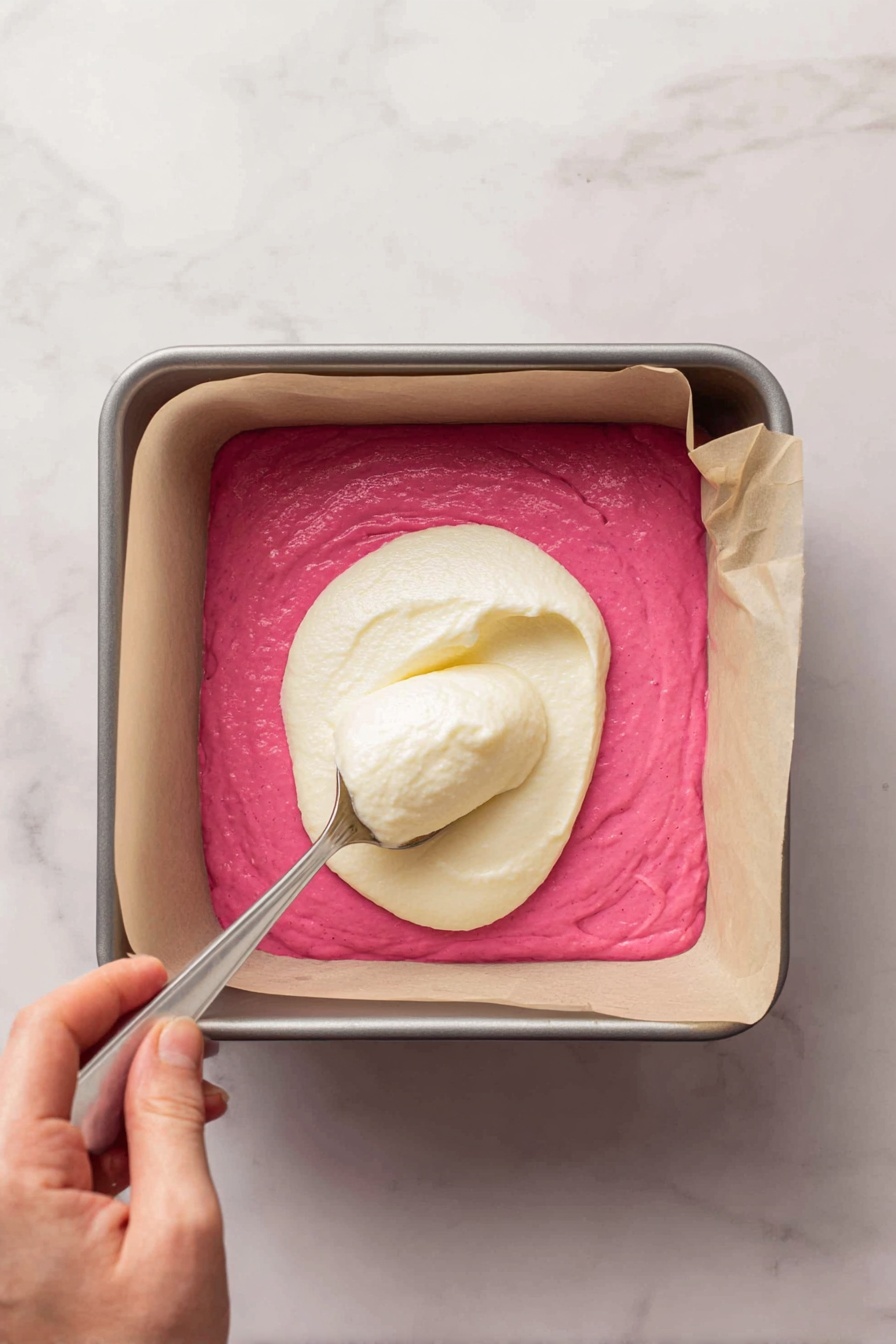
Step 4: Whip Up the Creamy White Fudge Layer
Grab a separate microwave-safe bowl and combine 1 ⅙ cups of white chocolate chips, ⅓ of the can of sweetened condensed milk, and 1 tablespoon unsalted butter. Repeat the 20-second microwave bursts stirring each time until smooth and fully melted — about 2 minutes. This luscious white layer will contrast beautifully with the red.
Step 5: Layer the White Fudge Over the Red
Carefully spoon the melted white fudge over the set red layer, then smooth it out to an even surface. Freeze again for a few minutes until this white layer firms up nice and solid.
Step 6: Add the Final Red Fudge Layer
Warm your remaining red fudge gently just enough so it’s stirrable again — remember, patience here keeps it creamy instead of grainy. Then, spread this last red layer evenly on top of the white. Smooth it out carefully to get a polished finish.
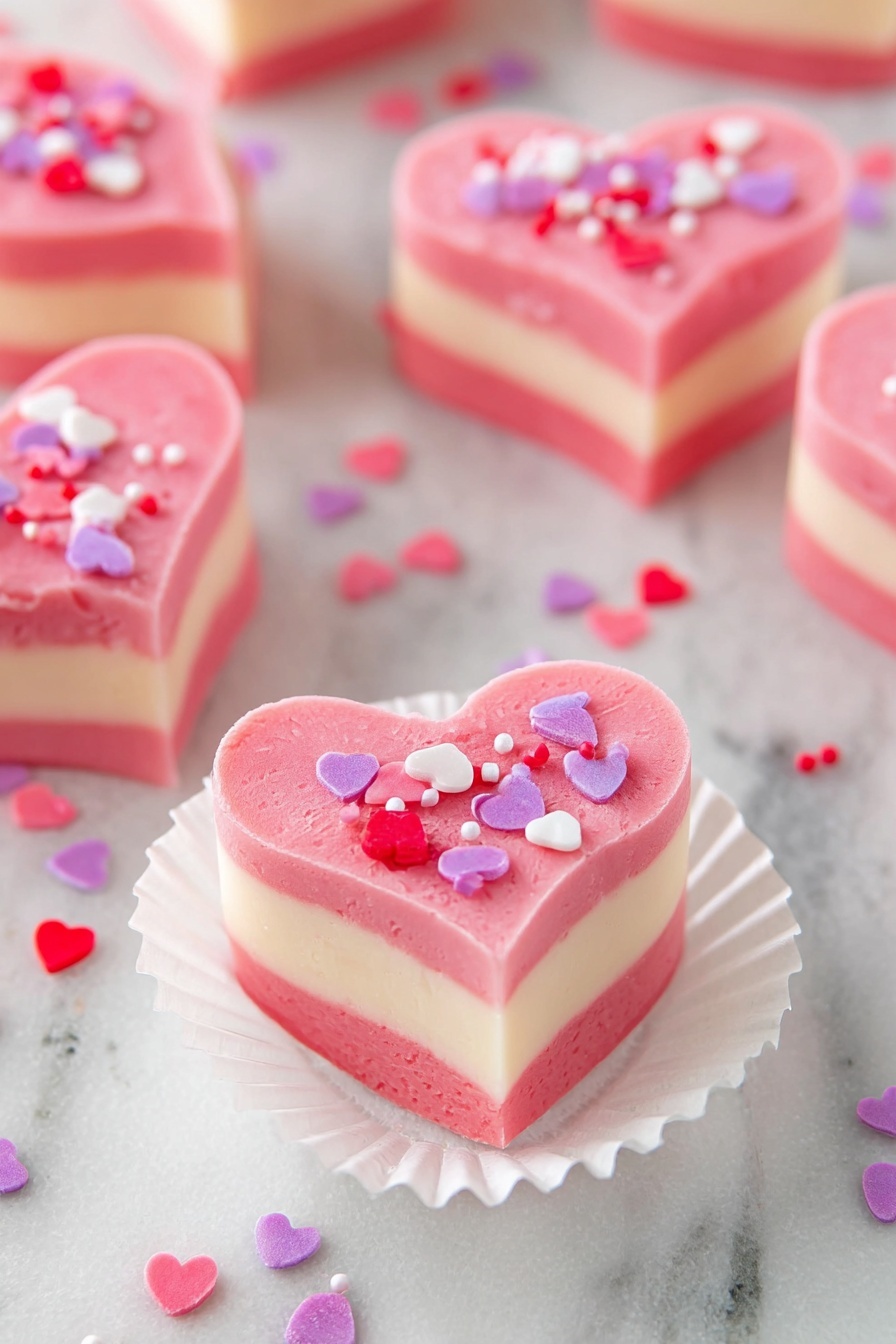
Step 7: Chill, Cut, and Decorate Your Fudge Hearts
Cover the whole pan with plastic wrap and refrigerate for 2 hours to let your fudge set fully. When firm, lift the fudge slab out of the pan using the parchment paper edges and place it on your counter. Use a small heart-shaped cookie cutter to cut out adorable heart pieces. Efficient cutting helps minimize any waste. Finally, sprinkle your hearts with heart-shaped sprinkles for that festive, lovable finish. Now, dig in and enjoy your beautiful Chocolate Heart Fudge!
Top Tip
To get the best results with your Chocolate Heart Fudge Recipe, these tips can make the process smoother and your treats even more delightful.
- Use Quality Ingredients: I always recommend choosing high-quality white chocolate chips because they melt better and give your fudge a creamier texture that really shines.
- Watch Your Microwave Time: From experience, heating the fudge mixture in short 20-second bursts and stirring in between helps avoid overheating and a grainy fudge consistency.
- Layer with Patience: Freezing each layer just enough to set before adding the next keeps layers neat and prevents them from blending into one another.
- Proper Pan Preparation: Lining your pan with parchment paper or foil is key—it makes lifting the fudge out for clean, precise heart-shaped cuts so much easier.
How to Serve Chocolate Heart Fudge Recipe
Garnishes
Heart-shaped sprinkles make a festive finishing touch, but you can also sprinkle edible glitter, crushed freeze-dried strawberries, or even a dusting of cocoa powder for an extra pop of color and flavor.
Side Dishes
This fudge is rich and creamy, so it pairs wonderfully with light, refreshing sides like fresh berries, a scoop of vanilla ice cream, or even a cup of hot herbal tea or coffee to balance the sweetness.
Make Ahead and Storage
Storing Leftovers
Store your Valentine Hearts Fudge in an airtight container in the refrigerator for up to two weeks. When you're ready to enjoy, let the fudge sit at room temperature for a bit—it softens nicely and brings out that creamy texture.
Freezing
If you want to keep your fudge fresh longer, freeze it for up to two months. Wrap the fudge first in parchment paper, then tightly in aluminum foil to protect it from freezer burn and preserve its flavors.
Reheating
When thawing frozen fudge, move it to the fridge overnight and then bring it to room temperature before serving. Avoid microwaving or reheating directly, so the fudge doesn't lose its perfect creamy consistency.
Frequently Asked Questions:
For the best texture and color contrast, it’s best to stick with white chocolate chips as specified. Other chocolates may melt differently and affect the final fudge consistency.
Sweetened condensed milk adds the necessary sweetness and creaminess that helps the fudge set properly. Using evaporated milk won’t provide the same thick, rich texture.
Avoid overheating the fudge mixture by microwaving in short bursts and stirring often. Overcooking causes the sugar to crystallize, leading to a grainy texture.
While the microwave method is quick and easy, you can melt the ingredients gently over a double boiler on the stove, stirring constantly until smooth.
Final Thoughts
This Chocolate Heart Fudge Recipe isn’t just a treat; it’s a labor of love suitable for any special occasion—especially Valentine’s Day. The combination of creamy white chocolate, the vibrant red layer, and those cute heart sprinkles brings a smile with every bite. I hope you treasure making and sharing these sweet hearts as much as I do. Happy cooking and celebrating love in every delicious piece!
Print
Chocolate Heart Fudge Recipe
- Prep Time: 10 minutes
- Chill Time: 2 hours
- Cook Time: 3 minutes
- Total Time: 2 hours 13 minutes
- Yield: 10 servings
- Category: Dessert
- Method: Microwave
- Cuisine: American
- Diet: Vegetarian
Description
Create delightful Valentine Hearts Fudge with creamy white chocolate layers infused with red food coloring and topped with festive heart-shaped sprinkles. This easy-to-make fudge recipe is perfect for special occasions and makes romantic, bite-sized treats.
Ingredients
Red Fudge Layer
- 2 ¼ cups white chocolate chips
- ⅔ can sweetened condensed milk
- 2 tablespoons unsalted butter
- 10 drops red food coloring
White Fudge Layer
- 1 ⅙ cups white chocolate chips
- ⅓ can sweetened condensed milk
- 1 tablespoon unsalted butter
Topping
- 1 tablespoon heart-shaped sprinkles
Instructions
- Prepare the pan. Line an 8x8 inch square pan with parchment paper or sprayed aluminum foil to allow easy removal of the fudge later.
- Make the red fudge base. In a microwave-safe bowl, combine 2 ¼ cups white chocolate chips, ⅔ can sweetened condensed milk, and 2 tablespoons unsalted butter. Microwave in 20-second bursts, stirring after each, until melted and smooth, about 2 minutes. Stir in 10 drops of red food coloring until color is evenly incorporated.
- Set the first layer. Spoon half of the red fudge mixture into the prepared pan and smooth the surface with a spoon. Freeze for a few minutes to set. Keep the remaining red fudge warm by wrapping the bowl with towels.
- Prepare the white fudge layer. In another microwave-safe bowl, combine 1 ⅙ cups white chocolate chips, ⅓ can sweetened condensed milk, and 1 tablespoon unsalted butter. Microwave in 20-second bursts, stirring each time, until melted and smooth, about 2 minutes.
- Add white fudge layer. Spoon the melted white fudge over the set red fudge layer and smooth the surface. Place in the freezer for a few minutes until firm.
- Top with the remaining red fudge. Warm the remaining red fudge to make it stirrable again, then spoon it over the set white layer and smooth out evenly.
- Chill to set. Cover the entire fudge with plastic wrap and refrigerate for 2 hours to fully set.
- Cut into hearts and decorate. Lift the fudge from the pan using the parchment paper. Using a small heart-shaped cookie cutter, cut out heart shapes efficiently to minimize waste. Sprinkle the hearts evenly with heart-shaped sprinkles and serve.
Notes
- Use high-quality white chocolate chips for smooth melting and better texture.
- Make sure to use sweetened condensed milk, not evaporated milk, for proper fudge consistency.
- Do not overcook the fudge mixture to prevent grainy texture.
- Lining the pan with parchment or foil allows easy removal and cleaner cutting.
- Store fudge in an airtight container in the fridge for up to two weeks, allowing it to come to room temperature before serving for softness.
- For longer storage, freeze fudge wrapped in parchment paper and aluminum foil for up to two months.
Nutrition
- Serving Size: 1 piece (approx. 40g)
- Calories: 180 kcal
- Sugar: 28 g
- Sodium: 25 mg
- Fat: 7 g
- Saturated Fat: 5 g
- Unsaturated Fat: 2 g
- Trans Fat: 0 g
- Carbohydrates: 28 g
- Fiber: 0 g
- Protein: 2 g
- Cholesterol: 15 mg


Leave a Reply