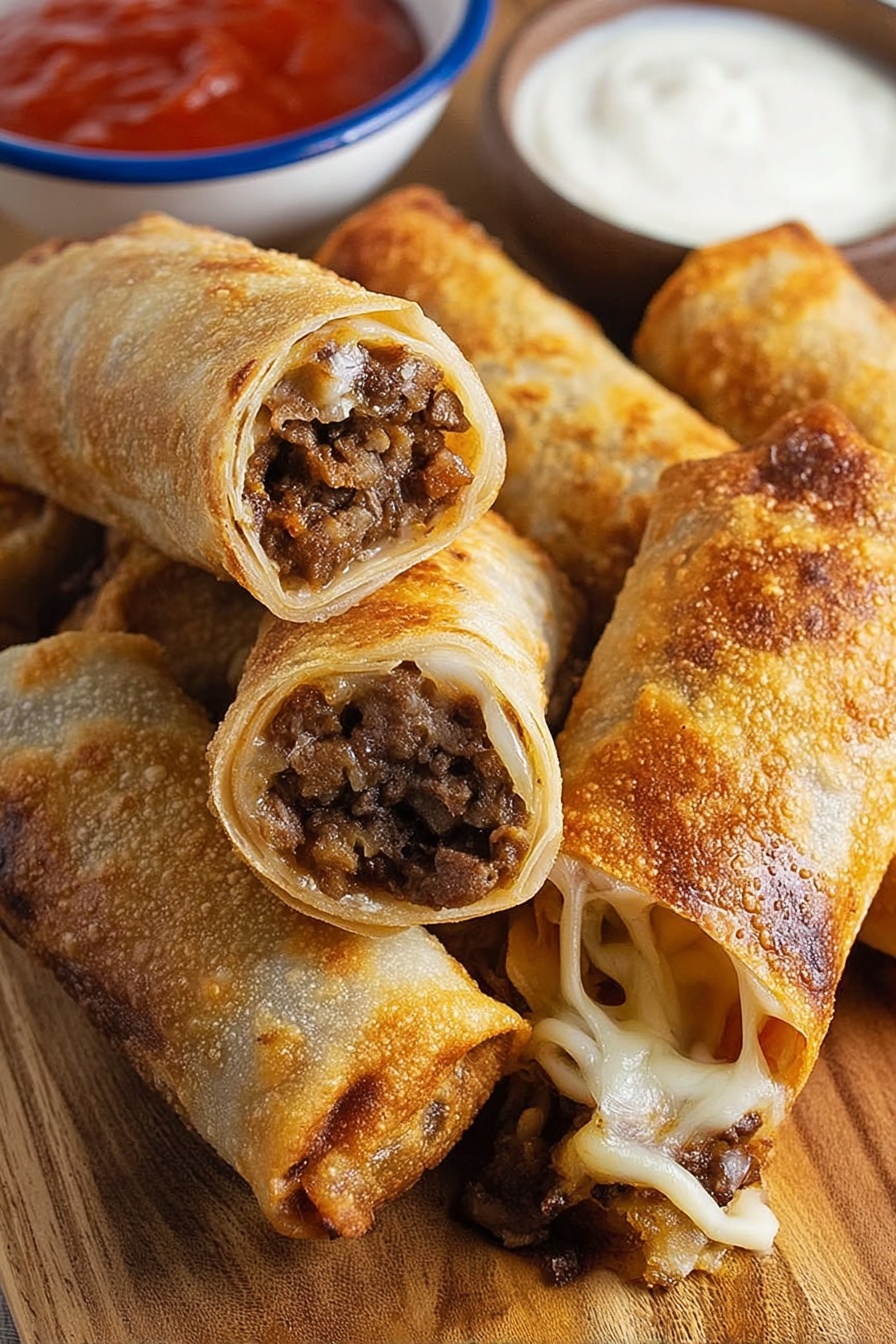
If you're craving that perfect combo of melty cheese, savory beef, and a satisfying crunch, I've got you covered with this Crispy Cheeseburger Spring Rolls Recipe. Imagine all your favorite cheeseburger flavors wrapped up in a crisp golden shell—it's total comfort food with a fun twist!

Jump to:
Why You'll Love This Recipe
I honestly can’t get enough of these crispy cheeseburger spring rolls! Every bite delivers that juicy beef and cheesy goodness wrapped in a perfectly crunchy exterior—the kind of snack or appetizer that gets everyone asking for seconds.
- Irresistible Flavor Mashup: All the classic cheeseburger flavors come together inside a crispy, golden spring roll wrapper.
- Quick and Easy: You can whip up a batch in about 35 minutes, perfect for last-minute gatherings or a fun weeknight treat.
- Customizable and Freezable: Freeze uncooked rolls ahead of time for a convenient snack whenever hunger strikes.
- Fryer or Air Fryer Friendly: Whether you prefer deep-frying or a lighter air-fried version, you’re covered.
Ingredients & Why They Work
Before you dive in, make sure you grab good-quality ingredients that pack flavor and texture. I stick with 80/20 ground beef for the perfect juicy bite and keep those spring roll wrappers covered to prevent cracking while assembling.
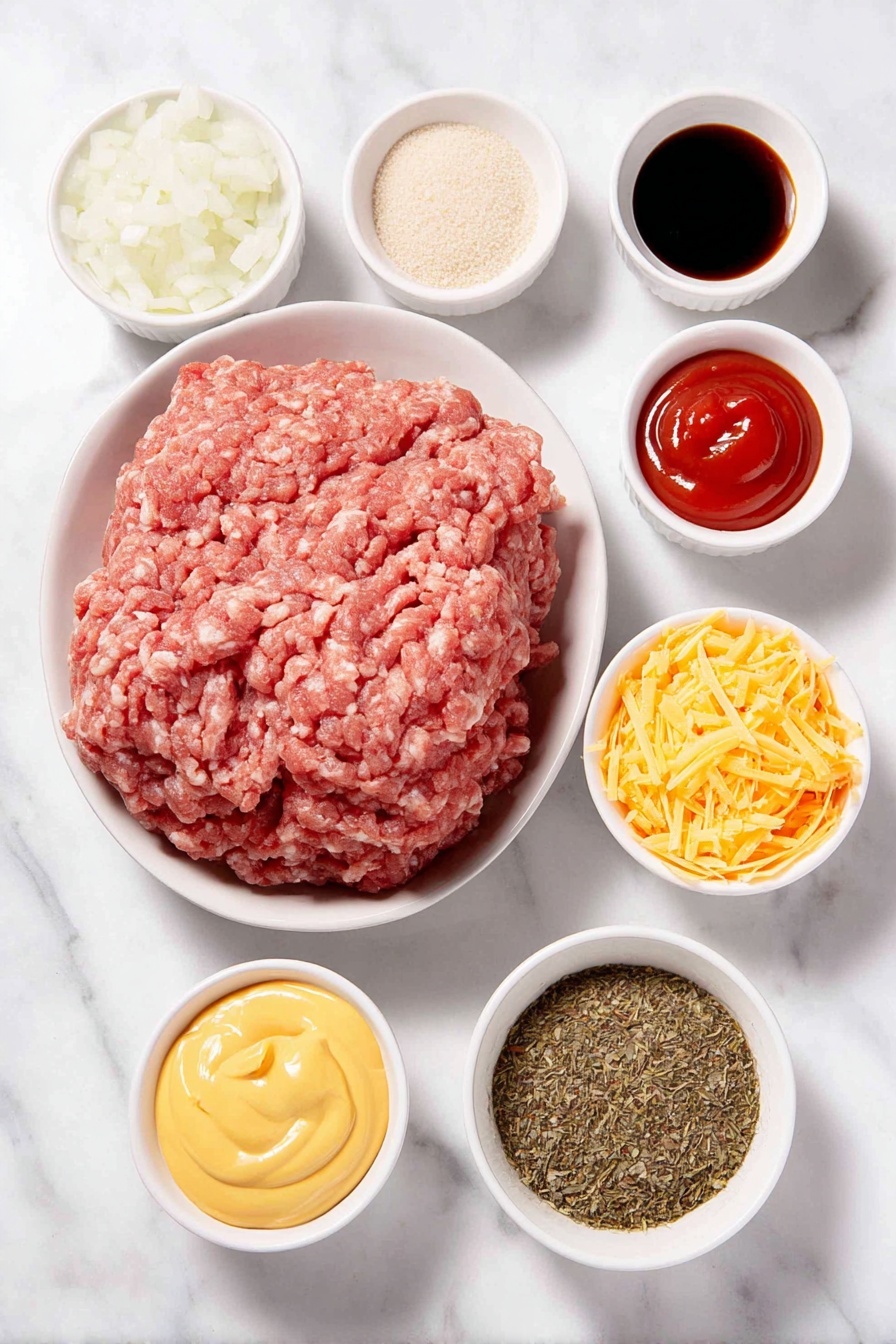
- Ground beef: Using 80/20 ensures a juicy, flavorful filling with just the right fat for browning.
- Small onion: Finely diced for sweet, savory depth in every bite.
- Ketchup: Adds a touch of tangy sweetness that balances the beef perfectly.
- Yellow mustard: Classic cheeseburger zing that brightens the filling.
- Worcestershire sauce: Boosts umami and richness for that “just like a burger” taste.
- Garlic powder: For mellow garlic warmth without overpowering.
- Onion powder: Enhances the onion flavor with subtle sweetness.
- Kosher salt and freshly cracked black pepper: Essential seasoning for flavor depth and balance.
- Shredded cheddar or American cheese: Melts beautifully for gooey cheeseburger comfort inside each roll.
- Finely chopped dill pickles: Adds crunch and that unmistakable tang, just like your favorite cheeseburger topping.
- Spring roll wrappers: Crispy, thin wraps that turn golden and crunchy when fried or air-fried—a better vehicle for cheeseburger flavor than a bun!
- Flour and water paste: Acts as the perfect glue to seal each roll tight, preventing any filling from escaping during cooking.
- Oil for frying (or spray for air frying): Necessary for that signature crispness—choose your preferred method for healthier or traditional cooking.
- Dipping sauces: Mix ketchup with mayo or toss some sweet chili sauce with sour cream to add extra layers of flavor when serving.
Make It Your Way
The beauty of this Crispy Cheeseburger Spring Rolls Recipe is how easy it is to customize to your own taste buds or dietary needs. Whether you want to spice things up, lighten it up, or add a seasonal twist, these rolls are ready to adapt.
- Extra Cheesy: I love doubling the cheese for an extra gooey center that oozes out when you bite into these rolls. Sharp cheddar works wonders here!
- Veggie Boost: For a fresher take, add finely chopped bell peppers or shredded carrots to the filling. It adds a nice crunch and freshness without losing that classic cheeseburger vibe.
- Spicy Kick: Add some diced jalapeños to the filling or mix a bit of sriracha into your dipping sauce. It really wakes up the flavors and makes these perfect for game day snacks.
- Air Fryer Friendly: If you’re looking to cut down on oil, the air fryer method still delivers that satisfying crunch with less mess and fewer calories.
Step-by-Step: How I Make Crispy Cheeseburger Spring Rolls Recipe
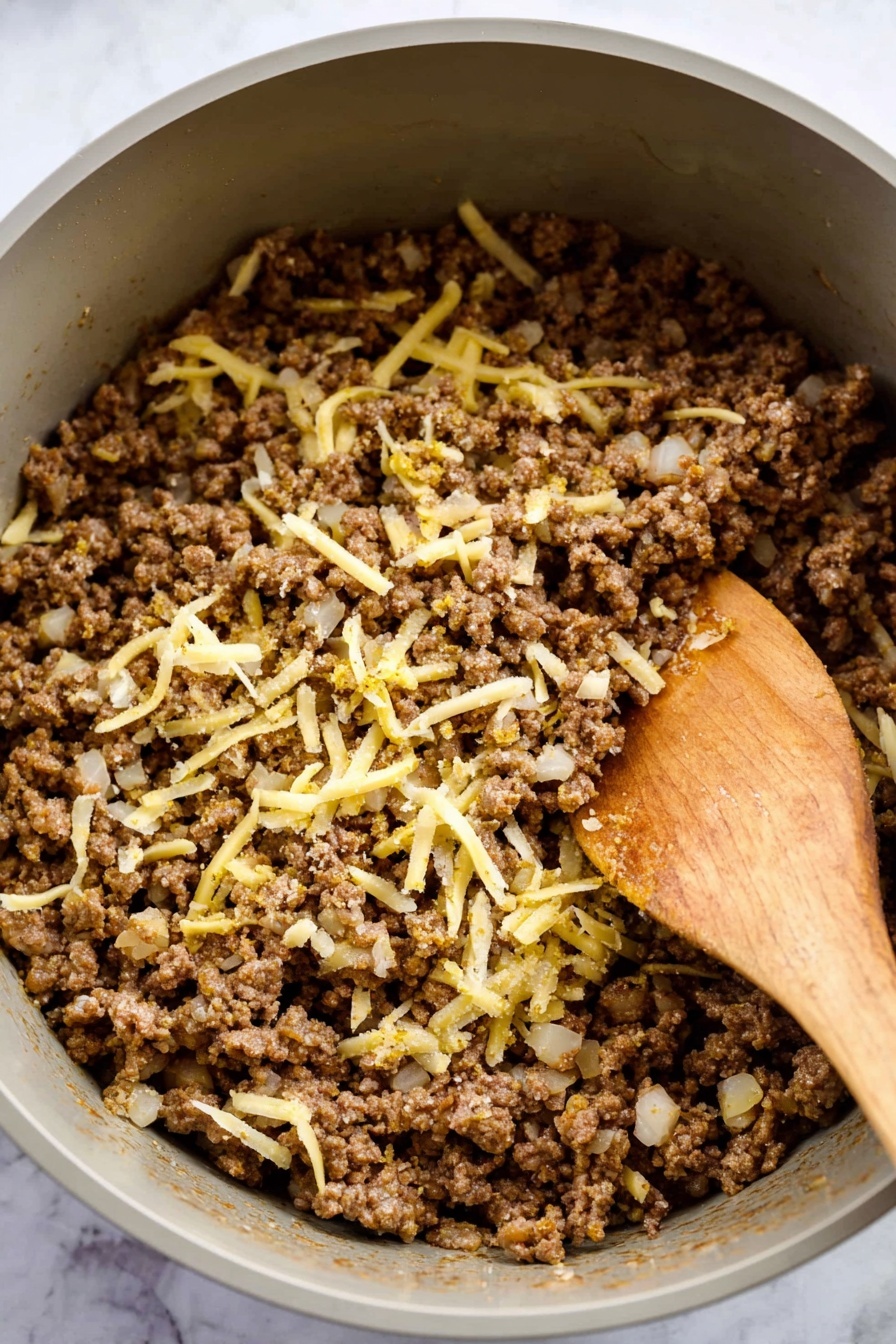
Step 1: Cook the Beef and Onion to Perfection
Start by heating your skillet over medium-high heat. Add the ground beef and finely diced onion, cooking until the beef is browned with deliciously crispy edges—this takes about 7 minutes. The aroma is unbeatable at this stage! Be sure to drain off all the excess grease to keep the filling from becoming soggy later on.
Step 2: Stir in Those Flavor Boosters
Once your beef and onions are cooked, stir in ketchup, yellow mustard, Worcestershire sauce, garlic powder, onion powder, plus kosher salt and freshly cracked black pepper to taste. Let everything cook together for another minute so the flavors meld beautifully. Then, remove from heat and let the filling cool for about 5 minutes—this step helps the cheese melt perfectly without turning runny.
Step 3: Fold in Cheese and Pickles
Once the filling has cooled slightly, fold in shredded cheddar or American cheese along with finely chopped dill pickles. The pickles bring that classic cheeseburger tanginess, while the cheese adds creamy richness. Mix until everything is evenly combined.
Step 4: Prepare Your Wrappers for Assembly
Keep your spring roll wrappers covered with a damp towel to prevent them from drying out and cracking—this little trick makes rolling so much easier! When you're ready, place about 2 tablespoons of the filling in the center of each wrapper.
Step 5: Roll and Seal Your Spring Rolls
Fold the sides of the wrapper inward and roll it tightly, much like a burrito, making sure to seal the edges with your flour-and-water paste. This sealant is key to keeping everything tucked in as they cook. Be careful not to overfill—they puff up a bit and bursting rolls are no fun!
Step 6: Crisp Them Up by Frying or Air Frying
Heat oil in a deep pan to 350°F and fry 3 to 4 spring rolls at a time for 3 to 4 minutes, until beautifully golden and crispy. Drain on paper towels to remove excess oil. Alternatively, spray the rolls lightly with oil and air fry at 390°F for 10 to 12 minutes, flipping halfway through to ensure they crisp evenly. Both methods yield irresistibly crunchy results!
Step 7: Serve and Enjoy with Your Favorite Dips
Serve your crispy, golden cheeseburger spring rolls hot with dips like a classic ketchup and mayonnaise mix or a sweet chili sauce combined with sour cream. These pairings add a creamy or sweet-spicy note that perfectly complements the savory filling.
Step 8: Freeze for Convenience
If you want to make a batch ahead, freeze the uncooked rolls on a parchment-lined tray. Once solid, transfer them into a zip-top bag. When you're ready to cook, add 1 to 2 extra minutes to your fry or air-fry time and enjoy fresh, crispy rolls anytime!
Top Tip
These tips will help you master the art of making crispy, flavorful spring rolls every time—because getting the texture and filling just right makes all the difference!
- Keep Wrappers Covered: Always keep your spring roll wrappers under a damp towel while assembling to prevent them from drying out and cracking—this little extra care saved me from frustrating roll breakage.
- Avoid Overfilling: Resist the urge to stuff too much filling inside. I learned that overstuffing causes the spring rolls to burst during frying or air frying, so about 2 tablespoons is perfect for a tight, secure roll.
- Drain Grease Thoroughly: Make sure you drain all the grease from the cooked beef mixture. I found that doing this keeps the filling from becoming soggy and helps the spring rolls stay crispy longer.
- Use Flour Paste to Seal: The simple flour and water paste is your best friend for sealing the edges tight. I’ve tried alternatives, but this paste consistently holds the rolls closed without messy packages breaking apart while cooking.
How to Serve Crispy Cheeseburger Spring Rolls Recipe
Garnishes
To elevate your presentation and add texture, consider sprinkling some finely chopped fresh chives or scallions on top after frying. A light dusting of smoked paprika or a drizzle of tangy BBQ sauce on the side also pairs wonderfully with the cheeseburger flavors.
Side Dishes
Serve these spring rolls alongside crispy French fries or a crunchy coleslaw for a complete snack experience. A fresh garden salad or even some seasoned sweet potato wedges add a nice balance if you want to keep things lighter but satisfying.
Make Ahead and Storage
Storing Leftovers
Store any leftover cooked spring rolls in an airtight container in the refrigerator for up to 3 days. To maintain crispness, reheat them in the oven or air fryer rather than the microwave.
Freezing
You can freeze uncooked spring rolls easily! Arrange them on a parchment-lined tray without touching, freeze until solid, then transfer to a zip-top bag. When ready to cook, simply fry or air fry from frozen, adding 1 to 2 minutes extra cooking time to ensure they’re cooked through and irresistibly crispy.
Reheating
For the best crispness, reheat leftover spring rolls in a preheated oven at 350°F for about 8-10 minutes or pop them in the air fryer at 390°F for 5 minutes, flipping halfway. Avoid microwaving, which can make them soggy.
Frequently Asked Questions:
Absolutely! While cheddar or American cheese work beautifully, feel free to use any melty cheese you love. Just keep in mind that sharper cheeses may alter the flavor profile slightly.
Yes! Air frying crisps the spring roll wrappers nicely with much less oil. Cook them at 390°F for 10 to 12 minutes, flipping halfway through for perfectly golden results.
Be sure not to overfill your rolls—about 2 tablespoons of filling per wrapper is ideal—and seal all edges well with the flour and water paste. This keeps them intact during cooking.
Definitely! The beef and cheese filling can be made a few hours ahead and refrigerated. Just cool completely before assembling the spring rolls to keep the wrappers from getting soggy.
Final Thoughts
There’s something so satisfying about combining familiar cheeseburger flavors with the fun crunch of spring rolls, isn’t there? Whether you’re serving these as a snack for friends or a playful appetizer, they’re sure to impress—and they're easy enough to make a batch and freeze for whenever the craving hits. I hope you enjoy making and sharing this Crispy Cheeseburger Spring Rolls Recipe as much as I do. Happy cooking and even happier eating!
Print
Crispy Cheeseburger Spring Rolls Recipe
- Prep Time: 20 minutes
- Cook Time: 15 minutes
- Total Time: 35 minutes
- Yield: 12 servings
- Category: Appetizer
- Method: Frying
- Cuisine: American
Description
Delicious Cheeseburger Spring Rolls combining classic cheeseburger flavors with crispy fried spring roll wrappers, perfect as a fun appetizer or snack.
Ingredients
Filling
- 1 pound ground beef (80/20 for best flavor)
- 1 small onion, finely diced
- 2 tablespoons ketchup
- 1 tablespoon yellow mustard
- 1 teaspoon Worcestershire sauce
- 1 teaspoon garlic powder
- 1 teaspoon onion powder
- Kosher salt and freshly cracked black pepper, to taste
- 1 cup shredded cheddar or American cheese
- ¼ cup finely chopped dill pickles
Spring Rolls & Sealant
- 12 spring roll wrappers (thawed if frozen)
- 2 tablespoons flour plus 3 tablespoons water (mixed into a paste for sealing)
Cooking
- Oil for frying (or spray for air frying)
Dipping Sauces
- Mix of ketchup and mayonnaise
- Sweet chili sauce and sour cream
Instructions
- Cook the Beef and Onion: Heat a skillet over medium-high heat and cook the ground beef and finely diced onion until browned and crispy around the edges, about 7 minutes. Drain all grease from the skillet.
- Mix the Flavorings: Stir in ketchup, yellow mustard, Worcestershire sauce, garlic powder, onion powder, kosher salt, and freshly cracked black pepper. Cook for an additional minute then remove from heat and let the mixture cool for 5 minutes.
- Add Cheese and Pickles: Once cooled slightly, fold in shredded cheddar or American cheese and finely chopped dill pickles until evenly combined with the beef mixture.
- Prepare the Wrappers: Keep the spring roll wrappers covered with a damp towel to prevent drying out while you assemble the rolls.
- Assemble the Spring Rolls: Place about 2 tablespoons of the beef filling in the center of each wrapper. Fold the sides inward and roll tightly like a burrito. Seal the edges with the flour and water paste to ensure the rolls stay closed during cooking. Avoid overfilling to prevent bursting.
- Fry the Rolls: Heat oil in a deep pan to 350°F. Fry 3 to 4 rolls at a time for 3 to 4 minutes or until golden brown and crispy. Remove and drain on paper towels.
- Air Fry Option: Alternatively, spritz the assembled rolls lightly with oil and air-fry at 390°F for 10 to 12 minutes, flipping halfway through for even crispness.
- Serve: Serve hot with dipping sauces such as a mix of ketchup and mayonnaise or a blend of sweet chili sauce and sour cream.
- Freeze for Later: Freeze uncooked rolls on a parchment-lined tray, then transfer to a zip-top bag once solid. Cook from frozen by adding 1 to 2 minutes to the fry or air-fry time.
Notes
- Use 80/20 ground beef for the best flavor and moisture balance.
- If you do not have Worcestershire sauce, a splash of soy sauce can be a substitute with slightly different flavor.
- Keep spring roll wrappers covered with a damp towel to prevent them from drying and cracking.
- Do not overfill wrappers to avoid bursts during frying or air frying.
- Drain excess grease from the cooked beef to keep the filling from becoming soggy.
- Air frying reduces oil usage but still yields crispy rolls.
- These spring rolls can be frozen uncooked and cooked directly from frozen with minor adjustments to cooking time.
Nutrition
- Serving Size: 1 spring roll
- Calories: 220 kcal
- Sugar: 2 g
- Sodium: 380 mg
- Fat: 14 g
- Saturated Fat: 6 g
- Unsaturated Fat: 7 g
- Trans Fat: 0 g
- Carbohydrates: 13 g
- Fiber: 1 g
- Protein: 10 g
- Cholesterol: 40 mg


Leave a Reply