There's something magical about the crisp, melt-in-your-mouth texture paired with that cool peppermint zing—and that's exactly why this Festive Peppermint Meringue Cookies Recipe is a must-try for the holidays. These airy cookies bring a refreshing twist to your traditional Christmas cookie platter, and honestly, they're as much fun to make as they are to eat!

Jump to:
- Why You'll Love This Recipe
- Ingredients & Why They Work
- Make It Your Way
- Step-by-Step: How I Make Festive Peppermint Meringue Cookies Recipe
- Top Tip
- How to Serve Festive Peppermint Meringue Cookies Recipe
- Make Ahead and Storage
- Frequently Asked Questions:
- Final Thoughts
- Festive Peppermint Meringue Cookies Recipe
Why You'll Love This Recipe
I remember the first time I made these peppermint meringue cookies—they were simply enchanting! Light as air and beautifully festive with those red and green swirls, they instantly became a holiday tradition in my kitchen. Trust me, once you’ve tried this recipe, you’ll find plenty of reasons to make it a staple in your seasonal baking.
- Light and Airy Texture: These cookies perfectly capture that delicate melt-in-your-mouth feeling that meringues are known for.
- Refreshing Peppermint Flavor: The peppermint extract adds just the right amount of holiday cheer without overpowering the sweetness.
- Fun Festive Colors: Using red and green gel food coloring makes these cookies pop, perfect for gift boxes or party platters.
- Easy to Make: Despite looking elegant, the recipe is straightforward and perfect for bakers of all skill levels.

Ingredients & Why They Work
Each ingredient in this Festive Peppermint Meringue Cookies Recipe plays a crucial role to build that perfect crisp outside and soft, chewy center. I always pay attention to quality here—after all, you want your egg whites to whip up beautifully and the peppermint flavor to shine through without being artificial.

- Egg Whites: Using room temperature eggs helps achieve those fluffy peaks. Just be super careful to avoid yolk contamination, which can prevent the meringue from whipping up properly.
- White Vinegar: Adds stability to the egg whites, helping your meringue keep its shape during baking.
- Cornstarch: Works like a charm to give the cookies a tender interior while maintaining a crisp exterior.
- Caster Sugar: I recommend this finely granulated sugar because it dissolves quickly, helping create a smooth meringue. If you don’t have it, pulse regular sugar in a food processor to make your own.
- Peppermint Extract: The star flavor here. Be sure to use pure extract for the best taste—it really brightens these cookies up.
- Gel Food Coloring: This is my go-to for vibrant reds and greens without watering down the meringue, plus it doesn’t affect the texture.
Make It Your Way
One of the things I love about this Festive Peppermint Meringue Cookies Recipe is how easy it is to personalize! Whether you want to tweak the flavor or add your own touch of festivity, you can easily make these cookies your own.
- Variation: I’ve tried swapping peppermint extract for a splash of almond extract for a different but equally delightful twist—gives the cookies a lovely warmth that’s unexpected but welcome during chilly holiday evenings.
- Dietary Play: These cookies are naturally gluten-free and dairy-free, making them a great choice if you’re baking for friends with dietary needs.
- Color Fun: Instead of the classic red and green, try using silver or gold edible dust on the cookies for a more elegant look—perfect for New Year's celebrations.
Step-by-Step: How I Make Festive Peppermint Meringue Cookies Recipe
Step 1: Whip Up Those Egg Whites to Perfection
Start with clean, dry bowls—any grease will sabotage your soft peaks. Beat the room temperature egg whites on high for about 30 seconds until they become foamy. I like to add the vinegar and cornstarch right after, which helps with stability. Continue beating until soft peaks form. This is the stage where your mixture should look glossy and hold a slight peak when you lift the whisk—no drooping!
Step 2: Sweeten Things Up Slowly
Slowly add your caster sugar in a thin, steady stream. Patience here makes all the difference. Rushing this step could flatten your meringue or give the cookies a grainy texture. Keep beating for about 4 minutes until stiff, glossy peaks form. Test by lifting the whisk—your meringue should stand tall and not slide off.
Step 3: Add Peppermint and Play with Colors
Gently fold in the peppermint extract—you'll smell that festive freshness right away! For the colors, I like to pipe half the mixture with red gel food coloring lines inside the pastry bag, then the other half with green. It’s a simple trick to get those festive swirls without messing up your meringue's structure.
Step 4: Pipe and Bake Low & Slow
Pipe one-inch star-shaped cookies onto parchment-lined sheets. Bake them at a low 200°F (about 93°C) for roughly 80 minutes. Then turn off the oven and let the cookies rest inside for 4 hours or overnight. This slow drying is key—it keeps the cookies crisp but light. Don’t skip this step even if you're impatient; it’s magical!
Top Tip
Through countless batches, here are the tips that saved my cookies and could save yours too!
- Use Room Temperature Eggs: Egg whites whip better and create more volume when they’re not cold.
- Be Sugar Patient: Adding sugar slowly prevents graininess and helps the meringue achieve that perfect glossy texture.
- Check Your Oven Temperature: An oven thermometer is your best friend here—if it’s too hot, your meringues won’t dry properly and can brown.
- Don’t Skip the Overnight Drying: It might feel like a long wait, but letting the cookies rest in the turned-off oven ensures perfect crispness and that classic melt-in-your-mouth consistency.
How to Serve Festive Peppermint Meringue Cookies Recipe

Garnishes
I love serving these with a sprinkle of crushed candy canes on top for extra crunch and pizzazz. Sometimes I carefully dust a few with edible glitter—it adds a subtle sparkle that makes the cookies feel extra special on a festive platter.
Side Dishes
Pair these cookies alongside a warm cup of hot cocoa or minty tea. The coolness of the peppermint cookie complements warm drinks perfectly, making it an ideal cozy combo during cold holiday nights.
Creative Ways to Present
For holiday parties, I often arrange these cookies nestled in decorative tins layered with festive tissue paper or tied with a red velvet ribbon for gifting. Another fun idea is to stack them with layers of white chocolate bark interspersed with peppermint pieces—looks stunning and tastes incredible.
Make Ahead and Storage
Storing Leftovers
I store any leftover meringues in an airtight container at room temperature. They tend to keep well for up to a week if protected from humidity. Trust me, though, these cookies are usually gone much sooner in my house.
Freezing
If you need to freeze them, I recommend placing the cookies in a single layer on a baking sheet to freeze solid before transferring to a sealed container or freezer bag. Thaw at room temperature before serving—it preserves the texture surprisingly well.
Reheating
Reheating isn’t really needed as these cookies are best crunchy and cool, but if they soften, a quick 5-7 minute toast in a low oven (around 175°F) helps them regain some crispness. Just watch carefully to avoid browning or melting the color.
Frequently Asked Questions:
No, powdered sugar is much finer and contains cornstarch which will change the texture of the meringue. If you don’t have caster sugar, pulse granulated white sugar in a food processor until finer, but avoid powder sugar for this recipe.
The vinegar helps stabilize the egg whites, allowing them to hold their volume and maintain stiff peaks during baking and drying. It’s a subtle but important ingredient for success.
First, ensure no traces of yolk or grease contaminated your bowl or whisk. Use a clean, dry bowl and room temperature eggs for best results. Also, make sure you add sugar slowly and beat long enough for stiff peaks to develop.
Store your Festive Peppermint Meringue Cookies in an airtight container at room temperature, away from humidity. Moisture is what makes them soft, so keeping them sealed and dry is key to maintaining crispness.
Final Thoughts
This Festive Peppermint Meringue Cookies Recipe holds a special place in my heart—it’s a recipe that brings lightness and joy to the often rich and heavy holiday spread. I hope you find as much delight in baking and sharing these cookies as I do. So next time you want to treat yourself or impress your holiday guests, grab those egg whites and get whipping. You’re going to create something truly magical!
Print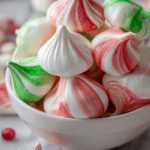
Festive Peppermint Meringue Cookies Recipe
- Prep Time: 15 minutes
- Cook Time: 1 hour 20 minutes
- Total Time: 5 hours 35 minutes
- Yield: 60 cookies
- Category: Dessert
- Method: Baking
- Cuisine: American
- Diet: Vegetarian
Description
These Christmas Meringue Cookies are light, airy, and perfectly sweet with a festive peppermint flavor and colorful swirls. Made from whipped egg whites and sugar, they bake at a low temperature to achieve a crisp, melt-in-your-mouth texture perfect for holiday celebrations.
Ingredients
Meringue Base
- 4 egg whites room temperature
- 1 tablespoon white vinegar
- 1 tablespoon cornstarch
- 1 cup caster sugar
- ¾ teaspoon peppermint extract
Decoration
- Gel food coloring (red and green)
Instructions
- Beat Egg Whites: Beat the egg whites on high speed until foamy, about 30 seconds, to begin incorporating air and creating a light texture.
- Add Vinegar and Cornstarch: Add the white vinegar and cornstarch to the foamy egg whites and continue beating until soft peaks form, which should take about one minute.
- Add Sugar and Peppermint: Slowly add the caster sugar in a steady stream while beating, then stir in the peppermint extract. Beat for about 4 minutes until stiff peaks form, indicating the meringue is glossy and holds its shape.
- Prepare Pastry Bags: Using a pastry bag fitted with a star tip, draw lines inside the bag with red gel food coloring. Fill the bag halfway with half of the meringue mixture.
- Pipe Red Cookies: Pipe one-inch star-shaped cookies onto a parchment-lined baking sheet from the mixture with red coloring.
- Prepare Green Cookies: Repeat the coloring and piping process with the remaining meringue mixture using green gel food coloring.
- Bake: Place the baking sheets in a 200 degree Fahrenheit oven for about 80 minutes. The low temperature gently dries the cookies rather than bakes them.
- Cool and Dry: After baking, turn off the oven and leave the cookies inside for 4 hours or overnight to fully dry and crisp.
- Store: Once cooled completely, store the cookies in an airtight container for up to one week to maintain their crispness.
Notes
- Don’t add the sugar too soon; wait until the egg whites are nice and foamy to ensure proper fluffiness.
- Separate the egg yolks carefully from the whites to avoid any yolk that can prevent stiff peaks.
- Check oven temperature carefully since too hot can ruin the texture by baking instead of drying.
- Meringue cookies are best eaten a few hours after baking but can be stored up to a week airtight.
- You can make caster sugar by pulsing granulated sugar in a food processor; do not use powdered sugar as it is too fine.
Nutrition
- Serving Size: 1 cookie
- Calories: 20 kcal
- Sugar: 3 g
- Sodium: 5 mg
- Fat: 0 g
- Saturated Fat: 0 g
- Unsaturated Fat: 0 g
- Trans Fat: 0 g
- Carbohydrates: 5 g
- Fiber: 0 g
- Protein: 1 g
- Cholesterol: 0 mg


Leave a Reply