There’s something magically indulgent about a creamy, colorful treat during the holidays. This Festive White Chocolate Christmas Fudge Recipe brings together that classic, melt-in-your-mouth texture with bright red and green swirls that scream celebration — perfect for gifting or keeping all to yourself!

Jump to:
- Why You'll Love This Recipe
- Ingredients & Why They Work
- Make It Your Way
- Step-by-Step: How I Make Festive White Chocolate Christmas Fudge Recipe
- Top Tip
- How to Serve Festive White Chocolate Christmas Fudge Recipe
- Make Ahead and Storage
- Frequently Asked Questions:
- Final Thoughts
- Festive White Chocolate Christmas Fudge Recipe
Why You'll Love This Recipe
Honestly, I can’t get enough of making this fudge each Christmas. It’s simple, forgiving, and the colors brightened my kitchen (and spirits) instantly. Here’s why you’ll find yourself making it year after year too.
- Super creamy texture: The white chocolate combined with sweetened condensed milk creates a perfectly smooth, melt-in-your-mouth fudge.
- Festive swirls: The red and green gel colors swirl beautifully and add that classic holiday look right in your own kitchen.
- Simple ingredients: No complicated steps or weird additions—just stuff you probably already have, making it a breeze to whip up last minute.
- Great for gifting: It cuts easily into neat little pieces, perfect for homemade gifts or sharing at holiday parties.

Ingredients & Why They Work
This recipe literally relies on a small handful of ingredients that perfectly complement each other. The high-quality white chocolate chips give you that creamy sweetness, while the sweetened condensed milk adds richness and body. The butter helps with smoothness, and the gel food colorings create those vibrant festive colors without changing the texture.

- White chocolate chips: I prefer brands like Ghirardelli for their smooth melt and rich flavor; avoid cheap chips that can feel waxy.
- Sweetened condensed milk: This thick, sweet milk balances the white chocolate and gives fudge its signature creaminess.
- Unsalted butter: Adding cold cubes helps the fudge set up nicely and keeps the flavor balanced.
- Red gel food coloring: Use gel coloring to get a bright color without affecting the fudge texture.
- Green gel food coloring: Same as red, gel colors work best for mixing in thick chocolate mixtures.
Make It Your Way
One of the best things about this fudge is how you can play around with it. I love swirling in a little peppermint extract sometimes to kick it up a notch or sprinkling crushed candy canes on top for extra crunch. You’ll find your own favorite way to personalize it.
- Peppermint variation: Adding ½ teaspoon of peppermint extract makes the fudge taste like Christmas in a bite—trust me, it’s a crowd-pleaser.
- Dairy-free tweak: Use vegan white chocolate and coconut condensed milk to adapt it for dairy-free friends.
- Less sweet version: Mix in some crushed toasted nuts for texture and less sugar per bite.
Step-by-Step: How I Make Festive White Chocolate Christmas Fudge Recipe
Step 1: Prep Your Pan for Easy Cleanup
Line an 8x8-inch straight-sided baking pan with parchment paper, making sure to have enough overhang on the sides. This little trick is a lifesaver—it lets you lift the whole slab of fudge out easily after it sets, making slicing neat squares so much simpler.
Step 2: Melt and Mix Your Base
Place white chocolate chips, sweetened condensed milk, and cold butter cubes in a medium saucepan over medium-low heat. Stir constantly for about 4–6 minutes until the chocolate melts fully and the mixture becomes silky smooth. I always keep the heat low and stir continually to avoid any grainy texture from overheating or burning.
Step 3: Divide and Add Colors Quickly
Scoop about a third of the warm fudge into a small bowl and stir in the red gel coloring—start with ¼ teaspoon, then add more if you want a deeper shade. Repeat with another third of the fudge and green gel coloring in a separate bowl. The last third stays plain white. Trust me, working fast here helps because the fudge mixture will start to firm up as it cools.
Step 4: Assemble Your Swirled Fudge
Dollop spoonfuls of each colored fudge randomly into the prepared pan. Then use a wooden skewer or butter knife to gently swirl the colors together. Don’t overmix; you want those pretty marbled patterns to show through. For a smooth top, press down lightly with a piece of parchment paper—just be gentle or you’ll flatten your swirls.
Step 5: Chill Until Set
Pop the pan into the fridge and chill for 2 to 3 hours until the fudge is completely set and firm to the touch. Then, use the parchment overhang to lift it out and cut into 1-inch squares—this recipe makes about 64 little pieces. I like to warm my knife briefly under hot water before slicing to get clean cuts.
Top Tip
From my experience, getting the fudge melt just right is key to that luscious texture. I learned the hard way that overheating or rushing the melting stage makes the fudge grainy, so I swear by low heat and constant stirring.
- Constant stirring: Keeps the chocolate smooth and prevents the sugar crystals from separating, ensuring a creamy fudge.
- Gel food coloring over liquid: Liquid colors can change the fudge’s consistency, so gels keep the texture perfect.
- Work quickly with colors: The fudge starts setting fast once off the heat, so adding colors and swirling must be done promptly for best results.
- Use parchment overhang: This makes lifting and cutting your fudge a stress-free moment instead of a sticky mess.
How to Serve Festive White Chocolate Christmas Fudge Recipe

Garnishes
I usually top mine with a sprinkle of crushed candy canes or chopped pistachios—adds a festive crunch and a pop of flavor! Sometimes a light dusting of edible glitter makes it extra special when serving guests.
Side Dishes
It pairs so well with hot cocoa or your favorite spiced holiday coffee. Plus, it’s a delightful companion to fruitcake or gingerbread during a cozy holiday dessert spread.
Creative Ways to Present
For Christmas parties, I like arranging the fudge cubes on pretty vintage plates alongside mini ornaments or pine sprigs for a rustic look. Wrapping small stacks in clear cellophane with a ribbon makes the perfect homemade gift that looks like it came from a candy shop.
Make Ahead and Storage
Storing Leftovers
Store your fudge in an airtight container in the fridge—mine keeps well up to a week and still tastes fresh and creamy. I always separate layers with parchment paper to prevent sticking.
Freezing
Freezing fudge works great! I wrap pieces in wax paper and freeze them in a container for up to 2 months. When ready, thaw in the fridge overnight to keep texture and flavor intact.
Reheating
If your fudge gets a little too firm after refrigeration, just let it come to room temperature before serving, or pop it in the microwave for a few seconds (careful not to melt it!)—it softens up beautifully without losing form.
Frequently Asked Questions:
This particular recipe relies on the creamy mild flavor of white chocolate to balance the sweetness and showcase the festive colors. Using milk or dark chocolate would change the flavor and texture considerably, so I recommend sticking to white chocolate chips for the best results.
Grainy fudge usually means it was overheated or the sugar crystals separated during cooking. To avoid this, always stir over low heat and keep a close eye on your mixture. If it gets grainy, unfortunately, the texture can’t be fixed, but you can try using it as a base for truffles or crumble it over ice cream to avoid waste.
Dollop spoonfuls of red, green, and plain fudge randomly in the pan then use a skewer or knife to gently swirl once or twice. Don’t overmix! The key is to swirl just enough to create pretty marbled patterns without blending all the colors into one.
Absolutely! This fudge keeps beautifully in the fridge for up to a week and can be frozen for a couple of months. I like to make it a few days before a gathering so the flavors meld and it’s ready to slice and serve when guests arrive.
Final Thoughts
This Festive White Chocolate Christmas Fudge Recipe holds a special place in my holiday traditions. It’s quick enough to make on a whim but feels like a real treat that spreads joy with every bite. I hope you enjoy making (and eating!) it as much as I do—happy holidays and happy cooking!
Print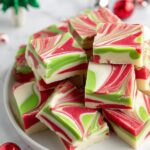
Festive White Chocolate Christmas Fudge Recipe
- Prep Time: 15 minutes
- Cook Time: 6 minutes
- Total Time: 3 hours 15 minutes
- Yield: 64 pieces
- Category: Dessert
- Method: Stovetop
- Cuisine: American
- Diet: Vegetarian
Description
This Christmas Fudge is a festive, colorful treat featuring creamy white chocolate combined with sweetened condensed milk and swirled with vibrant red and green gel food coloring. Perfect for holiday gatherings, this fudge is rich, smooth, and visually appealing with its decorative swirls.
Ingredients
Main Ingredients
- 22 oz white chocolate chips (2 11-oz. bags, Ghirardelli brand recommended)
- 14 ounce can sweetened condensed milk
- 4 tablespoons unsalted butter, cold and cut into small cubes
Coloring
- ¼-½ teaspoon red gel food coloring (Americolor brand recommended)
- ¼-½ teaspoon green gel food coloring (Americolor brand recommended)
Instructions
- Prepare the Pan: Line an 8×8 straight sided baking pan with parchment paper, allowing enough overhang on the sides for easy removal of the fudge after it sets.
- Melt the Mixture: In a medium saucepan over medium-low heat, combine white chocolate chips, sweetened condensed milk, and cold cubes of unsalted butter. Stir constantly for 6 minutes or until all chocolate chips have melted and the mixture is smooth. Remove from heat.
- Color the Red Portion: Transfer one-third of the white chocolate mixture to a small bowl, add red gel food coloring starting with ¼ teaspoon, and stir until the color is uniform with no white streaks.
- Color the Green Portion: Transfer another one-third of the white chocolate mixture to a second small bowl, add green gel food coloring starting with ¼ teaspoon, and stir until the mixture is uniformly colored with no white streaks.
- Combine in Pan: Pour dollops of the plain white, red, and green fudge mixtures randomly into the prepared baking pan until all fudge is used.
- Create Swirls: Use a wooden skewer or butter knife to gently swirl the different colored mixtures to form a decorative pattern on top.
- Smooth the Surface: Using a small piece of parchment paper, gently press down on the fudge while still soft to smooth the top without disturbing the swirl pattern.
- Set the Fudge: Place the baking pan in the refrigerator for 3 hours or until the fudge is fully set.
- Slice and Serve: Once set, lift the fudge out of the pan using the parchment paper overhang, place on a cutting board, and slice into 64 pieces measuring 1×1 inch each. Serve and enjoy.
Notes
- Store fudge in an airtight container in the refrigerator for up to 1 week.
- For longer storage, freeze fudge in an airtight container for up to 2 months. Thaw completely in the refrigerator before serving.
- Line the pan with parchment or waxed paper sprayed with cooking spray or rubbed with butter to prevent sticking.
- Work quickly when adding gel food coloring as the fudge mixture firms up fast after removal from heat.
- If fudge mixture becomes too firm, gently warm the bowls for 15-20 seconds to loosen before assembling.
- Reheat chocolate carefully in short bursts in the microwave, stirring often to prevent burning or seizing.
- Stir the fudge continuously for 6 minutes to ensure smoothness and prevent grainy texture.
- Cut fudge into small pieces since it is very rich; warming the knife before slicing helps create clean edges.
Nutrition
- Serving Size: 1 piece (1x1 inch)
- Calories: 110 kcal
- Sugar: 14 g
- Sodium: 30 mg
- Fat: 6 g
- Saturated Fat: 4 g
- Unsaturated Fat: 2 g
- Trans Fat: 0 g
- Carbohydrates: 14 g
- Fiber: 0.2 g
- Protein: 1 g
- Cholesterol: 10 mg


Leave a Reply