Gluten-Free Chocolate Chip Blondies Recipe are pure magic—think sweet, chewy, and loaded with melty chocolate chips, all without a hint of gluten. They’re a delightfully simple treat that’s perfect when you want something homey but fuss-free, and honestly, they always impress my friends when I bring them along!

Jump to:
- Why You'll Love This Recipe
- Ingredients & Why They Work
- Make It Your Way
- Step-by-Step: How I Make Gluten-Free Chocolate Chip Blondies Recipe
- Top Tip
- How to Serve Gluten-Free Chocolate Chip Blondies Recipe
- Make Ahead and Storage
- Frequently Asked Questions:
- Final Thoughts
- Gluten-Free Chocolate Chip Blondies Recipe
Why You'll Love This Recipe
I've made countless blondie recipes over the years, but this Gluten-Free Chocolate Chip Blondies Recipe stands out. It’s the perfect balance of rich almond butter, subtle sweetness from maple syrup, and plenty of chocolate chips—what's not to love?
- Simple & Allergy-Friendly: Uses almond and tapioca starch for a tender, gluten-free texture without complicated ingredients.
- Perfectly Moist & Chewy: The combination of avocado oil and almond butter keeps them irresistibly soft.
- Chocolate Chip Heaven: Folded and sprinkled with chocolate chips for gooey pockets in every bite.
- Quick & Easy: Ready in about 30 minutes from start to finish—great for busy days or last-minute treats.
Ingredients & Why They Work
These ingredients aren’t just random—they work together so well to give you a blondie that’s tender, flavorful, and everything you hope for in a gluten-free dessert. Some tips on what to look for when you shop can make a big difference, too.

- Almond Flour: Gives the blondies a moist crumb and mild nutty flavor; make sure it’s finely ground for best texture.
- Tapioca Starch: Helps hold the blondies together and adds chewiness—avoid swapping it for cornstarch as the texture changes.
- Baking Soda: Provides just enough lift to keep the blondies tender and light without being cakey.
- Sea Salt: Balances the sweetness and enhances the almond and chocolate flavors.
- Almond Butter: Adds richness and moisture; creamy almond butter blends better and keeps the batter smooth.
- Avocado Oil: Neutral-flavored oil that helps keep the blondies soft without overpowering flavors.
- Maple Syrup: Natural sweetener with a hint of caramel that pairs wonderfully with almond and chocolate.
- Eggs: Bind the ingredients and add structure without heaviness.
- Vanilla Extract: Adds warmth and depth to the overall flavor.
- Chocolate Chips: The star of the show—choose high-quality chips that melt beautifully.
Make It Your Way
I love how adaptable this Gluten-Free Chocolate Chip Blondies Recipe is—over time, I've tweaked it to suit different occasions and cravings. Don't hesitate to make it your own!
- Nut-Free Variation: Try sunflower seed butter instead of almond butter if you're avoiding nuts; I did this once for a friend and it worked like a charm!
- Extra Crunch: Add chopped toasted pecans or walnuts for a little texture contrast—it's a lovely surprise in every bite.
- Darker Chocolate: Swap semi-sweet chips with dark chocolate chunks for a richer, more sophisticated taste.
- Adding Spices: Toss in a pinch of cinnamon or ginger for warming seasonal vibes, especially during cozy fall afternoons.
Step-by-Step: How I Make Gluten-Free Chocolate Chip Blondies Recipe

Step 1: Prep and Mix the Dry Ingredients
First, I preheat my oven to 350°F and line an 18"x13" sheet pan with parchment paper. This size helps the blondies bake evenly without worrying about undercooked centers. Then, in a large bowl, I whisk together almond flour, tapioca starch, baking soda, and sea salt. This ensures everything is evenly distributed before mixing with the wet ingredients.
Step 2: Combine the Wet Ingredients
In a separate bowl, I mix creamy almond butter, avocado oil, maple syrup, eggs, and vanilla extract until smooth. Using a hand mixer or whisk makes this go faster and ensures a silky batter. I’ve learned that mixing the wet ingredients really well first prevents lumps and gives you that luxe texture every time.
Step 3: Bring It All Together
Next, I add the dry ingredients to the wet mixture and stir until thick batter forms. You’ll notice it’s denser than a cookie dough but still scoopable. At this point, I fold in 1 cup of chocolate chips, reserving the rest for later—it’s key for that ooey-gooey finish.
Step 4: Bake and Finish with Chocolate
Pour the batter into the prepared pan and spread it evenly using a spatula. I bake it for 10 minutes, then pull it out to sprinkle the remaining ¼ cup chocolate chips on top. This step creates a beautiful chocolatey crust once it bakes for another 10 minutes. After baking, I let them cool completely before cutting into squares—trust me, this makes slicing neat and keeps the texture perfect.
Top Tip
From my experience, a few simple tricks help you nail the perfect Gluten-Free Chocolate Chip Blondies Recipe every time. These tips helped me avoid pitfalls I encountered early on.
- Right Pan Size: Using the recommended 18"x13" pan is crucial! If you try a smaller one, the blondies get too thick and undercooked in the middle.
- Wait to Add Chocolate Chips on Top: Sprinkling chips halfway through baking keeps them from sinking and makes for a pretty, melty topping.
- Use Room Temperature Wet Ingredients: Cold eggs or almond butter can make the batter lumpy — warming them slightly before mixing works wonders.
- Cool Completely Before Cutting: Blondies firm up as they cool, so rushing this leads to crumbly slices. Patience pays off!
How to Serve Gluten-Free Chocolate Chip Blondies Recipe

Garnishes
I like to keep it simple with a light dusting of powdered sugar or a drizzle of melted dark chocolate on top—makes the blondies feel special without extra effort. Sometimes, a tiny sea salt sprinkle on top right after baking amps up the flavor and balances the sweetness beautifully.
Side Dishes
Pair these blondies with a scoop of vanilla ice cream for a classic combo or a dollop of whipped coconut cream if you want a dairy-free option. A cup of rich coffee or herbal tea rounds out the experience nicely—the perfect afternoon indulgence.
Creative Ways to Present
For parties, I’ve served these blondies cut into bite-sized squares on pretty platters, decorated with fresh berries and mint leaves. It’s an easy way to elevate the presentation. Another time, I layered them with chocolate frosting between the squares to make a sheet pan blondie cake—everyone loved it!
Make Ahead and Storage
Storing Leftovers
I store leftover blondies in an airtight container at room temperature for up to 3 to 4 days. If I want them to last longer, I pop the container in the fridge and that keeps them fresh for about a week. Just remember they’ll firm up a bit, so warming slightly before serving helps.
Freezing
Freezing is a lifesaver for me. I wrap each blondie piece tightly in plastic wrap then place them in a freezer-safe bag. They keep perfectly for up to 3 months, and thawing at room temperature restores their moist texture beautifully.
Reheating
Whenever I reheat frozen or leftover blondies, I pop them in a preheated oven at 325°F for 5 to 7 minutes. This warm-up softens them without drying out. For a quick option, the microwave works—just 15 seconds on medium power is enough to make them taste freshly baked.
Frequently Asked Questions:
Almond flour is key for the moist, tender texture in this recipe, so I recommend sticking with it. However, if you need a substitute, finely ground hazelnut flour or a gluten-free baking blend could work, but you might need to adjust the amount of tapioca starch to get the right consistency.
Adding chocolate chips halfway through baking prevents them from sinking into the batter, creating a nice melty topping that’s visually appealing and adds extra chocolate goodness with every bite.
Yes! To make them nut-free, swap the almond butter for sunflower seed butter. The texture will be slightly different, but I’ve done this successfully for friends with nut allergies and the blondies still turned out moist and delicious.
Store blondies in an airtight container at room temperature for 3-4 days or in the fridge for up to a week. For longer storage, freeze them wrapped individually and thaw at room temperature before serving.
Final Thoughts
This Gluten-Free Chocolate Chip Blondies Recipe quickly became a staple in my kitchen—not just because it’s delicious, but because it’s reliable and easy. Baking these blondies feels like a warm hug on a tray, and every time I share them, I’m met with smiles. You’ll love how effortless they are, and I’m confident they’ll become a favorite for you and those you bake for.
Print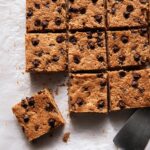
Gluten-Free Chocolate Chip Blondies Recipe
- Prep Time: 10 minutes
- Cook Time: 20 minutes
- Total Time: 30 minutes
- Yield: 16 servings
- Category: Dessert
- Method: Baking
- Cuisine: American
- Diet: Gluten Free
Description
This easy gluten-free chocolate chip blondies recipe features a moist and chewy texture made with almond flour and tapioca starch, sweetened naturally with maple syrup and enriched with creamy almond butter. Perfect for a quick, delicious dessert or snack that everyone can enjoy.
Ingredients
Dry Ingredients
- 1 cup almond flour
- ¾ cup tapioca starch
- 1 teaspoon baking soda
- ¼ teaspoon sea salt
Wet Ingredients
- 1 cup creamy almond butter
- ½ cup avocado oil
- 1¼ cup maple syrup
- 2 large eggs
- 1 teaspoon vanilla extract
Add-ins
- 1¼ cup chocolate chips, divided
Instructions
- Preheat Oven: Preheat your oven to 350 degrees Fahrenheit and line an 18"x13" sheet pan with parchment paper to prepare for easy removal and clean-up.
- Mix Dry Ingredients: In a large bowl, whisk together almond flour, tapioca starch, baking soda, and sea salt until evenly combined.
- Combine Wet Ingredients: In a separate bowl, stir together the creamy almond butter, avocado oil, maple syrup, eggs, and vanilla extract until the mixture is smooth and well blended.
- Form Batter: Pour the dry ingredients into the wet ingredients and mix thoroughly until a thick and uniform batter forms.
- Add Chocolate Chips: Fold in 1 cup of chocolate chips gently to distribute them evenly throughout the batter.
- Spread Batter: Transfer the batter to the prepared sheet pan and spread it evenly with a spatula to ensure an even bake.
- Bake Partially: Bake for 10 minutes in the preheated oven to start the cooking process and set the base of the blondies.
- Add Topping: Remove the pan from the oven and sprinkle the remaining ¼ cup of chocolate chips evenly over the top of the partially baked batter for a pretty, melty finish.
- Finish Baking: Return the pan to the oven and bake for an additional 10 minutes until the blondies are cooked through and golden on top.
- Cool and Serve: Allow the blondies to cool completely in the pan before cutting into squares to serve.
Notes
- Use an 18"x13" sheet pan to ensure even baking; if using a different size pan, adjust baking time accordingly.
- Sprinkling extra chocolate chips halfway through baking prevents them from sinking into the batter and adds a decorative finish.
- Store blondies in an airtight container at room temperature for up to 3 to 4 days or refrigerate for up to one week.
- These blondies freeze well for up to 3 months; wrap individually in plastic wrap and store in an airtight container or freezer bag.
- To serve from frozen, thaw squares and warm in the oven; for an extra indulgence, top with chocolate frosting to turn them into a sheet pan cake.
Nutrition
- Serving Size: 1 square (approx. 2x2 inches)
- Calories: 210 kcal
- Sugar: 14 g
- Sodium: 90 mg
- Fat: 16 g
- Saturated Fat: 2.5 g
- Unsaturated Fat: 12 g
- Trans Fat: 0 g
- Carbohydrates: 18 g
- Fiber: 2 g
- Protein: 4 g
- Cholesterol: 30 mg


Leave a Reply