There’s something incredibly comforting about a classic banana pudding done right — creamy, smooth, and layered with just the right touch of sweetness. This Homemade Banana Pudding Recipe stands out because it’s rich, real, and surprisingly easy to master, making it a dessert I love sharing with friends and family.

Jump to:
Why You'll Love This Recipe
I can honestly say this recipe feels like the perfect balance between old-fashioned charm and modern ease. The flavors meld beautifully without any shortcuts, and once you get the hang of tempering those egg yolks, it’s a total breeze to make.
- Authentic Flavor: This recipe uses real banana extract and vanilla bean paste to give you that deep, luscious taste without artificial aftertastes.
- Smooth, Creamy Texture: Heavy cream, whole milk, and a butter finish create that silky pudding consistency everyone loves.
- Layered Goodness: The combo of homemade pudding, Nilla wafers, and fresh bananas creates this incredible contrast of textures and flavors.
- Make-Ahead Friendly: It gets better overnight, so you can prep ahead and impress without last-minute stress.

Ingredients & Why They Work
This Homemade Banana Pudding Recipe is all about simple, fresh ingredients that combine to create that classic Southern comfort dessert everyone raves about. Each component has its role, from richness to flavor bursts, so it’s worth using quality items where you can.

- Whole milk: Adds the creamy body without being too heavy; fresh whole milk makes a noticeable difference in flavor and texture.
- Heavy whipping cream: This boosts the richness and gives the pudding that silky feel that milk alone just can’t achieve.
- Bourbon (optional): Just a splash adds subtle warmth and depth — it’s my secret ingredient that no one guesses!
- Egg yolks: Crucial for thickening the pudding naturally and adding a luxuriously smooth texture.
- Vanilla bean paste: More flavorful and visually appealing than extract, I always reach for this for that rich vanilla punch.
- Cornstarch: The thickening agent that helps the pudding set perfectly without any graininess.
- Sugar (caster or granulated): Just enough sweetness to balance the bananas and cream but not overpower.
- Salted butter: Adds shine and a slight savory note that elevates the pudding’s flavor.
- Banana/banana cream extract: Intensifies the banana flavor beyond just slices—trust me, this step is a game changer.
- Cream cheese: For the topping, I use full-fat brick cream cheese for that rich, tangy contrast to the sweet pudding.
- Cool Whip: It lightens and sweetens the topping, making it airy and luscious.
- Sweetened condensed milk: Adds body and extra sweetness, making the topping dreamy without being heavy.
- Nilla wafers: Classic and perfect for layering—they soften slightly but still hold a bit of crunch.
- Bananas (sliced): Fresh and ripe but firm bananas provide natural sweetness and freshness.
- Fresh mint leaves (optional): For a pop of color and a refreshing hint when serving.
Make It Your Way
One of the things I love most about this Homemade Banana Pudding Recipe is how flexible it is. You can easily tweak sweetness, swap toppings, or even adjust for dietary needs without losing that classic feel.
- Variation: Sometimes I like to add a dash of cinnamon or nutmeg to the pudding for a hint of warmth, especially in cooler months — it’s delicious and cozy.
- Dairy-free option: Swap whole milk and cream for coconut milk and use a dairy-free cream cheese alternative; the pudding still turns out great, just a slightly different flavor.
- Make it mini: I’ve also assembled individual parfaits in small jars for parties — they’re super cute and perfect for portion control.
- Extra crunch: For a textural twist, try sprinkling chopped toasted pecans between the layers for a nutty surprise.
Step-by-Step: How I Make Homemade Banana Pudding Recipe
Step 1: Gently Heat The Creamy Base
Start by combining your whole milk, heavy cream, and if you’re feeling adventurous, a splash of bourbon in a saucepan over medium-high heat. Keep an eye on it and warm until it’s barely simmering — you want it hot but not boiling, which takes about 5-7 minutes. This step sets the stage for a rich, velvety pudding that’s not too heavy but still indulgent.
Step 2: Whisk Together Your Egg Yolks Mixture
While your cream mix heats, whisk together the egg yolks, vanilla bean paste, cornstarch, and sugar in a separate bowl. Aim for a smooth, consistent paste — it should be thick but pourable. This mixture will thicken your pudding without turning it into scrambled eggs, so a thorough whisk is key here.
Step 3: Temper The Egg Yolks
This is where many home cooks feel a bit nervous, but it’s easier than you think! Slowly add a tablespoon of your hot cream mixture into the egg yolks, stirring immediately to combine. Repeat this 2-3 times so the egg yolks gently warm up without cooking too quickly. Tempering prevents lumps and ensures a silky pudding — don’t rush, take it slow!
Step 4: Cook the Pudding Until Thickened
Pour the tempered egg yolk mixture back into the saucepan with the remaining cream on medium heat. Whisk constantly — this is critical to avoid curdling. After about 4-5 minutes, you’ll notice the pudding thickening up beautifully. Remove from heat before it gets too thick; the butter and banana extract you add next will enrich and smooth out the pudding perfectly.
Step 5: Chill The Pudding
Pour your finished pudding into an airtight container and press plastic wrap directly onto its surface to keep a skin from forming. Pop it in the fridge for at least 4 hours, but overnight is ideal — this resting time lets the flavors meld and the pudding set to the perfect consistency.
Step 6: Make The Creamy Topping
Using a handheld mixer, blend room-temperature cream cheese, Cool Whip, sweetened condensed milk, and vanilla bean paste until smooth and fluffy. If you don’t have Cool Whip on hand, you can substitute with freshly whipped cream sweetened lightly with sugar. This topping is the light, sweet contrast that makes the whole dish sing.
Step 7: Layer Your Banana Pudding
Get creative! Whether you use a trifle bowl, baking dish, or individual glasses, start layering with pudding, Nilla wafers, creamy topping, and banana slices. Repeat until you reach the top, finishing with some topping and a few wafer crumbs for texture. Let it chill for at least an hour to let all those flavors marry before serving.
Top Tip
From personal experience, I’ve learned that the most important part of this Homemade Banana Pudding Recipe is patience and steady heat when cooking the pudding. Rushing or heating too fast leads to lumps or scrambled eggs, which nobody wants! Taking your time really pays off.
- Temperature control: Keep your heat medium-low when whisking the pudding and stir constantly for the smoothest texture.
- Plastic wrap hack: Pressing it directly on the pudding surface stops the dreaded skin from ruining your silky finish.
- Use fresh bananas: Make sure your bananas are ripe but not overly soft — they should hold their shape and texture between layers.
- Chill time is key: I recommend refrigerating the assembled pudding for at least an hour before serving so the wafers soften just enough without becoming soggy.
How to Serve Homemade Banana Pudding Recipe

Garnishes
I usually keep it simple and elegant with a few fresh mint leaves on top — it adds a little pop of color and a refreshing note that balances all that creamy richness. If I’m feeling fancy, I might sprinkle crushed Nilla wafers or lightly toasted pecans for extra crunch.
Side Dishes
This pudding shines on its own, but if you’re pairing it with something else for a potluck or dinner party, try light, crisp options like a citrusy salad or roasted seasonal veggies to contrast the richness.
Creative Ways to Present
For a special occasion, I love serving this layered in clear parfait glasses or mason jars — guests can see all the beautiful layers, and it feels more personal. You can even top with a small scoop of vanilla ice cream or a drizzle of caramel sauce for a decadent finish.
Make Ahead and Storage
Storing Leftovers
I store leftovers in an airtight container in the fridge, and the pudding stays fresh up to 3 days. The wafers tend to soften over time, so if you like a little crunch, it’s best to assemble just before serving when possible.
Freezing
I've tried freezing this pudding, but the texture changes a bit — the bananas soften too much and the pudding loses some of its creaminess. I’d recommend enjoying it fresh or refrigerated instead for the best experience.
Reheating
This dessert is best served chilled, but if you want to warm it slightly, take small portions out and let them come to room temperature naturally. Heating in the microwave tends to break down the pudding texture, so I usually avoid reheating.
Frequently Asked Questions:
While the eggs are essential for the pudding’s thickness and texture in this recipe, you can try substituting with a cornstarch-based custard for an eggless version. Just keep in mind flavors and texture might differ.
Choose bananas that are ripe but still firm enough to hold their shape when sliced. Overripe bananas tend to turn mushy and can cause the pudding to become too soft.
Absolutely! While Nilla wafers are classic, you can use shortbread cookies, graham crackers, or even crushed vanilla-flavored cookies for a twist. Just be aware these alternatives may absorb moisture differently.
The bourbon is optional and adds a subtle warmth and complexity, but it doesn’t make the pudding taste boozy. If you prefer a non-alcoholic version, simply leave it out.
Final Thoughts
This Homemade Banana Pudding Recipe has become one of my all-time favorites for good reason — it’s comforting, nostalgic, and just genuinely delicious without any fuss. I hope you enjoy making it as much as I do, and it becomes a go-to dessert that brings a little extra warmth and sweetness to your home.
Print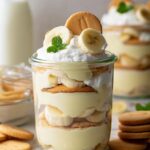
Homemade Banana Pudding Recipe
- Prep Time: 25 minutes
- Cook Time: 10 minutes
- Total Time: 35 minutes
- Yield: 6 servings
- Category: Dessert
- Method: Stovetop
- Cuisine: American Southern
- Diet: Vegetarian
Description
This homemade banana pudding recipe combines a creamy, rich pudding base with layers of Nilla wafers, fresh banana slices, and a luscious cream cheese topping. Chilled to perfection, this classic Southern dessert is perfect for gatherings or a comforting treat at home.
Ingredients
Banana Pudding
- 2 cups whole milk
- 1 cup heavy whipping cream
- 1 tablespoon bourbon (optional)
- 5 large egg yolks
- 1 tablespoon vanilla bean paste
- ¼ cup cornstarch
- ½ cup caster sugar (or granulated sugar)
- ¼ cup salted butter, cut into cubes
- 1 tablespoon banana or banana cream extract
Creamy Topping
- 8 ounces full-fat brick cream cheese, room temperature
- 8 ounces Cool Whip, room temperature
- ½ cup sweetened condensed milk
- 1 tablespoon vanilla bean paste
Banana Pudding Assembly
- 1 (11-ounce) box Nilla wafers
- 4 medium bananas, sliced into ½-inch thick coins
- Fresh mint leaves, for garnish (optional)
Instructions
- Heat the dairy mixture: In a saucepan over medium-high heat, combine the whole milk, heavy cream, and optional bourbon. Heat the mixture until it is barely hot but not bubbling, about 7 minutes.
- Prepare the egg mixture: In a medium bowl, whisk together the egg yolks, vanilla bean paste, cornstarch, and sugar until fully combined and thickened to a paste-like consistency.
- Temper the egg yolks: Slowly add a tablespoon of the hot milk mixture to the egg yolk mixture while stirring to temper the eggs. Repeat this process 2-3 more times to prevent curdling.
- Combine and thicken the pudding: Remove the saucepan from heat but keep it on the stove. Pour the tempered egg yolk mixture into the hot milk mixture and whisk constantly for about 2 minutes to avoid cooking the eggs. Return the pan to medium heat and whisk continuously until the pudding thickens, about 5 minutes.
- Add butter and flavor: Remove from heat, then immediately stir in the cubed butter and banana extract until the butter has melted and the mixture is smooth.
- Chill the pudding: Transfer the pudding to an airtight container. Press plastic wrap directly onto the surface of the pudding to prevent skin from forming, then cover the container and refrigerate for at least 4 hours or preferably overnight.
- Make the creamy topping: In a large bowl, beat together the softened cream cheese, Cool Whip, sweetened condensed milk, and vanilla bean paste using a handheld mixer until smooth and well combined.
- Assemble the banana pudding: In a large trifle dish or individual glasses, layer the pudding, Nilla wafers, creamy topping, and sliced bananas. Repeat the layering until you reach the top, finishing with the creamy topping and a few Nilla wafer crumbs.
- Chill before serving: Refrigerate the assembled pudding for at least 1 hour to allow flavors to meld.
- Garnish and serve: Optionally, garnish with fresh mint leaves before serving. Enjoy your homemade banana pudding!
Notes
- Use ripe but firm bananas to prevent browning and mushiness in the pudding.
- For an adult twist, the bourbon adds a subtle flavor but can be omitted for kids or alcohol-free versions.
- Pressing plastic wrap onto the pudding surface while chilling prevents a skin from forming and keeps it creamy.
- The pudding can be assembled in individual ramekins for portion control or in one large dish for gatherings.
- Leftovers can be stored covered in the refrigerator for up to 3 days.
Nutrition
- Serving Size: 1 cup
- Calories: 350 kcal
- Sugar: 35 g
- Sodium: 180 mg
- Fat: 20 g
- Saturated Fat: 12 g
- Unsaturated Fat: 7 g
- Trans Fat: 0.5 g
- Carbohydrates: 40 g
- Fiber: 2 g
- Protein: 6 g
- Cholesterol: 150 mg


Leave a Reply