There’s something incredible about tearing into a golden, perfectly roasted bird that’s bursting with juicy flavor and topped with crispy, irresistible skin. That’s exactly what you get with this Juicy Spatchcock Chicken with Crispy Skin Recipe. It’s a game-changer for dinner — super flavorful, simple to make, and always a crowd-pleaser.

Jump to:
- Why You'll Love This Recipe
- Ingredients & Why They Work
- Make It Your Way
- Step-by-Step: How I Make Juicy Spatchcock Chicken with Crispy Skin Recipe
- Top Tip
- How to Serve Juicy Spatchcock Chicken with Crispy Skin Recipe
- Make Ahead and Storage
- Frequently Asked Questions:
- Final Thoughts
- Juicy Spatchcock Chicken with Crispy Skin Recipe
Why You'll Love This Recipe
I first tried this method of spatchcocking chicken a few years ago, and it completely changed how I roast chicken forever. The magic is in flattening the bird – it cooks faster and more evenly, so you get juicy meat and that coveted crispy skin every time.
- Speedy Cooking: Flattening the chicken means it roasts in less time than a whole bird, freeing you up sooner for other things (hello, wine time!).
- Perfect Crispy Skin: The spatchcock technique exposes more surface area to heat, giving you that restaurant-worthy crackling skin.
- Flavor-Packed: By rubbing seasoning under the skin and marinating, the chicken soaks up every note of spice and herb.
- Show-Stopping Presentation: Serving a flattened bird looks fun and impressive, especially for family dinners or weekend gatherings.
Ingredients & Why They Work
Every ingredient in this Juicy Spatchcock Chicken with Crispy Skin Recipe plays a vital role, from the herbs that add fragrant brightness to the chicken seasoning that creates that irresistible crust. Choosing quality ingredients makes all the difference, and buying fresh thyme and good broth really elevates the flavors.
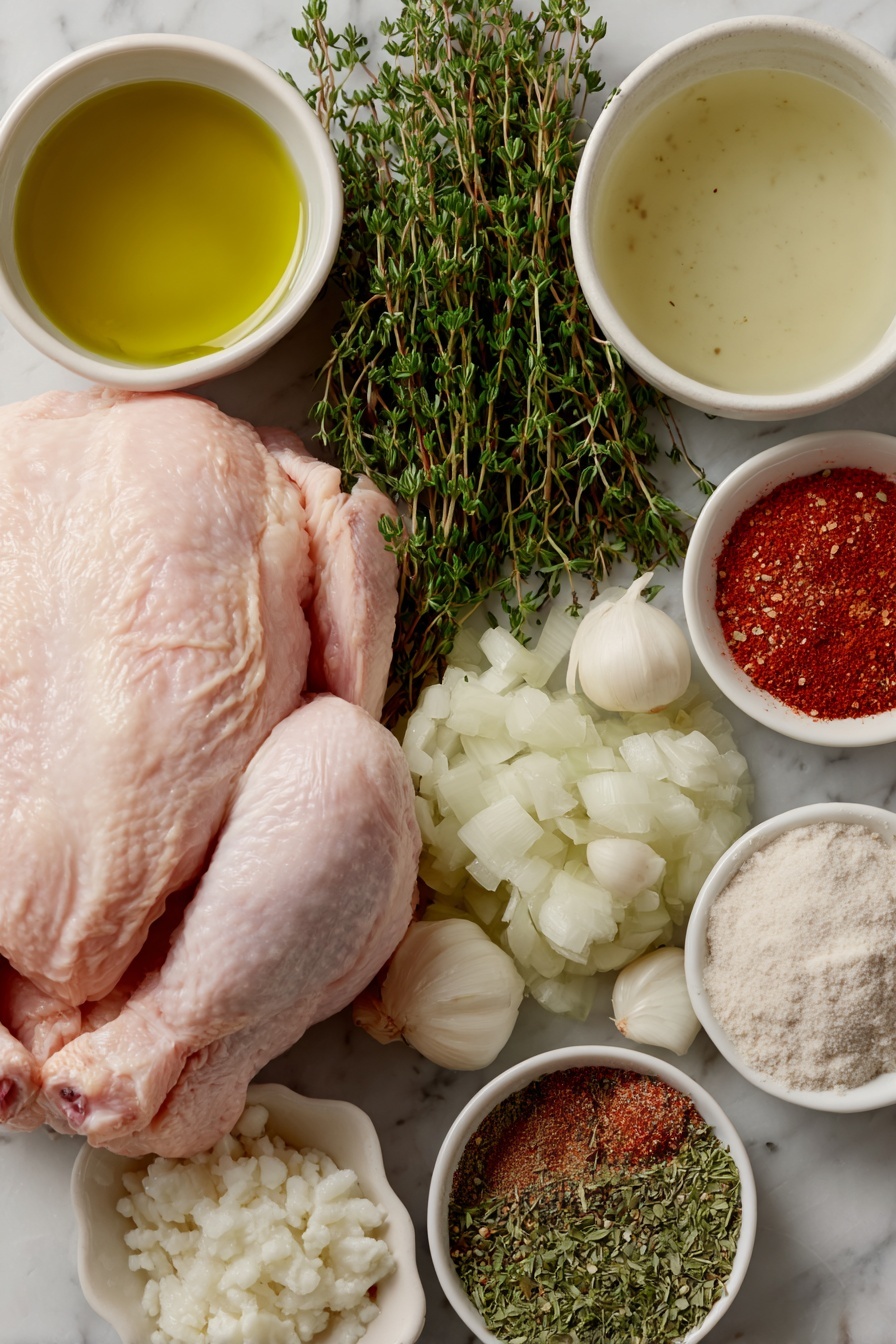
- Whole chicken: Opt for a fresh 3-4 pound bird for the best roasting results and tenderness.
- Salt: Separating salt into steps helps season under the skin and on the surface for balanced flavor and skin crisping.
- Olive oil: This helps the skin brown beautifully and keeps the meat luscious.
- White onion and garlic: Roasting these under the chicken infuses the pan juices with savory sweetness and aromatics.
- Fresh thyme: Adds a clean, herby note that complements the chicken’s natural flavor.
- Dry white wine: Elevates the pan sauce with acidity and depth.
- Broth: Keeps the sauce rich and layered; chicken or vegetable broth works best.
- Lemon juice: Brightens the sauce with a fresh zing.
- Cornstarch: Thickens the pan sauce for a perfect finishing touch.
- Chicken seasoning blend: The combo of garlic powder, chili powder, cumin, herbs, and brown sugar creates that signature sweet-spicy crust.
Make It Your Way
One of my favorite things about this Juicy Spatchcock Chicken with Crispy Skin Recipe is how easy it is to make your own by swapping herbs or adjusting the seasoning heat level. Experimenting in the kitchen is where the fun really starts!
- Variation: I’ve added smoked paprika and a pinch of cayenne for a smoky, spicy twist that’s a hit on game day.
- Herbs swap: Try rosemary instead of thyme if you want a piney aroma.
- Acid alternative: Swap lemon juice with a splash of apple cider vinegar in the sauce for a sharp tang.
- Make it dairy-free: This recipe is naturally dairy-free — perfect for everyone at your table.
Step-by-Step: How I Make Juicy Spatchcock Chicken with Crispy Skin Recipe
Step 1: Prep Your Chicken for Success
Start by mixing all your chicken seasoning spices in a bowl while you get your chicken ready. Next, place the chicken breast-side down on a sturdy board. Take a pair of really sharp kitchen shears and carefully cut down each side of the spine to remove it—this is called spatchcocking. Don’t toss the spine—it makes great stock! Flip the chicken over and press firmly on the breastbone to flatten the bird. This is key for even cooking and getting that wonderful crispy skin.
Step 2: Season Under the Skin & Marinate
Carefully slide your fingers under the skin and sprinkle 1 teaspoon of salt directly onto the meat—this deep seasoning really boosts flavor and helps dry the skin. Rub the rest of the spice blend all over the chicken, making sure every spot is covered. Then pop it in the fridge for at least 15 minutes, but if you have the time, a couple of hours will make the flavors sing and the skin crisp better.
Step 3: Roast to Golden Perfection
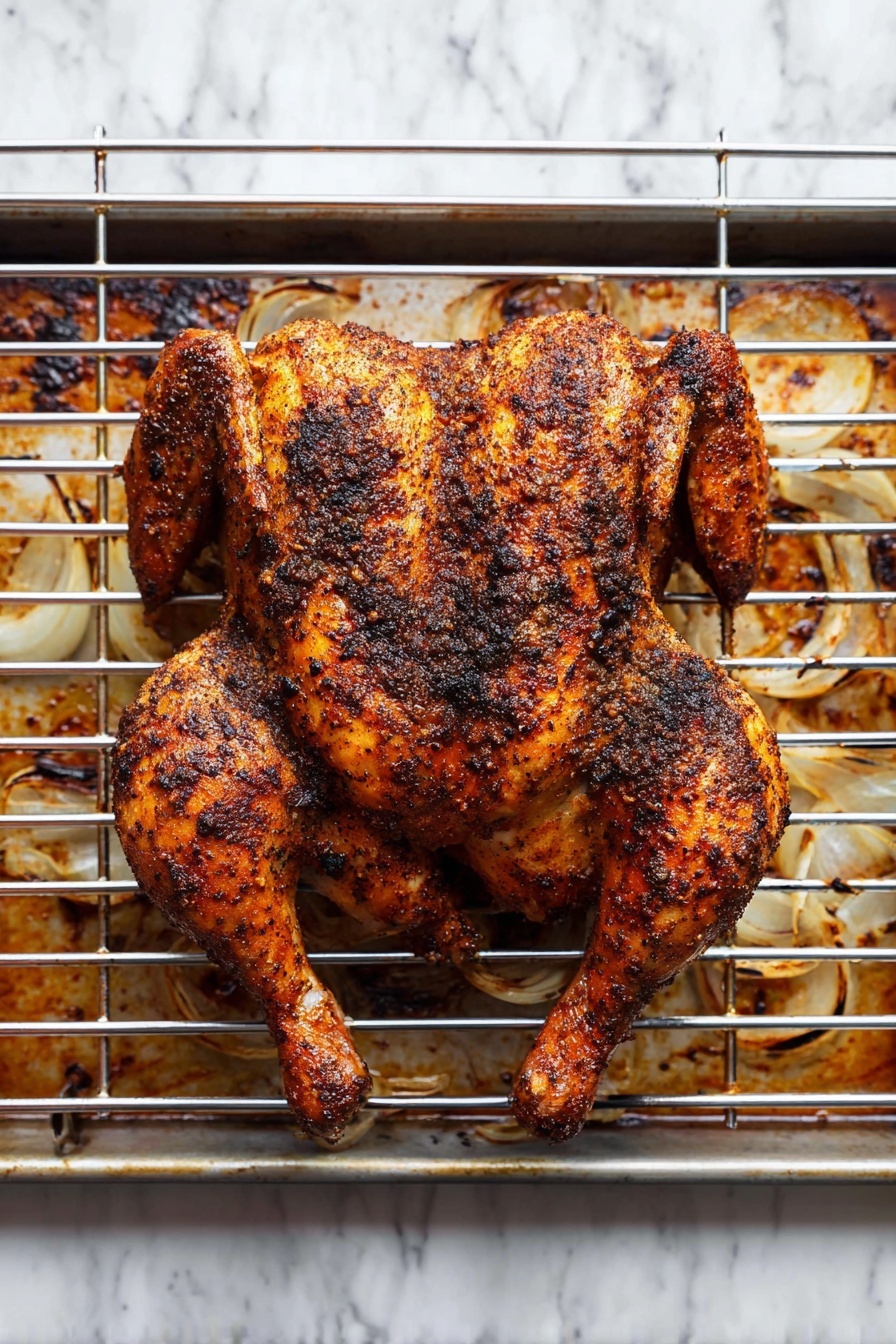
Preheat your oven to 425ºF and line a baking sheet with foil. Toss onion, garlic, thyme, white wine, broth, olive oil, and a pinch of salt onto the foil. Place a metal rack on top—this lets air circulate under the chicken so the skin crisps perfectly. Set the chicken breast-side up on the rack and massage the remaining olive oil into the skin. Roast for 35-45 minutes—use a meat thermometer to check for 160ºF in the thickest part of the thigh. Rest the chicken for 15 minutes so juices redistribute (it’ll keep cooking a little more, reaching 165ºF).
Step 4: Make the Pan Sauce
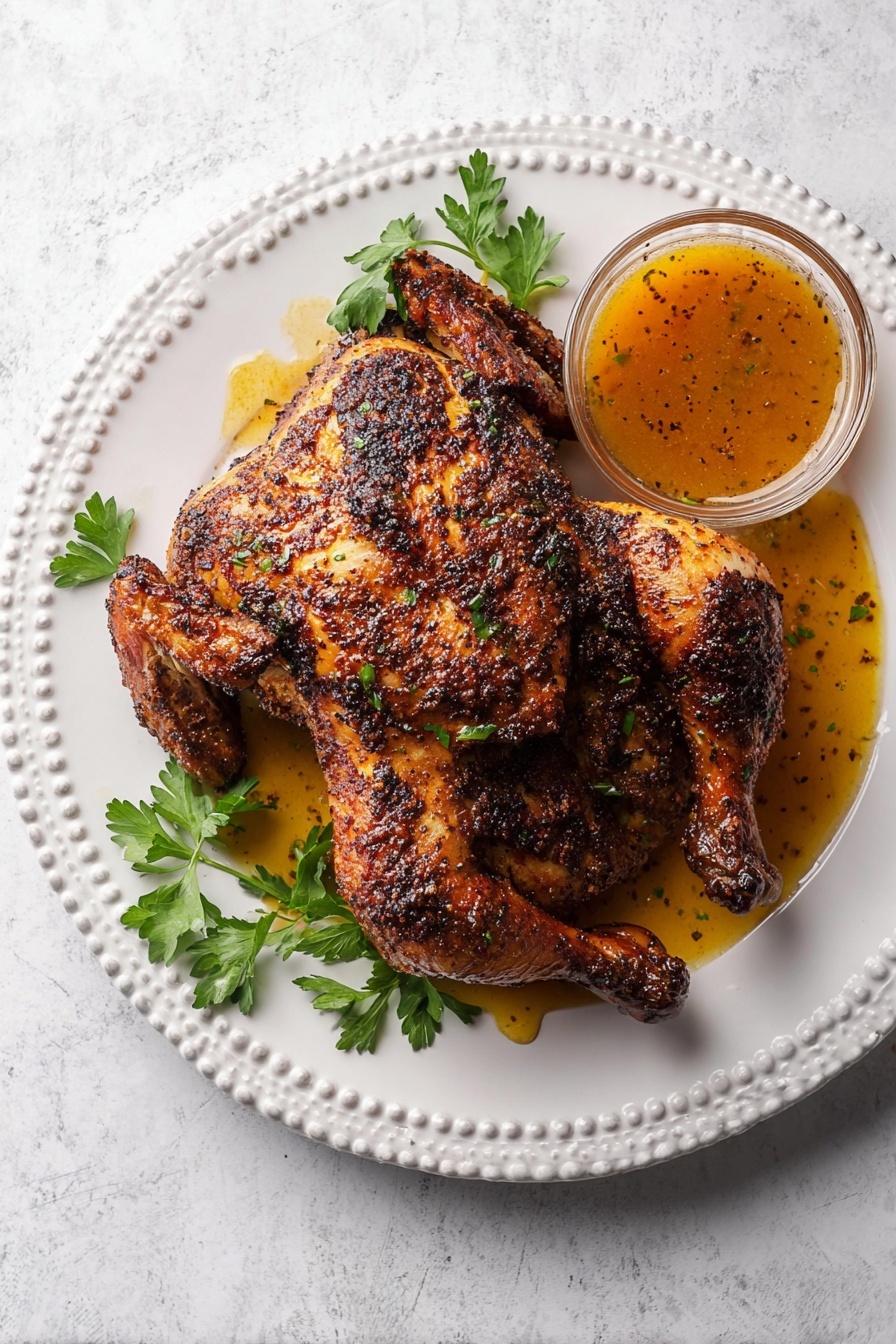
While the chicken rests, pour all those tasty veggies and juices from the baking sheet into a small saucepan along with the remaining broth. Bring to a boil, then simmer and whisk in lemon juice and cornstarch to thicken. Strain out the thyme stems, and you’ve got a luscious, flavorful sauce to drizzle.
Top Tip
From cooking this Juicy Spatchcock Chicken with Crispy Skin Recipe loads of times, I’ve learned a few tricks that make all the difference between “meh” and wow-worthy.
- The Chill Factor: Don’t skip refrigerating your seasoned chicken—it helps the spices penetrate and the skin dry out for that perfect crisp.
- Sharp Tools Are a Must: Using very sharp kitchen shears for spatchcocking makes cutting easier and safer, plus cleaner cuts.
- Rack It Up: Always roast on a metal rack so hot air surrounds the chicken evenly for golden, crackly skin.
- Use a Thermometer: Checking the internal temp stops you from overcooking and ensures juicy, tender meat every time.
How to Serve Juicy Spatchcock Chicken with Crispy Skin Recipe
Garnishes
I love finishing this chicken with a sprinkle of fresh thyme leaves and a few twists of black pepper—it adds freshness and a pop of color. Sometimes, a quick zest of lemon over the top really wakes up the flavors. It looks simple but elevates the whole plate beautifully.
Side Dishes
This recipe pairs wonderfully with roasted root veggies or a crisp green salad for balance. My go-to is garlic mashed potatoes or creamy polenta—it’s the perfect base to soak up that luscious pan sauce. For something lighter, steamed green beans with a drizzle of olive oil and lemon juice works like a charm.
Creative Ways to Present
When hosting, I like to carve the spatchcock chicken into quarters and arrange on a rustic wooden board, surrounded by roasted veggies and lemon wedges. It’s casual, colorful, and inviting. Adding edible flowers or fresh herbs really adds to the wow factor when friends come over!
Make Ahead and Storage
Storing Leftovers
I usually store any leftover chicken in an airtight container in the fridge for up to 3 days. Make sure the chicken is fully cooled before sealing it to keep the skin from getting soggy.
Freezing
If you want to freeze, carve the meat off the bones and store it separately from the skin and bones. Wrap tightly in plastic wrap and freeze for up to 2 months. This way, you avoid freezer burn and keep texture intact.
Reheating
To reheat, I recommend warming the chicken in a 350ºF oven on a baking tray for 10-15 minutes, uncovered. This helps revive the skin crispness. Avoid microwaving if you can—it makes the skin soggy, unfortunately.
Frequently Asked Questions:
Spatchcocking means removing the backbone of the chicken and flattening it out, allowing it to cook more evenly and faster. It also exposes more skin to heat, resulting in a crispier finish.
Yes! Spatchcocking works well with other poultry like turkey or Cornish hens, although cooking times and seasoning amounts will need to be adjusted accordingly.
Drying the skin by refrigerating the seasoned bird uncovered helps. Roasting the chicken on a wire rack so air circulates underneath is key, as is massaging olive oil into the skin before baking at a high temperature.
Absolutely! Marinating overnight in the fridge intensifies the flavors and further dries the skin, resulting in even better taste and crispiness. Just cover loosely to keep the skin dry.
Final Thoughts
This Juicy Spatchcock Chicken with Crispy Skin Recipe has become my go-to for any occasion where I want flavorful food with minimal fuss. It brings so much joy to the table – both in how stunning it looks and in every juicy bite. Seriously, give this recipe a try; you’ll end up impressing yourself and anyone lucky enough to share this feast with you.
Print
Juicy Spatchcock Chicken with Crispy Skin Recipe
- Prep Time: 25 minutes
- Cook Time: 45 minutes
- Total Time: 1 hour 10 minutes
- Yield: 4 servings
- Category: Main Course
- Method: Baking
- Cuisine: American
Description
This spatchcock chicken recipe delivers a perfectly crispy and juicy roast chicken with a flavorful herb and spice rub. Flattening the bird ensures even cooking and crispy skin, while a delicious pan sauce made from roasted vegetables and broth complements the tender meat. Ideal for a satisfying dinner, this method uses an oven bake at high heat for quick roasting.
Ingredients
Main Ingredients
- 3 – 4 lb. whole chicken
- 1.5 teaspoon salt, separated
- 3 tablespoons olive oil, separated
- ½ white onion, chopped
- 4 cloves garlic, peeled and smashed
- 10 sprigs fresh thyme
- ¼ cup dry white wine
- 1.5 cups broth, any kind (separated)
- 2 teaspoons lemon juice
- 2 teaspoons cornstarch
Chicken Seasoning
- 2 teaspoons garlic powder
- 1 teaspoon chili powder
- 1 teaspoon cumin
- 1 teaspoon dried thyme
- 1 teaspoon ground mustard
- 1 teaspoon dried basil
- ½ teaspoon ground pepper
- ½ teaspoon red pepper flakes
- ½ teaspoon sea salt
- ½ teaspoon paprika
- 1 teaspoon brown sugar
Instructions
- Prepare Chicken Seasoning: Mix together all the spices listed under chicken seasoning in a bowl and set aside.
- Prepare the Chicken: Remove the whole chicken from packaging and pat it dry with paper towels to remove excess moisture.
- Spatchcock the Chicken: Place the chicken breast-side down on a cutting board. Using sharp kitchen shears, cut along one side of the spine from top to bottom through ribs, then repeat on the other side. Remove and discard the spine.
- Flatten the Chicken: Flip the chicken over so breast-side up and press down firmly with your hands on the breastbone to flatten the bird evenly.
- Season Under the Skin: Carefully loosen the chicken skin and rub 1 teaspoon salt directly on the meat underneath to season it thoroughly.
- Season the Whole Chicken: Rub the prepared chicken seasoning all over the skin, legs, thighs, and other exposed surfaces. Refrigerate the seasoned chicken for at least 15 minutes, preferably for 2 hours, to allow flavors to absorb and skin to dry.
- Preheat Oven and Prepare Pan: When ready to cook, preheat the oven to 425ºF. Line a baking sheet with aluminum foil.
- Arrange Vegetables and Herbs: Spread chopped onion, garlic cloves, fresh thyme, white wine, ½ cup broth, 1 tablespoon olive oil, and ½ teaspoon salt on the foil-lined baking sheet.
- Place Chicken on Rack: Set a metal rack over the vegetables on the baking sheet and place the flattened chicken breast-side up on top of the rack.
- Oil the Chicken: Massage the remaining 2 tablespoons olive oil thoroughly into the chicken skin.
- Bake the Chicken: Roast in the oven at 425ºF for 45 minutes or until an internal thermometer inserted into the thickest part reaches at least 160ºF.
- Rest the Chicken: Remove the chicken from the oven and let it rest for at least 15 minutes to allow the internal temperature to rise to 165ºF and juices to redistribute.
- Prepare the Pan Sauce: Transfer the cooked vegetables, herbs, and liquid from the bottom of the pan into a small saucepan. Add the remaining 1 cup broth. Bring to a boil, then reduce heat to medium-low. Stir in lemon juice.
- Thicken the Sauce: Gradually whisk in cornstarch and simmer until the sauce thickens. Remove herb stems and discard.
- Serve: Carve the chicken and serve with the flavorful pan sauce.
Notes
- For best flavor and crisp skin, refrigerate the seasoned chicken for the full 2 hours before roasting to allow the spices to penetrate and skin to dry.
- Using a wire rack on the baking sheet is crucial for crispy skin as it prevents the chicken from sitting in juices during roasting.
- Use a meat thermometer to check doneness to avoid undercooking or overcooking the chicken.
- If you don't have white wine, substitute with additional broth or an equal amount of white grape juice.
- Resting the chicken after baking is important so the internal temperature rises to the safe 165ºF marking and the juices stay locked in.
Nutrition
- Serving Size: 1 serving
- Calories: 450 kcal
- Sugar: 2 g
- Sodium: 700 mg
- Fat: 28 g
- Saturated Fat: 6 g
- Unsaturated Fat: 20 g
- Trans Fat: 0 g
- Carbohydrates: 4 g
- Fiber: 1 g
- Protein: 40 g
- Cholesterol: 120 mg


Leave a Reply