There’s something magical about the way mint and chocolate dance together, especially in a classic, eye-catching design. This Mint Chocolate Checkerboard Cookies Recipe isn’t just a feast for your taste buds—it doubles as a fun, creative baking project that’ll make you proud every time.

Jump to:
- Why You'll Love This Recipe
- Ingredients & Why They Work
- Make It Your Way
- Step-by-Step: How I Make Mint Chocolate Checkerboard Cookies Recipe
- Top Tip
- How to Serve Mint Chocolate Checkerboard Cookies Recipe
- Make Ahead and Storage
- Frequently Asked Questions:
- Final Thoughts
- Mint Chocolate Checkerboard Cookies Recipe
Why You'll Love This Recipe
I remember the first time I made these cookies: the thrill of seeing the checkerboard pattern appear slice by slice never got old. This recipe captures that same joy I felt and translates it into a delicious, minty-chocolate combo that’s surprisingly approachable for home bakers.
- Striking Visual Appeal: The checkerboard design makes your cookies look bakery-fabulous without complicated decorating skills.
- Perfect Flavor Harmony: The refreshing mint balances beautifully with rich chocolate, making these cookies irresistible.
- Fun Hands-On Baking: Assembling the dough strips is a tactile, satisfying experience that’s great if you like to get creative in the kitchen.
- Flexible & Friendly: The dough is forgiving and easy to work with, so even if you’re new to shaped cookies, you’ll get great results with a little patience.
Ingredients & Why They Work
This Mint Chocolate Checkerboard Cookies Recipe uses straightforward ingredients that blend smoothly for that perfect texture and flavor. A few little tips on picking and prepping them can really elevate your cookie game.

- All-purpose flour: The sturdy base, spooned and leveled for accuracy, gives structure while keeping the dough tender.
- Baking powder: Provides a subtle lift that stops the cookies from being too dense.
- Salt: Enhances the sweetness and balances the flavors.
- Unsalted butter: Softened to room temperature for perfect creaming; this adds richness and a melt-in-your-mouth texture.
- Granulated sugar: Sweetens and helps create that slight crunch on the outside.
- Egg & egg yolk: Adds moisture, binds the dough, and helps with tenderness; save the extra egg white for a shiny sugar-coated finish.
- Vanilla extract: Brings warmth and rounds out both the mint and chocolate notes.
- Peppermint extract: The star of the mint dough that delivers that refreshing zing without overpowering.
- Green food dye (optional): Just a drop or two enhances the mint dough’s appearance without going overboard.
- Cocoa powder: Rich unsweetened cocoa deepens the chocolate flavor; Dutch-process works great here.
- Milk: Adds a little moisture to balance the cocoa and keep the dough pliable.
- Espresso powder (optional): A secret booster that intensifies chocolate flavor without tasting like coffee.
Make It Your Way
Personally, I love playing with the intensity of the mint and chocolate—sometimes adding a bit more peppermint extract or trying a dark cocoa for a richer contrast. Feel free to customize the checkerboard size to fit your style or occasion.
- Variation: I experimented once by swapping peppermint with orange extract, which made for a festive twist—though classic mint-chocolate is still my favorite!
- Dietary tweaks: For a dairy-free version, I swapped butter with coconut oil and made sure to use dairy-free milk; the texture changes slightly but still delicious.
- Color play: Beyond traditional green, try pastels for spring or red for Christmas to make these cookies perfect for any party theme.
Step-by-Step: How I Make Mint Chocolate Checkerboard Cookies Recipe

Step 1: Mixing the Base Dough
Start by whisking together your flour, baking powder, and salt—this keeps the dry ingredients even throughout the dough. Using a stand mixer or hand mixer, I cream softened butter with sugar on medium-high for about 3 minutes until it’s light and fluffy. Then I add the egg, extra yolk, and vanilla, beating just until everything is combined. Make sure to scrape down the sides so nothing’s left behind—it really helps get a smooth, cohesive dough.
Step 2: Divide and Flavor
The dough is thick and sticky here—perfect. Split it evenly, then add peppermint extract (and green dye if you like) to one half. On the other half, whisk in cocoa powder, milk, and a hint of espresso powder. Mix each until well combined but don’t overwork the dough.
Step 3: Shape, Chill & Slice
This is the fun part: shape each dough half into a rectangular block—about 6 inches long and 2 inches thick. Chill them just enough to firm up without becoming rock solid, about an hour. Then slice each block into strips and carefully arrange the strips in alternating mint and chocolate patterns. Press the strips tight so the checkerboard pattern stays crisp. Wrap the blocks and chill again for at least 2 hours—this step sets the structure so your cookies slice cleanly.
Step 4: Bake to Perfection
Preheat your oven to 350°F (177°C). Cut the chilled dough blocks into roughly ½-inch slices (thinner slices make more cookies but bake faster). Place them spaced out on a parchment-lined tray. If you like, brush each cookie with a simple egg wash (extra egg white mixed with water) and sprinkle coarse sugar on top for sparkle and crunch. Bake 12–14 minutes until the edges are just golden. Let them cool on the sheet before moving to a rack—this prevents breakage.
Top Tip
Chilling time is your best friend here. I’ve learned the hard way that too short in the fridge means the dough is too sticky to handle; too long and it cracks when you slice and assemble. Aim for that sweet spot—about 1 hour before assembly and 2 hours after to get neat squares without fuss.
- Perfect Chilling Time: Stick to about 1 hour initial chill to keep dough pliable for shaping.
- Trim for tidiness: Don’t hesitate to trim uneven edges of dough strips for a cleaner checkerboard effect—it really makes a difference.
- Egg Wash Magic: The egg wash and coarse sugar topping add just the right crunch and shine that feels extra special.
- Sharp Knife: Use a sharp, clean knife and wipe it between cuts to avoid squashing dough strips.
How to Serve Mint Chocolate Checkerboard Cookies Recipe

Garnishes
I usually keep garnishes simple—just a light dusting of coarse sugar before baking and sometimes a tiny drizzle of melted dark chocolate on top after cooling. It adds a touch of extra elegance without stealing the spotlight from the checkerboard.
Side Dishes
These cookies are perfect alongside a glass of cold milk or a warm cup of dark coffee, which balances the mint and chocolate flavors brilliantly. For holiday gatherings, pairing with fresh berries or whipped cream creates a delightful dessert spread.
Creative Ways to Present
For gifting, I like stacking them neatly in a cookie tin with parchment paper in between layers to show off the checkerboard design. During parties, arranging the cookies in a circular pattern with alternating colors on a slate serving board makes a beautiful centerpiece.
Make Ahead and Storage
Storing Leftovers
I store leftover cookies in an airtight container at room temperature, layered with parchment paper to keep them from sticking. They stay fresh and soft for up to a week—perfect for nibbling over several days.
Freezing
I often freeze the shaped checkerboard dough blocks wrapped tightly in plastic wrap. When I’m ready to bake, I thaw them overnight in the fridge and slice as usual. Baked cookies freeze well too—just thaw in the fridge and set at room temp before serving for best taste.
Reheating
If you want that fresh-baked warmth, pop cookies in a 300°F oven for about 5 minutes or microwave briefly for 10 seconds. Just don’t overdo it, or they’ll dry out.
Frequently Asked Questions:
Absolutely! The green food coloring is purely for visual effect. Your cookies will taste just as fantastic in natural colors.
Make sure your dough is well chilled but still pliable—not frozen solid. Use a sharp knife and wipe it clean between cuts to keep edges sharp and prevent dough from sticking.
Yes! You can assemble the checkerboard dough blocks and refrigerate them for up to four days before slicing and baking. You can also freeze the dough blocks or baked cookies for up to three months.
Espresso powder enhances the chocolate flavor and adds depth without any coffee taste. It’s optional but highly recommended for chocolate lovers.
Final Thoughts
I genuinely find this Mint Chocolate Checkerboard Cookies Recipe a joyful way to get hands-on with baking and enjoy timeless flavors with a twist. Each slice revealing the checkerboard pattern still makes me smile, reminding me how fun and rewarding baking can be. Give this a try—you’ll enjoy both the process and the delicious results just as much as I do!
Print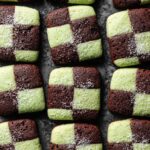
Mint Chocolate Checkerboard Cookies Recipe
- Prep Time: 4 hours 45 minutes
- Cook Time: 13 minutes
- Total Time: 5 hours
- Yield: 36 cookies
- Category: Dessert
- Method: Baking
- Cuisine: American
- Diet: Vegetarian
Description
These Mint Chocolate Checkerboard Cookies combine classic buttery sugar cookie dough with refreshing peppermint and rich chocolate for a visually stunning and delicious treat. Featuring a fun checkerboard design, these cookies are perfect for impressing guests or adding a festive touch to any occasion.
Ingredients
Base Cookie Dough
- 2 and ½ cups (313g) all-purpose flour (spooned & leveled)
- ½ teaspoon baking powder
- ½ teaspoon salt
- 1 cup (16 Tbsp; 226g) unsalted butter, softened to room temperature
- 1 cup (200g) granulated sugar
- 1 large egg + 1 egg yolk, at room temperature*
- 1 and ½ teaspoons pure vanilla extract
- Optional for topping: 1 Tablespoon (15ml) water and ¼ cup (50g) coarse sugar
Mint Dough
- 1 teaspoon peppermint extract
- Optional: 1 drop green food dye
Chocolate Dough
- 2 Tablespoons (10g) unsweetened natural or dutch-process cocoa powder
- 1 Tablespoon (15ml) milk
- Optional: 1 teaspoon espresso powder
Instructions
- Make the dough: Whisk together the flour, baking powder, and salt in a medium bowl and set aside.
- Cream butter and sugar: In a large bowl, use a hand mixer or stand mixer with paddle attachment to beat butter and granulated sugar on medium-high speed until light and fluffy, about 3 minutes.
- Add eggs and vanilla: Add the whole egg, egg yolk, and vanilla extract; beat on high speed until fully combined, about 1 minute, scraping down the sides as needed.
- Combine dry and wet ingredients: Mix dry ingredients into the wet mixture on low speed until a thick, sticky dough forms. Remove dough from bowl.
- Divide dough: Divide dough roughly in half (just under 2 cups each).
- Prepare mint dough: Put half the dough back in the mixing bowl, add peppermint extract and optional green food dye, beat on low until combined.
- Prepare chocolate dough: Put the other half of dough into the bowl, add cocoa powder, milk, and optional espresso powder, mix on low until well incorporated.
- Shape and chill dough: On a lightly floured surface, form each dough half into a 6-inch long, 2-inch wide, 2-inch tall rectangle. Wrap tightly and refrigerate for 1 hour until firm but pliable.
- Shape dough strips: Remove chilled dough blocks, cut each lengthwise into 3 even strips, then each strip into thirds to yield 9 strips per dough. Trim any rounded edges for neatness.
- Assemble checkerboard blocks: Layer alternating mint and chocolate dough strips tightly together in rows to form checkerboard patterns. Repeat for second block starting with the opposite dough color. Trim edges if needed.
- Chill assembled blocks: Wrap checkerboard blocks and refrigerate for 2 hours to firm up, up to 4 days refrigerating possible.
- Preheat oven and prepare baking sheets: Heat oven to 350°F (177°C) and line two baking sheets with parchment paper or silicone mats.
- Slice and bake cookies: Slice each block into 12 slices (½ inch thick) or 18 slices (⅓ inch thick for thinner cookies). Optional: brush with egg wash made by mixing saved egg white with 1 tablespoon water and sprinkle with coarse sugar. Arrange on prepared sheets 2-3 inches apart and bake for 12-14 minutes until edges are lightly browned.
- Cool cookies: Let cookies cool on baking sheet for 5 minutes before transferring to wire racks to cool completely.
Notes
- Make Ahead: Baked cookies freeze well up to 3 months; thaw overnight in refrigerator before serving. Assembled checkerboard dough blocks also freeze up to 3 months.
- Egg Wash: Use reserved egg white mixed with water to brush on cookies before baking for a crunchy, sparkling finish.
- Trimming Dough: Trimming edges of strips, blocks, and sliced cookies helps create neat checkerboard shapes. Leftover dough scraps can be rolled out and baked separately.
- Chilling Time: Do not overchill dough; the dough should be firm but pliable for shaping to avoid cracking.
- Food Coloring: Add green food dye gradually to achieve the desired mint green shade.
Nutrition
- Serving Size: 1 cookie
- Calories: 150 kcal
- Sugar: 12 g
- Sodium: 70 mg
- Fat: 9 g
- Saturated Fat: 5 g
- Unsaturated Fat: 3 g
- Trans Fat: 0 g
- Carbohydrates: 17 g
- Fiber: 1 g
- Protein: 2 g
- Cholesterol: 30 mg


Leave a Reply