If you've ever dreamed of a dessert that melts in your mouth with a luscious molten center, wait till you try this Peanut Butter Chocolate Lava Cakes Recipe. These little cakes are rich, gooey, and have that perfect peanut butter surprise inside—trust me, they’re pure magic!

Jump to:
- Why You'll Love This Recipe
- Ingredients & Why They Work
- Make It Your Way
- Step-by-Step: How I Make Peanut Butter Chocolate Lava Cakes Recipe
- Top Tip
- How to Serve Peanut Butter Chocolate Lava Cakes Recipe
- Make Ahead and Storage
- Frequently Asked Questions:
- Final Thoughts
- Peanut Butter Chocolate Lava Cakes Recipe
Why You'll Love This Recipe
Whenever I make these peanut butter chocolate lava cakes, friends always ask for seconds. They’re straightforward to whip up but taste like you spent hours crafting them — the dream combo of chocolate and peanut butter is unbeatable.
- Rich & Melty: The molten chocolate center pairs perfectly with the creamy peanut butter surprise inside for an indulgent bite.
- Quick to Prepare: You’ll have these decadent treats ready in just over half an hour, making them ideal for any last-minute dessert emergency.
- Simple Ingredients: No crazy pantry items here—just quality chocolate, smooth peanut butter, and a handful of basics.
- Elegant Presentation: Baked in individual ramekins, these lava cakes make an impressive dessert for dinner parties or cozy nights in.
Ingredients & Why They Work
Choosing the right ingredients is key for these lava cakes to come out perfectly gooey and rich. I always recommend investing in high-quality semi-sweet chocolate and creamy commercial peanut butter, as they truly elevate the flavor and texture of the final dessert.
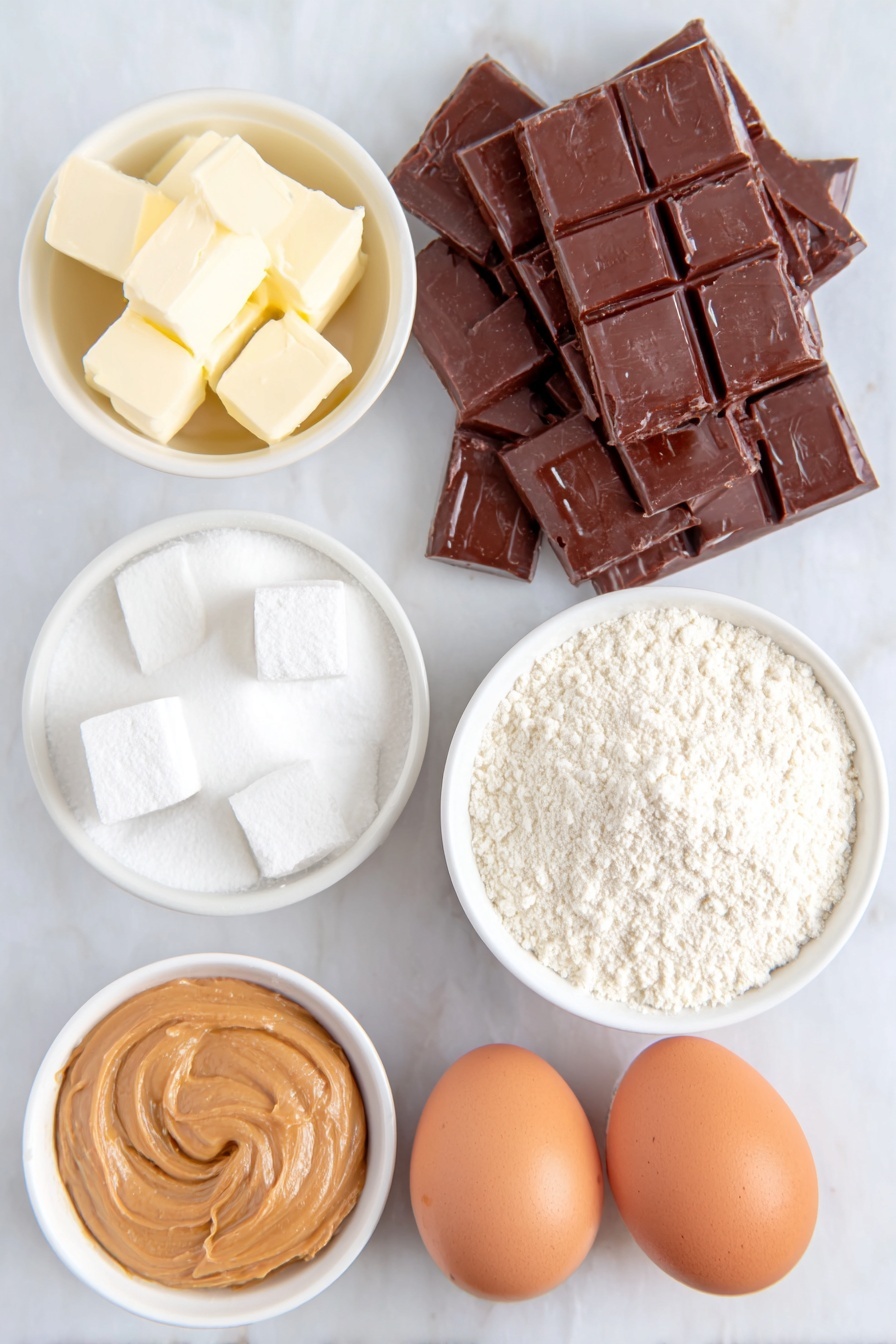
- Semi-sweet chocolate: This gives the cake a deep, balanced chocolate flavor without being overly bitter or too sweet.
- Unsalted butter: It adds richness and helps create the smooth molten texture we all crave.
- All-purpose flour: Just enough to give the cakes structure without weighing down the lava center.
- Confectioners’ sugar: Sweetens gently and helps keep the batter silky smooth.
- Salt: A pinch to enhance all those rich flavors and balance the sweetness.
- Large eggs and egg yolks: Essential for that tender crumb and getting the lava cake’s incredible fudgy texture.
- Creamy peanut butter: The star surprise that melts inside, adding a luscious, nutty twist to the classic chocolate lava cake.
- Optional garnishes like ice cream and drizzles: Perfect to customize your dessert and turn it into a truly indulgent experience.
Make It Your Way
The joy of this Peanut Butter Chocolate Lava Cakes Recipe is in its versatility. Whether you’re craving a richer peanut butter flavor or want to keep it purely chocolatey, these lava cakes easily adapt to your preferences. Let’s explore some tasty twists to make these molten delights truly your own.
- Peanut Butter-Free Version: If you want a classic molten chocolate cake without the peanut butter surprise, simply omit the peanut butter topping. The baking time remains the same—bake the cakes for 12-13 minutes until the edges are set but the centers are still slightly soft.
- Mini Lava Cakes with Muffin Pan: Short on ramekins? No problem! Use a greased and cocoa-powder-dusted muffin pan instead. You’ll get 6 smaller cakes that bake faster—just 8-10 minutes at 425°F. I tried this for a party, and guests loved having their own petite indulgence.
- Drizzled Delights: After baking, try drizzling your cakes with extra melted peanut butter or warm chocolate syrup. Adding a scoop of vanilla or salted caramel ice cream takes it from wonderful to truly unforgettable.
- Make-Ahead Batter: Life gets busy, so prepare the batter up through mixing, cover tightly, and refrigerate for up to 1 day. Bring it to room temperature when ready to bake—you’ll save prep time without sacrificing freshness.
Step-by-Step: How I Make Peanut Butter Chocolate Lava Cakes Recipe
Step 1: Prep Your Ramekins and Oven
Start by greasing four 6-ounce ramekins thoroughly with nonstick cooking spray. Then dust them with cocoa powder—this little step guarantees your lava cakes will slide out smoothly after baking, leaving you with gorgeous edges. While you’re at it, preheat your oven to a toasty 425°F (218°C) so it’s ready when your batter is set.
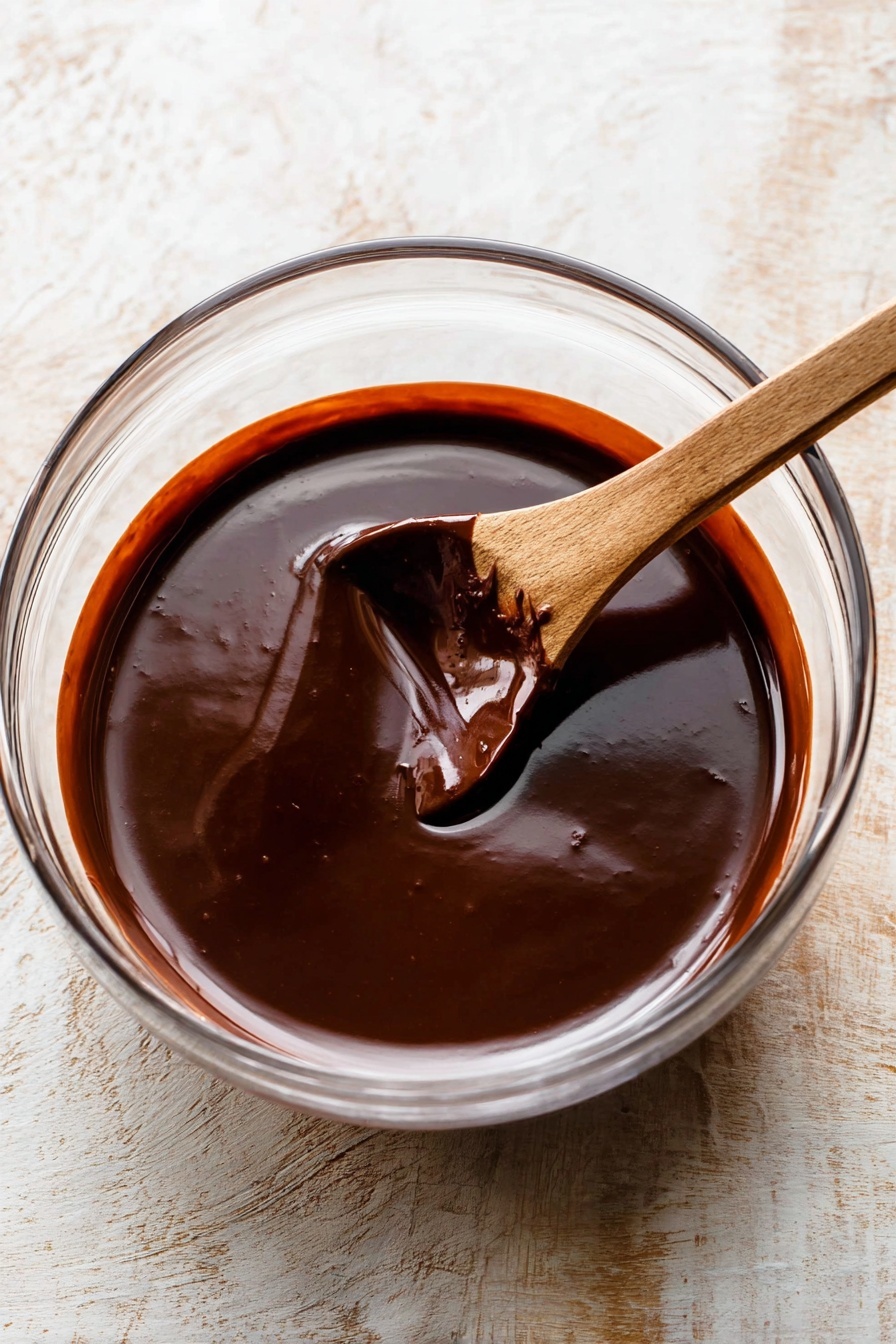
Step 2: Melt the Chocolate and Butter
Coarsely chop 6 ounces of high-quality semi-sweet chocolate and place it into a medium heat-proof bowl with ½ cup (8 Tbsp; 113g) of unsalted butter. Microwave the mixture on high in 10-second bursts, stirring after each one, until you have a beautifully smooth, glossy batter. This slow, patient melting helps prevent burning and keeps your chocolate silky perfect.
Step 3: Mix Dry Ingredients and Eggs
In a small bowl, whisk together ¼ cup (31g) all-purpose flour, ½ cup (60g) confectioners’ sugar, and ⅛ teaspoon salt until evenly combined. In another bowl, vigorously whisk 2 large eggs and 2 large egg yolks until smooth and fully blended. These steps ensure a lump-free, well-incorporated batter that bakes evenly.
Step 4: Combine Ingredients into Batter
Slowly add the flour mixture and the eggs to the warm chocolate and butter blend. Use a silicone spatula or wooden spoon to fold everything together gently. If you spot any lumps, feel free to whisk lightly until the batter is thick but silky smooth. The magic here is a perfect balance between rich fudge texture and flowy lava inside.
Step 5: Fill Ramekins and Add Peanut Butter
Divide the batter evenly among the prepared ramekins. Dollop 2 teaspoons of creamy peanut butter on top of each, then gently press it down slightly so it nestles within the batter. Some peanut butter may peek out—that’s part of the delightful molten surprise waiting inside!
Step 6: Bake and Flip
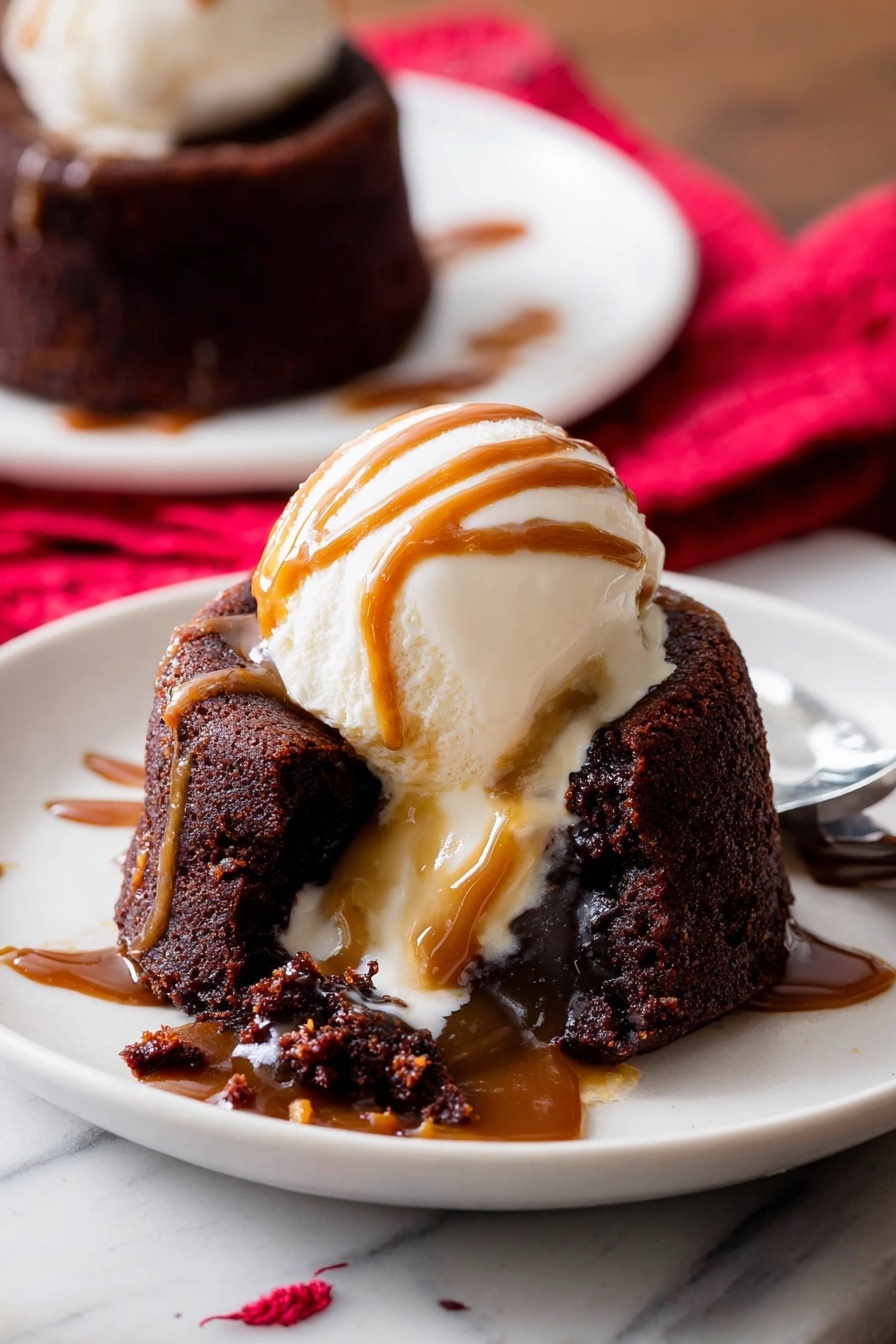
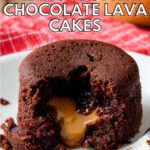
Place your ramekins on a baking sheet and slide them into the preheated oven. Bake for 12 to 13 minutes until the edges are set and firm, but the center tops look a bit soft and jiggly. After baking, let the cakes cool for one minute. Then, using oven mitts, invert each ramekin onto a serving plate. The cakes should release easily, revealing that luscious molten center and a perfectly gooey peanut butter core.
Step 7: Serve Immediately and Enjoy
For the ultimate indulgence, serve your Peanut Butter Chocolate Lava Cakes warm with a scoop of ice cream and a drizzle of melted peanut butter or chocolate syrup. The contrast of hot cake and cold ice cream, combined with the silky molten core, is absolutely divine. Dig in right away for the best experience!
Top Tip
Getting that perfect molten center with a luscious peanut butter surprise is what makes this Peanut Butter Chocolate Lava Cakes Recipe stand out. Here are some tried-and-true tips from my kitchen to yours that will help you nail this dessert every time.
- Ramekin Prep: Make sure to spray and dust your ramekins with cocoa powder well. This simple step ensures your lava cakes release perfectly when inverted, avoiding any frustration of stuck edges.
- Use Creamy Peanut Butter: Stick to smooth, commercial creamy peanut butter like Jif or Skippy. I learned that natural or crunchy varieties don’t melt well, throwing off the texture of that glorious molten center.
- Baking Timing: Keep the baking between 12 and 13 minutes exactly. I once left mine in too long and missed that gooey core – it’s all about that fine line between set edges and a soft center.
- Cool Before Flipping: Let the cakes cool for just one minute before flipping them upside down. This short pause lets the sides firm up but keeps the center wonderfully molten. Trust me, rushing this step can cause breakage.
How to Serve Peanut Butter Chocolate Lava Cakes Recipe
Garnishes
Adding the right garnishes takes these lava cakes from delicious to unforgettable. Try topping each warm cake with a scoop of vanilla ice cream — the contrast of cold and warm is divine. Drizzle some melted peanut butter or rich chocolate syrup over the top for extra decadence. A sprinkle of chopped roasted peanuts or a dusting of cocoa powder can add a lovely crunch or a touch of elegance.
Side Dishes
While these cakes are a showstopper on their own, you can serve them alongside fresh berries like raspberries or sliced strawberries to add a refreshing tartness. A light whipped cream or even a small bowl of salted caramel sauce also pairs beautifully, balancing the richness of the chocolate and peanut butter. For a cozy meal ending, consider a cup of strong coffee or espresso to cut through the indulgence.
Make Ahead and Storage
Storing Leftovers
If you have any leftover Peanut Butter Chocolate Lava Cakes (though that would be impressive!), store them covered in an airtight container in the refrigerator for up to 2 days. Because the center is molten, it's best to enjoy them fresh, but refrigeration helps preserve them briefly.
Freezing
To freeze, prepare the batter through step 6 (before baking), then cover each ramekin tightly with plastic wrap and store them in a freezer-safe bag or container for up to 1 month. When ready to enjoy, thaw in the refrigerator overnight and bring to room temperature before baking as usual.
Reheating
Reheat baked cakes gently in a microwave for about 20-30 seconds just to warm them through — you don't want to overcook and lose the molten center! Alternatively, pop them in a 350°F oven for 5-7 minutes if you prefer a gentle heat-up without risking overbaking.
Frequently Asked Questions:
No, it’s best to use smooth, commercial creamy peanut butter like Jif or Skippy. Crunchy or natural peanut butter doesn’t melt as smoothly and can affect the texture and melting consistency in the lava cakes.
Bake the cakes for 12 to 13 minutes until the sides are set and firm, but the tops still look slightly soft. This balance gives you that molten center. Overbaking can cause the center to become too firm.
Absolutely! You can prepare the batter through step 6, then cover and refrigerate it for up to 1 day. Make sure to bring it to room temperature before filling your ramekins and baking.
Yes! Simply omit the peanut butter step and bake the chocolate batter for 12-13 minutes as usual. You’ll still get a rich, classic molten chocolate lava cake.
Final Thoughts
Making these Peanut Butter Chocolate Lava Cakes is like giving yourself a warm hug through dessert — rich, smooth, and just a little bit indulgent. Whether it’s for a special occasion or a sweet treat to brighten your day, this recipe brings together the best of chocolate and peanut butter in a way that’s surprisingly easy but feels absolutely luxurious. I hope you have as much fun baking and savoring these as I did perfecting them. Enjoy every melty, gooey bite!
Print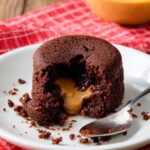
Peanut Butter Chocolate Lava Cakes Recipe
- Prep Time: 15 minutes
- Cook Time: 13 minutes
- Total Time: 35 minutes
- Yield: 4 cakes
- Category: Dessert
- Method: Baking
- Cuisine: American
- Diet: Vegetarian
Description
Indulge in rich and gooey Peanut Butter Chocolate Lava Cakes featuring a molten chocolate center with a creamy peanut butter surprise. Perfect for a decadent dessert that combines semi-sweet chocolate and smooth peanut butter, baked to perfection for a luscious treat.
Ingredients
Main Ingredients
- 6 ounces high quality semi-sweet chocolate (such as Ghirardelli or Lindt)
- ½ cup unsalted butter (8 Tbsp; 113g)
- ¼ cup all-purpose flour (31g, spooned & leveled)
- ½ cup confectioners’ sugar (60g)
- ⅛ teaspoon salt
- 2 large eggs
- 2 large egg yolks
- 8 teaspoons creamy peanut butter (42g, about 2 teaspoons per cake)
Optional for Serving
- Ice cream
- Melted peanut butter for drizzling
- Chocolate syrup for drizzling
Instructions
- Prepare Ramekins: Spray 4 six-ounce ramekins with nonstick cooking spray and dust with cocoa powder to ensure the cakes release easily after baking.
- Preheat Oven: Set your oven to 425°F (218°C) to get it ready for baking.
- Melt Chocolate and Butter: Coarsely chop the chocolate and place it over the butter in a medium heat-proof bowl. Microwave in 10-second increments, stirring after each until completely smooth. Set aside to cool slightly.
- Combine Dry Ingredients: In a small bowl, whisk together flour, confectioners’ sugar, and salt until evenly mixed.
- Mix Eggs: In another bowl, whisk the eggs and egg yolks together until fully combined.
- Make Batter: Slowly add the flour mixture and eggs into the melted chocolate mixture, stirring gently with a spatula or wooden spoon. Whisk lightly to remove any lumps. The batter will be thick.
- Fill Ramekins: Spoon the chocolate batter evenly into the prepared ramekins. Top each with 2 teaspoons of creamy peanut butter, gently pressing it down into the batter. Some peanut butter may remain exposed.
- Bake: Place the ramekins on a baking sheet and bake for 12 to 13 minutes, until the sides are firm and set while the tops remain slightly soft.
- Invert Cakes: Let the lava cakes cool for 1 minute, then cover each with an inverted plate and carefully flip using oven mitts to release the cakes onto the plates.
- Serve: Serve immediately, optionally topping with ice cream and drizzling with melted peanut butter and/or chocolate syrup.
Notes
- Make Ahead: Prepare the batter through step 6 and refrigerate covered for up to 1 day. Bring to room temperature before baking.
- Peanut Butter: Use creamy commercial brand peanut butter (e.g., Jif or Skippy). Avoid natural or crunchy peanut butter and other nut butters.
- Ramekins: Use 6-ounce oven-proof ramekins for best results. Different sizes may affect baking time and texture.
- Alternative Bakeware: Muffin pans can be used by greasing and dusting cups, baking for 8-10 minutes at 425°F. Yields 6 smaller lava cakes.
- Plain Version: Omit peanut butter if preferred. No changes in baking required; bake for 12-13 minutes.
- Tools: Recommended are 6-ounce ramekins, whisk, silicone spatula or wooden spoon, microwave-safe bowl, and baking sheet.
Nutrition
- Serving Size: 1 cake
- Calories: 420 kcal
- Sugar: 28 g
- Sodium: 90 mg
- Fat: 30 g
- Saturated Fat: 12 g
- Unsaturated Fat: 16 g
- Trans Fat: 0 g
- Carbohydrates: 32 g
- Fiber: 3 g
- Protein: 6 g
- Cholesterol: 185 mg


Leave a Reply