If you love soft, flavorful sugar cookies with a fun twist, then this Strawberry Kiss Cookies Recipe is going to become your new favorite. Imagine tender, funfetti-studded dough crowned with a luscious Hershey’s Strawberry Ice Cream Cone Kiss—doesn’t that sound irresistibly festive and tasty?

Jump to:
Why You'll Love This Recipe
From the moment I baked my first batch of these strawberry-topped wonders, I was hooked. They’re the perfect marriage of funfetti cheer and creamy strawberry bliss—ideal for everything from birthday parties to casual afternoons with friends.
- Soft & Moist Texture: Cream cheese in the dough adds that subtle tang and extra moisture you’ll notice in every bite.
- Festive Funfetti: The sprinkle-packed sugar cookie mix brings a cheerful pop of color and a little crunch.
- Strawberry Burst: Each cookie gets a crown of a Hershey’s Strawberry Ice Cream Cone Kiss for creamy, fruity flavor.
- Easy to Make: Just three simple dough ingredients plus a topping—perfect for getting the family involved.
Ingredients & Why They Work
When you shop for this recipe, you’ll want funfetti sugar cookie mix for that classic sprinkle-studded look and flavor. Using softened cream cheese is key—it blends smoothly for a dough that’s soft but holds its shape nicely. And of course, don’t skip the Hershey’s Strawberry Ice Cream Cone Kisses; they really make this cookie stand out!
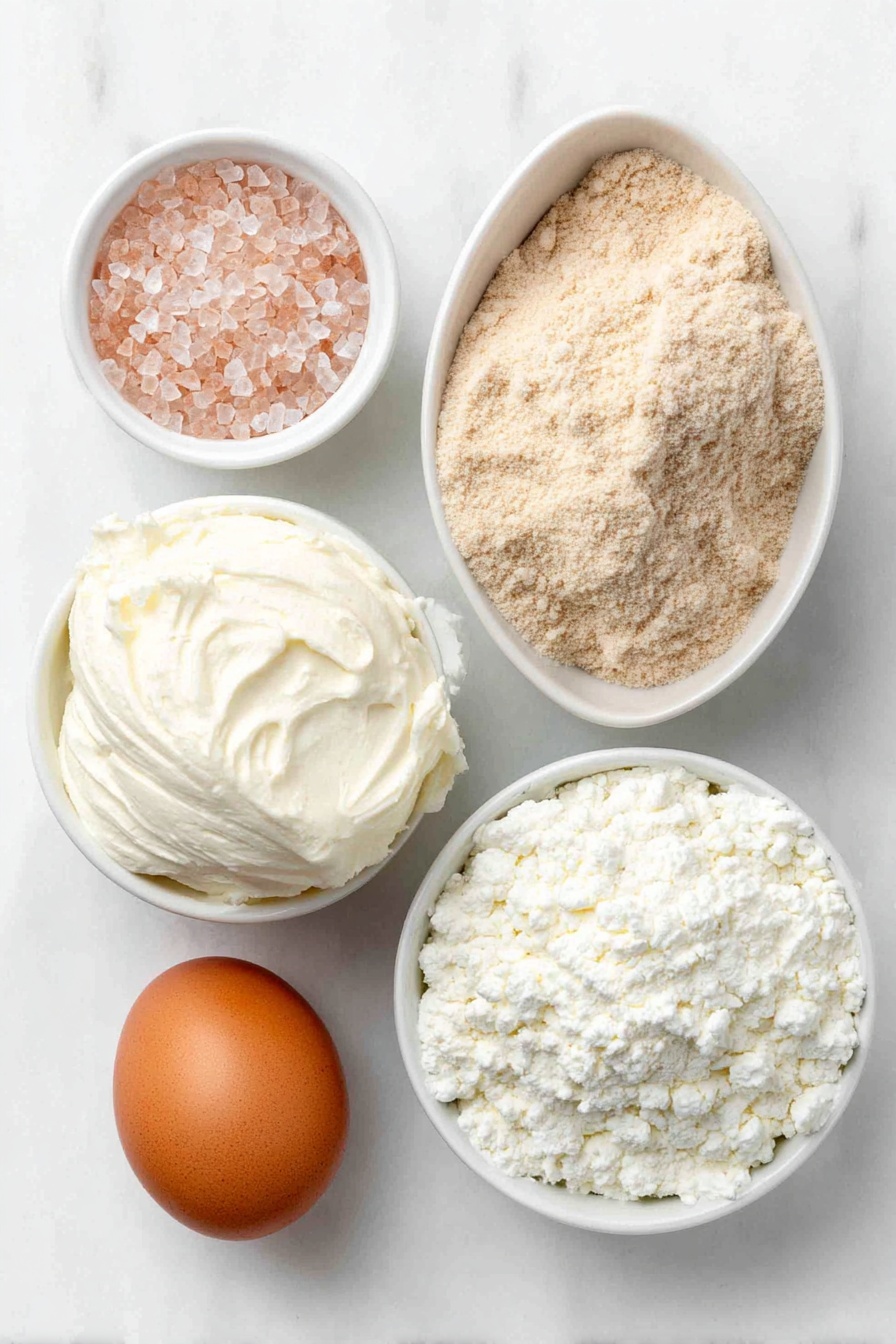
- Funfetti Sugar Cookie Mix: Adds colorful sprinkles and a sweet, classic base that’s ready to go.
- Cream Cheese: Provides tang and moisture, making these cookies extra tender and flavorful.
- Large Egg: Helps bind the dough while keeping it soft and chewy.
- Pink or White Sanding Sugar or Non-Pareils: Coats the dough balls for a delicate crunch and decorative sparkle on the outside.
- Hershey’s Strawberry Ice Cream Cone Kisses: The irresistible star topping with creamy strawberry flavor that melts just right.
Make It Your Way
One of the best parts about the Strawberry Kiss Cookies Recipe is how easy it is to make it your own. Whether you're looking to add a personal twist or fit a special occasion, these cookies are a perfect canvass for creativity and fun!
- Variation: I love swapping out the pink sanding sugar for white non-pareils to give the cookies a playful texture and a bit of extra crunch. It also makes for a charming presentation that’s perfect for celebrations like birthdays and baby showers.
- Dietary tweaks: If you want to make these vegan-friendly, try substituting the cream cheese with a vegan alternative and an egg replacer of your choice—though keep in mind the texture might vary slightly.
- Seasonal spin: For a festive winter version, sprinkle some edible glitter or crushed peppermint candy over the tops right after adding the Strawberry Kisses to add a holiday sparkle and fresh flavor.
- Flavor boost: For a subtle twist, fold in some finely chopped freeze-dried strawberries into the dough before scooping — it amplifies the strawberry magic and adds a little surprise crunch!
Step-by-Step: How I Make Strawberry Kiss Cookies Recipe
Step 1: Preheat and Prep Your Workspace
First things first — line a large baking sheet with parchment paper to prevent sticking and make cleanup a breeze. Then, preheat your oven to 375 degrees Fahrenheit. This temperature ensures your cookies bake evenly and turn out perfectly soft, with edges that are gently set but centers that still have that melt-in-your-mouth feel.
Step 2: Whip Up the Dough
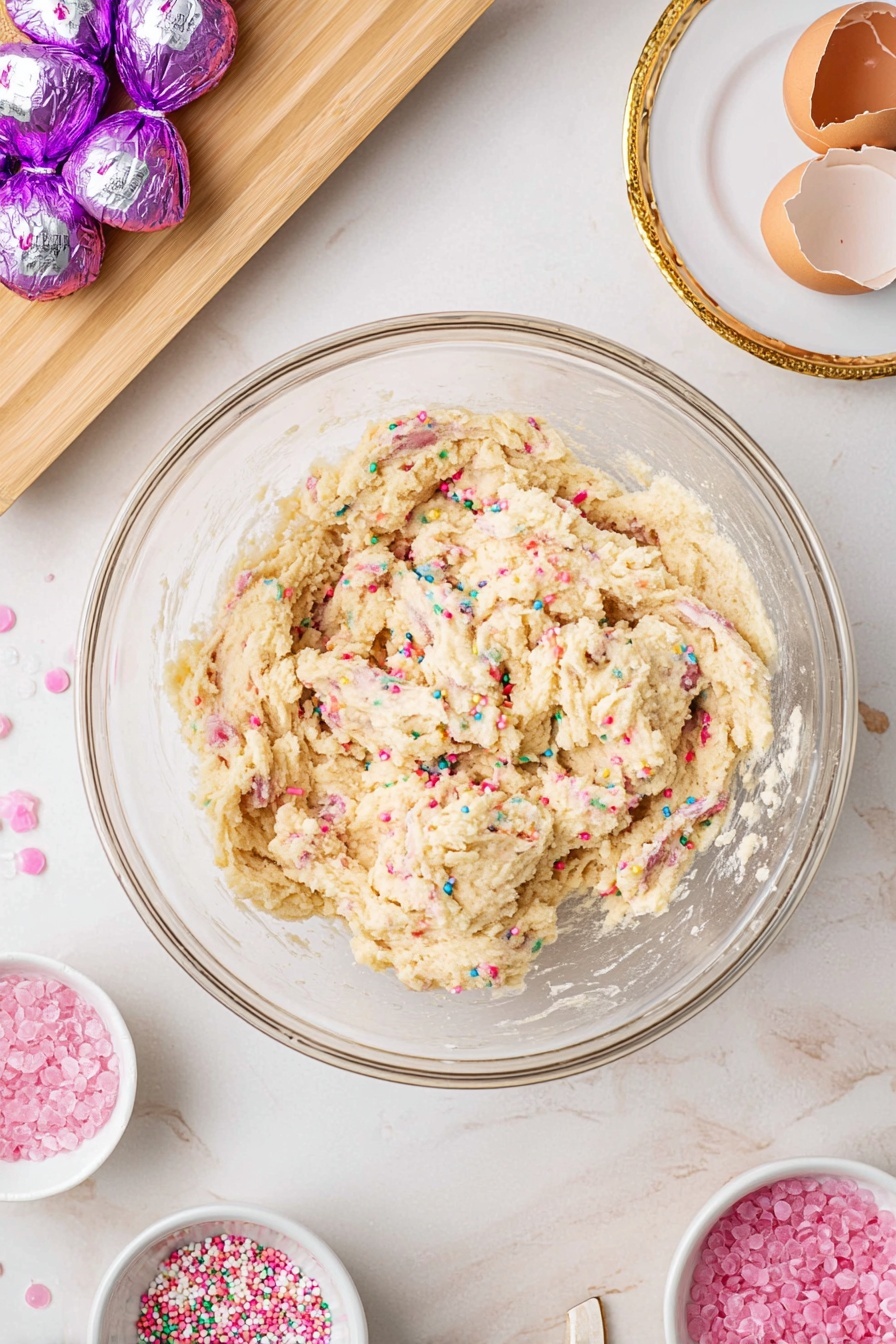
In a large mixing bowl, combine the funfetti sugar cookie mix, softened cream cheese, and one large egg. Using a hand or stand mixer, beat everything together until a soft dough forms. It should be a little sticky but smooth—this cream cheese addition is the secret behind the tender texture and a subtle tang in each bite.
Step 3: Coat the Dough Balls
Pour your choice of pink or white sanding sugar or non-pareils into a shallow bowl. Using a 1 ½ tablespoon cookie scoop, portion out dough balls. Roll each ball gently in the sugar or non-pareils until it's fully coated and has a smooth, even surface. This coating not only adds sparkle but also helps handle the slightly sticky dough.
Step 4: Chill the Dough (Optional But Helpful!)
If you find the dough too sticky to scoop or roll easily, just pop it in the fridge or freezer for about 30 to 60 minutes. This chill time firms up the dough, making it easier to work with without altering the delicious softness of your cookies. It’s a little extra step, but trust me—it’s worth it!
Step 5: Arrange and Bake
Place each coated cookie ball onto the prepared baking sheet, spacing them about 1 ½ inches apart. This gives the cookies room to spread without merging into one another. Bake in your preheated oven for 12 minutes, or until the edges look set but the centers still feel soft and tender.
Step 6: Cool and Add the Strawberry Kisses
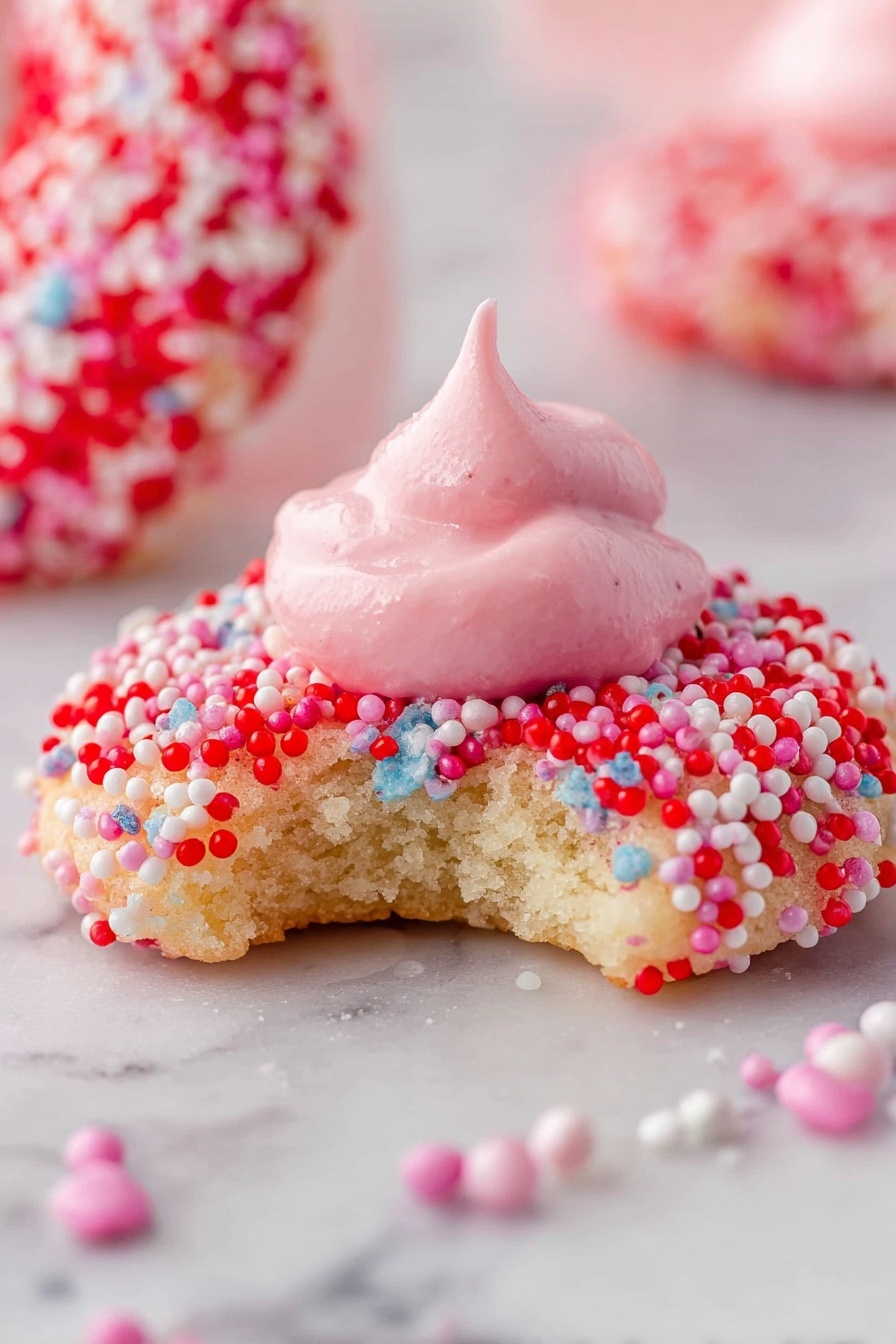
Once baked, allow your cookies to cool on the baking sheet for 3 to 5 minutes—this little wait is key. It lets the cookies firm up just enough so when you press an unwrapped Hershey’s Strawberry Ice Cream Cone Kiss into the center of each cookie, the chocolate won’t melt too much or lose its signature shape. If you love a gooey, melting kiss, press the kisses in immediately; otherwise, wait longer for a firmer finish.
Step 7: Final Cooling and Serving
Transfer your cookies to a wire rack to cool completely if you want to enjoy that perfect balance of soft cookie and intact strawberry kiss. Or, serve them warm right away for a dreamy, slightly melty treat that’s hard to resist.
Top Tip
These tips can make your Strawberry Kiss Cookies Recipe turn out perfectly every time. From handling sticky dough to achieving that ideal Kiss topping—these little tricks come straight from my kitchen trials to yours.
- Chill for Easier Handling: The dough is naturally sticky, so refrigerating it for 30-60 minutes before scooping helps a ton. I learned the hard way that trying to scoop sticky dough without chilling just makes a mess!
- Use Sanding Sugar on Hands and Tools: Dust your hands and the cookie scoop with pink or white sanding sugar to prevent sticking. It’s a small step that saves big frustration and keeps those cookie balls perfectly smooth.
- Timing the Kisses Placement: Press the Strawberry Ice Cream Cone Kisses into warm cookies (about 3-5 minutes after baking) for a melty, luscious look. Waiting longer keeps your Kisses firmer if that’s your preference.
- Avoid Covering Warm Cookies: Covering cookies while warm can deform the Kisses. Always let them cool on the sheet for a bit before packing them away.
How to Serve Strawberry Kiss Cookies Recipe
Garnishes
For an extra pop of festivity, sprinkle a few pink or white sanding sugars or non-pareils around the serving platter. If you want to elevate the look, add some fresh mint leaves or edible flowers to contrast those pretty Strawberry Kisses beautifully.
Side Dishes
These cookies pair wonderfully with a cold glass of milk or a fresh berry smoothie. If serving for a party, try alongside a light fruit salad or a creamy vanilla yogurt dip to balance their sweet, tangy flavor.
Make Ahead and Storage
Storing Leftovers
Once your Strawberry Kiss Cookies have cooled completely, store them in an airtight container at room temperature for 3-4 days. Alternatively, you can refrigerate them for up to a week—but be sure to bring them back to room temperature before eating for the best texture and flavor.
Freezing
Freezing is an excellent way to keep these cookies fresh for longer. Place cooled cookies in an airtight container or freezer bag, separating layers with parchment paper, and freeze for 2-3 months. Thaw overnight at room temperature before serving.
Reheating
If you love your cookies warm, pop them in the microwave for about 10 seconds or heat them in a low oven. Just be cautious not to overheat so the Strawberry Kisses keep their perfect shape.
Frequently Asked Questions:
Yes, you can substitute regular sugar cookie mix if funfetti isn’t available. The cookies will be just as soft and flavorful, but they won’t have the colorful sprinkles throughout.
Adding cream cheese makes the cookies extra moist with a subtle tang that balances the sweetness perfectly, giving a soft, tender bite that's a real treat.
If you don’t have these decorative sugars, you can skip the coating step or use finely granulated sugar. Just know it may slightly affect the cookie’s texture and appearance.
Waiting 3 to 5 minutes after baking before pressing the Kisses into the cookies helps keep them from melting too much. If you want them firmer, cool the cookies completely before adding the Kisses.
Final Thoughts
I hope this Strawberry Kiss Cookies Recipe brings a little extra sweetness and joy to your kitchen! These soft, colorful cookies topped with creamy strawberry Kisses are more than just a treat—they’re a celebration in every bite. Whether you’re making them for a holiday, a party, or just because, they’re sure to delight family and friends alike. Happy baking, and enjoy every delicious moment!
Print
Strawberry Kiss Cookies Recipe
- Prep Time: 10 minutes
- Chill Time: 30 minutes
- Cook Time: 12 minutes
- Total Time: 52 minutes
- Yield: 18 cookies
- Category: Dessert
- Method: Baking
- Cuisine: American
- Diet: Vegetarian
Description
Strawberry Kiss Cookies are delightful soft sugar cookies made from funfetti sugar cookie mix combined with cream cheese for extra moisture and tang. Each cookie is topped with a Hershey’s Strawberry Ice Cream Cone Kiss for a perfect burst of creamy strawberry flavor, making them a festive and irresistible treat for any occasion.
Ingredients
Main Ingredients
- 16 ounce bag Funfetti Sugar Cookie Mix
- 4 ounce cream cheese, softened
- 1 large egg
Topping
- ½ cup pink or white sanding sugar or non-pareils
- 18 Hershey’s Strawberry Ice Cream Cone Kisses, unwrapped
Instructions
- Preheat and Prepare: Line a large baking sheet with parchment paper and preheat your oven to 375 degrees Fahrenheit to ensure even baking.
- Make the Dough: In a large mixing bowl, use a hand or stand mixer to beat together the funfetti sugar cookie mix, softened cream cheese, and one large egg until a soft dough forms.
- Coat the Dough Balls: Place the sanding sugar or non-pareils into a shallow bowl. Use a 1 ½ tablespoon cookie scoop to portion dough balls, then roll each ball gently in the sugar or non-pareils until fully coated and smooth.
- Optional Chill: If the dough is too sticky to handle, refrigerate or freeze it for 30 to 60 minutes to firm up, which will make scooping and rolling easier but is not required.
- Arrange on Baking Sheet: Place the coated cookie dough balls onto the prepared baking sheet, spacing them about 1 ½ inches apart to allow for spreading during baking.
- Bake the Cookies: Bake the cookies in the preheated oven for 12 minutes or until the edges have set but the centers remain soft.
- Cool and Add Kisses: Let the cookies cool on the baking sheet for 3 to 5 minutes, then gently press an unwrapped Strawberry Kiss into the center of each cookie.
- Final Cooling: Transfer the cookies to a cooling rack to cool completely, or serve them warm if preferred.
Notes
- Store cooled cookies in an airtight container at room temperature for 3-4 days, or refrigerate for up to a week.
- To freeze, keep cookies in an airtight container for 2-3 months.
- Avoid covering cookies while still warm to prevent Kisses from deforming.
- Chilling dough helps with sticky handling; dust hands or tools lightly with sanding sugar if needed.
- The timing of pressing Kisses affects softness: pressing immediately after baking will melt them more, while waiting longer keeps them firmer.
Nutrition
- Serving Size: 1 cookie
- Calories: 180 kcal
- Sugar: 14 g
- Sodium: 110 mg
- Fat: 9 g
- Saturated Fat: 4.5 g
- Unsaturated Fat: 3 g
- Trans Fat: 0 g
- Carbohydrates: 22 g
- Fiber: 0.5 g
- Protein: 2 g
- Cholesterol: 25 mg


Leave a Reply