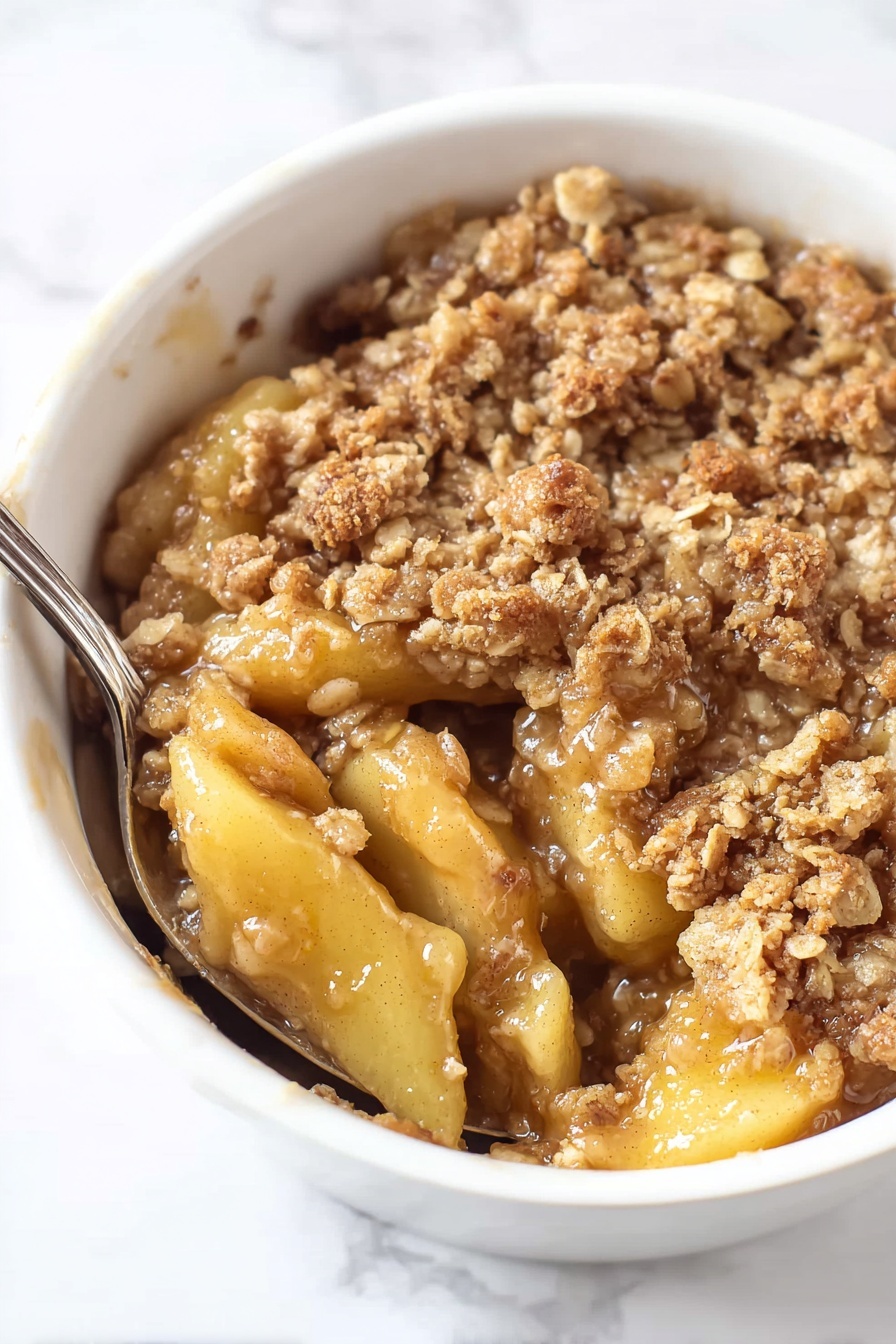
There's something irresistibly cozy about warm apples mingling with a crisp, buttery topping fresh from the oven. This The Best Apple Crisp Recipe is my go-to comfort dessert — simple to make, yet endlessly satisfying every single time.

Why You'll Love This Recipe
This apple crisp hits all the right notes: it's sweet, tangy, and topped with a perfectly golden, crumbly layer that everyone raves about in my family. I’m excited to share why it’s become a staple in my kitchen and yours will too.
- Simple Ingredients: No fancy stuff required — just classic pantry staples you probably already have.
- Perfect Comfort Food: Warm spiced apples covered with a crunchy oat topping make it a hug in dessert form.
- Easy to Customize: Add nuts, swap apples, or toss in extra spices to fit your mood or season.
- Kid-Approved and Crowd-Pleasing: My son’s nut allergy means no nuts here, but everyone still asks for seconds!
Ingredients & Why They Work
Every ingredient in The Best Apple Crisp Recipe plays a key role — from the tart-sweet apples that soften just right, to the buttery topping enriched with oats for extra texture. Here’s why I choose each one and how to pick the best versions.
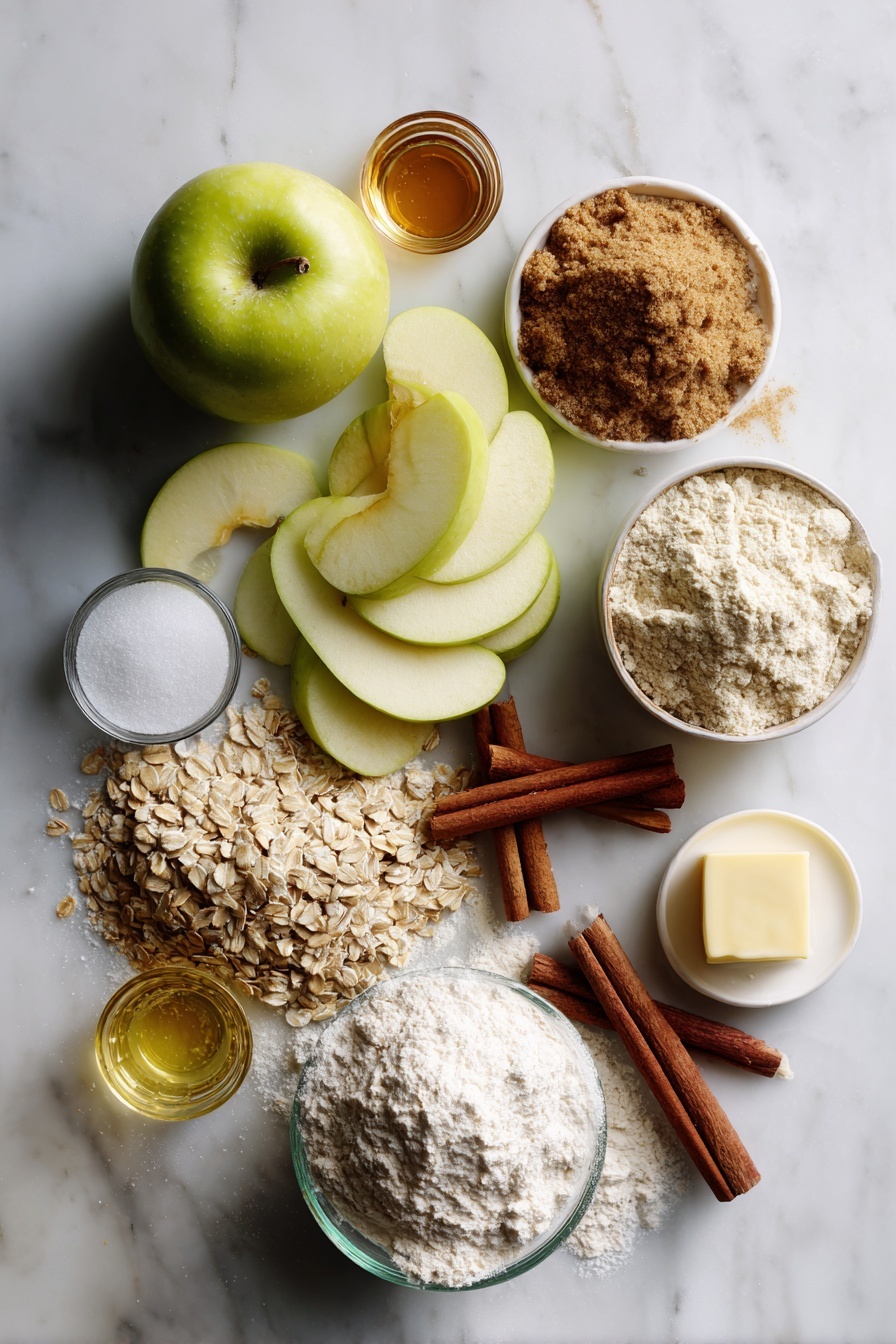
- Fresh apples: Choose firm, slightly tart apples like Granny Smith or Honeycrisp for the ideal balance; they keep their shape and add bright flavor.
- Granulated white sugar: Sweetens the apples slightly and helps draw out their juices to bubble up under the topping.
- Cinnamon: This warm spice is essential — it lifts the whole dessert with a cozy, familiar scent and taste.
- Vanilla extract: Adds a subtle depth and enhances the natural sweetness of the apples.
- All-purpose flour: Forms the base of the crumbly topping, giving structure when combined with butter.
- Old-fashioned oats: Provide that classic crisp texture that makes the topping irresistible.
- Packed brown sugar: Adds moisture, chewiness, and a rich caramel flavor to the topping.
- Salt: Balances the sweetness and enhances all the flavors.
- Butter (melted): Binds the topping ingredients and creates a golden, luscious crust as it bakes.
Make It Your Way
I love how flexible this apple crisp is. Sometimes I toss in chopped walnuts for crunch, and other times I swap the spice mix with a pinch of nutmeg and cloves for a fall twist. It’s all about making it your own.
- Nut-Free Variation: Like me, if you’re dealing with allergies, just skip the nuts — the crisp topping is delicious on its own.
- Seasonal Twist: Swap some apples with pears or add fresh cranberries to the filling for a tart surprise.
- Gluten-Free Version: Swap all-purpose flour with your favorite gluten-free blend; I’ve tested it and it bakes beautifully.
- Extra Oat Crunch: Double the oats in the topping for a heartier texture that’s perfect with coffee or tea.
Step-by-Step: How I Make The Best Apple Crisp Recipe
Step 1: Prep Your Apples with Care
Start by peeling (if you prefer, I often leave the peel on for texture and color), coring, and slicing your apples evenly. I use a slicer gadget to speed things up, then cut the slices in half again to about half an inch thick. This ensures the apples cook evenly — a small detail that makes a big difference.
Step 2: Mix the Filling
Toss your sliced apples in a bowl with sugar, cinnamon, and a splash of vanilla extract. Make sure every slice gets coated well — this helps the apples soften into a tender, flavorful filling while baking.
Step 3: Prepare the Topping
In a separate bowl, combine flour, oats, brown sugar, salt, and cinnamon. Pour in melted butter and mix with a fork or your fingers until crumbly and well coated. It should feel like coarse wet sand. This combination creates that classic crisp top that’s crunchy, sweet, and buttery.
Step 4: Assemble and Bake
Spread your apple mixture evenly in a buttered baking dish, then sprinkle the topping all over, covering every slice. Pop it into the oven at 350°F and bake for about 45 to 60 minutes. The fruit should be bubbling and tender, and the topping golden brown and crisp. If the topping starts browning too quickly, loosely cover with foil.
Step 5: Cool and Serve
Let it cool for 10-15 minutes to let the filling thicken slightly. This step is key if you want clean, satisfying spoonfuls. Serve warm with your favorite vanilla ice cream or whipped cream — trust me, the contrast of hot and cold is heavenly.
Top Tip
Over the years, I’ve learned some little tricks that keep this apple crisp tasting fresh and baking perfectly every time — here’s what I do:
- Slice Uniformly: Using a slicer helps me get consistent sizes so my apples cook evenly without some pieces turning mushy and others still crunchy.
- Watch the Topping Color: If your topping edges are browning too fast, tent with foil partway through baking to avoid bitterness.
- Let it Rest: Never skip letting the crisp cool just a bit before serving — it improves texture and makes scooping easier.
- Customize Wisely: Add chopped nuts or swap apples but be mindful of cook times; denser fruits might need a bit longer in the oven.
Garnishes
I’m a classic vanilla ice cream fan here — the cool creaminess pairs beautifully with warm apples and cinnamon. Sometimes I drizzle a bit of caramel sauce on top or sprinkle chopped toasted pecans for a little extra crunch. Whipped cream works great too if you want something lighter.
Side Dishes
This apple crisp shines as a dessert after dinner but makes a delightful breakfast treat too when paired with strong coffee or a warm latte. I’ve served it alongside simple roasted pork chops or grilled chicken, as the sweet and spicy notes complement savory mains wonderfully.
Creative Ways to Present
For special occasions, I like to serve individual portions of this apple crisp in small mason jars or ramekins. It looks charming and makes portion control easy. Adding a sprig of fresh mint or a cinnamon stick garnish can spruce up the presentation if you’re entertaining guests.
Make Ahead and Storage
Storing Leftovers
Cover any leftovers tightly with plastic wrap or transfer to an airtight container and refrigerate. I typically eat mine within 3-4 days, and it reheats beautifully, still retaining its crisp topping and tender fruit.
Freezing
I’ve frozen this apple crisp both before and after baking. If freezing before baking, cover tightly and bake from thawed, adding a bit more time. If freezing after baking, wrap well; it reheats well in the oven to regain crispness, though the topping may soften a bit.
Reheating
To warm up leftovers, I like to do it in the oven at 325°F for 15-20 minutes—this keeps the topping crunchy without drying out the fruit. Microwaving works in a pinch but tends to soften the topping more than I like.
Frequently Asked Questions:
I recommend tart, firm apples like Granny Smith or Honeycrisp. They hold their shape well and offer a nice balance of tartness and sweetness, essential for that perfect apple crisp filling.
Yes! You can assemble the apple crisp a few hours before baking and keep it covered in the fridge. Just bake it when you’re ready. Leftovers store well refrigerated for 3-4 days and can be reheated in the oven.
Absolutely! You can freeze the crisp either before or after baking. Just make sure to cover it well. When reheating from frozen, bake until heated through and topping is crispy again.
Yes! Adding chopped nuts like walnuts or pecans gives a wonderful crunch and flavor. Just be mindful of allergies, and if you add nuts, consider toasting them lightly before mixing into the topping for extra depth.
Final Thoughts
Every time I make The Best Apple Crisp Recipe, it reminds me of cozy family dinners and festive gatherings. It’s a dessert that’s both simple and special — the kind you’ll want to share but also secretly savor for yourself. Try it out soon, and I can’t wait to hear how it becomes a favorite in your home too.
Print
The Best Apple Crisp Recipe
- Prep Time: 10 minutes
- Cook Time: 60 minutes
- Total Time: 70 minutes
- Yield: 8 servings
- Category: Dessert
- Method: Baking
- Cuisine: American
- Diet: Vegetarian
Description
A classic homemade apple crisp featuring tender, cinnamon-spiced apples topped with a buttery, crumbly oat topping. This comforting dessert is perfect served warm with vanilla ice cream or whipped cream for a deliciously cozy treat.
Ingredients
Filling
- 5 cups fresh apples, sliced
- ½ cup granulated white sugar
- ½ teaspoon cinnamon
- 1 teaspoon vanilla extract
Topping
- ½ cup all purpose flour
- ⅓ cup old fashioned oats
- ⅔ cup packed brown sugar
- ¼ teaspoon salt
- ½ teaspoon cinnamon
- ¼ cup (½ stick) butter, melted
Instructions
- Preheat and prepare dish. Preheat your oven to 350 degrees Fahrenheit. Grease a deep dish pie plate or a large baking dish with butter or cooking spray to prevent sticking and set it aside.
- Mix the filling. In a large bowl, combine the sliced apples with the sugar, cinnamon, and vanilla extract. Stir well until all the apple slices are evenly coated with the mixture. Transfer the coated apples into the prepared baking dish.
- Prepare the topping. In a separate medium bowl, mix together the flour, old fashioned oats, brown sugar, salt, and cinnamon. Pour in the melted butter and stir the mixture until it becomes crumbly and well coated.
- Assemble the crisp. Sprinkle the crumb topping evenly over the apples in the baking dish, covering them completely.
- Bake the crisp. Place the baking dish in the preheated oven and bake for 60 minutes or until the fruit is soft and bubbling and the topping turns golden brown.
- Cool and serve. Allow the apple crisp to cool slightly before serving. Enjoy it warm, ideally topped with a scoop of vanilla ice cream, whipped cream, or a drizzle of caramel sauce if desired.
Notes
- Slice your apples evenly to ensure even baking; aim for slices about ½ inch wide. You can also chop them into uniform chunks if preferred.
- If the topping browns too quickly before the apples are cooked through, cover the dish loosely with aluminum foil and continue baking to prevent burning.
- For extra crunch and flavor, consider adding chopped pecans or walnuts to the topping, unless there are nut allergies.
- This apple crisp pairs wonderfully with vanilla ice cream, whipped cream, or a drizzle of caramel sauce for rich added flavor.
Nutrition
- Serving Size: 1 serving
- Calories: 320 kcal
- Sugar: 30 g
- Sodium: 150 mg
- Fat: 12 g
- Saturated Fat: 7 g
- Unsaturated Fat: 4 g
- Trans Fat: 0 g
- Carbohydrates: 50 g
- Fiber: 4 g
- Protein: 2 g
- Cholesterol: 30 mg


Leave a Reply