If you’re looking for a sweet way to say “I love you,” this Valentine’s Day Chocolate Bark with Pink Candy Melts Recipe is an absolute showstopper. Swirled layers of rich dark chocolate, creamy white chocolate, and playful pink candy melts make this bark as beautiful as it is delicious.

Jump to:
- Why You'll Love This Recipe
- Ingredients & Why They Work
- Make It Your Way
- Step-by-Step: How I Make Valentine’s Day Chocolate Bark with Pink Candy Melts Recipe
- Top Tip
- How to Serve Valentine’s Day Chocolate Bark with Pink Candy Melts Recipe
- Make Ahead and Storage
- Frequently Asked Questions:
- Final Thoughts
- Valentine’s Day Chocolate Bark with Pink Candy Melts Recipe
Why You'll Love This Recipe
When I first tried making this Valentine’s Day chocolate bark, I was instantly hooked—not just because it tastes amazing, but because it’s super easy to customize and makes a gorgeous gift. I love how the layers come together into a pretty marble effect with pops of vibrant pink that scream festive vibes.
- Simple but impressive: No baking required, making it perfect for last-minute holiday treats.
- Customizable toppings: Add your favorite Valentine’s candies and sprinkles for a personal touch.
- Beautiful marble effect: The pink candy melts swirl adds a pop of color and fun texture.
- Perfect for gifting: Easy to break into pieces and package for friends, family, or your sweetheart.
Ingredients & Why They Work
To get this bark just right, it’s best to choose high-quality chocolates and candy melts. Picking the right ingredients ensures smooth melting and a perfect glossy finish that’s eye-catching and oh-so-tasty.
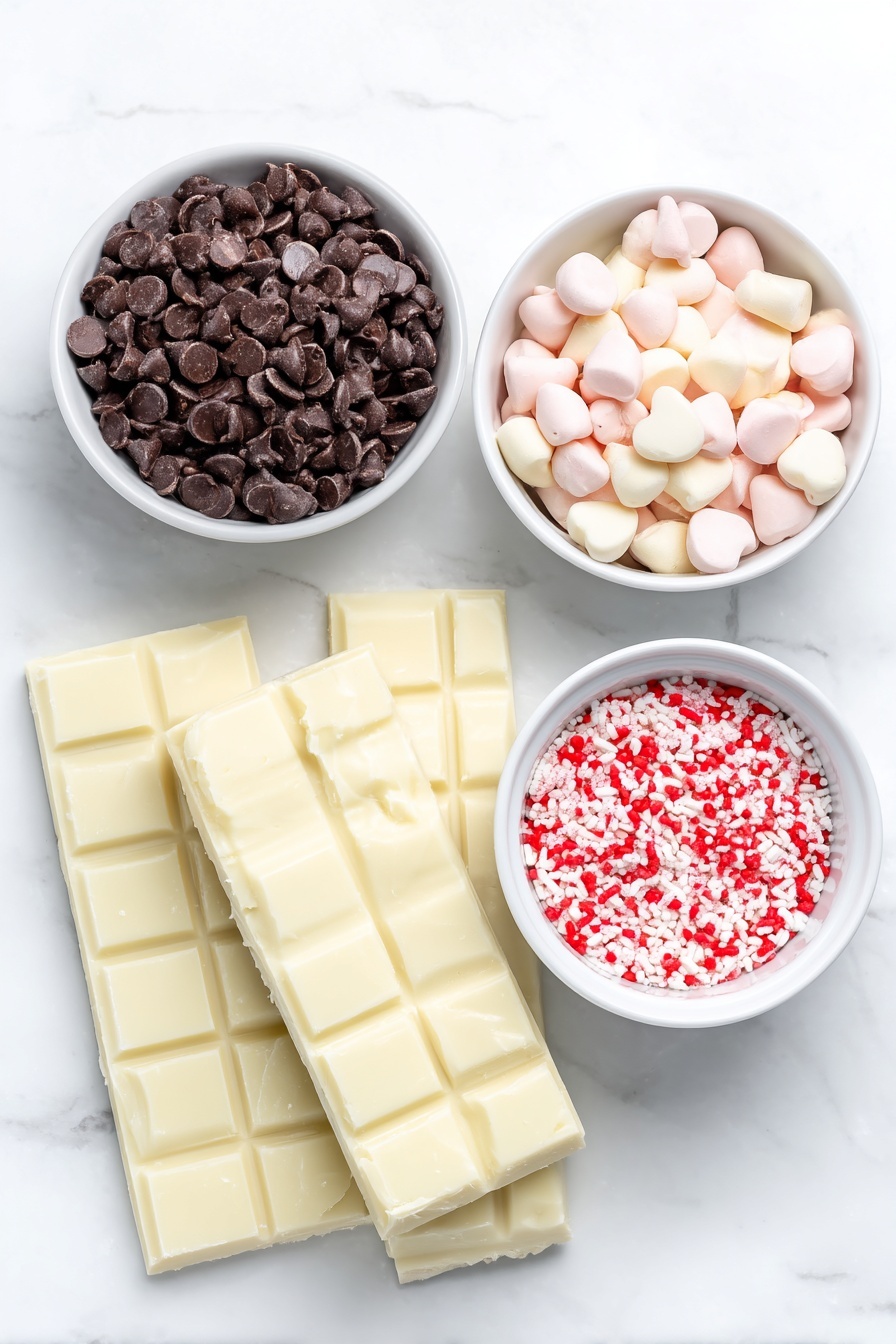
- Dark chocolate chips: I like chips here because they melt evenly and smooth out beautifully for that rich base layer.
- White chocolate baking bars: Bars melt better than chips, giving you creamy coverage that contrasts perfectly with dark chocolate.
- Pink candy melts: These melt quickly and add that vibrant pink color, essential for the Valentine’s Day theme.
- Valentine’s Day candy: Adds crunch and festive sweetness right on top to make each bite fun and celebratory.
- Valentine’s Day sprinkles: Tiny decorative accents that give your bark that special holiday sparkle.
Make It Your Way
This Valentine’s Day Chocolate Bark with Pink Candy Melts Recipe is wonderfully versatile, so feel free to get creative and personalize it to match your taste and style. Whether you want to add a twist on the toppings or swap out chocolates, the options are endless and always fun!
- Nutty Delight: I love sprinkling chopped toasted almonds or pecans on top for an added crunch and a toasty flavor that complements the sweetness perfectly.
- Dairy-Free Version: Swap the white chocolate baking bars and dark chocolate chips for vegan or dairy-free chocolate alternatives to make this treat friendly for those avoiding dairy.
- Berry Twist: Try adding freeze-dried raspberry pieces or strawberry bits among the toppings to introduce a little tartness that pairs beautifully with the pink candy melts.
- Extra Festive: Use heart-shaped sprinkles or edible glitter for a sparkle that wows, especially if you’re gifting this chocolate bark to someone special.
Step-by-Step: How I Make Valentine’s Day Chocolate Bark with Pink Candy Melts Recipe
Step 1: Prep Your Pan and Melt the Dark Chocolate
First things first: line a half sheet baking pan with parchment paper, leaving some overhang on the edges—that way, you’ll be able to lift the bark out easily once it hardens. Place it aside while you gently melt 1½ cups of dark chocolate chips in a microwave-safe bowl. Heat for 30 seconds, stir well, then continue in 15-20 second bursts, stirring thoroughly after each interval until the chocolate is silky smooth. Taking it slow here prevents overheating and keeps your chocolate glossy and perfect for spreading.
Step 2: Spread the Dark Chocolate Layer & Let It Set
Pour the melted dark chocolate onto your prepared parchment paper and spread it evenly into a thin layer using a spreading spatula. Aim for a smooth surface but don’t stress about perfection—that’s part of the charm! Allow it to rest for about 10 minutes, just until it’s mostly set but still slightly tacky so the next layers will stick beautifully.
Step 3: Melt the White Chocolate and Pink Candy Melts
Break the 12 ounces of white chocolate baking bars into smaller chunks and place them in a microwave-safe bowl. Heat for 30 seconds, stir, then continue heating in short increments while stirring until completely smooth.
In a separate bowl, melt the ¾ cup pink candy melts the same way—start with 30 seconds, then heat in 15-20 second intervals, stirring well each time until the pink candy is smooth and ready to drizzle.
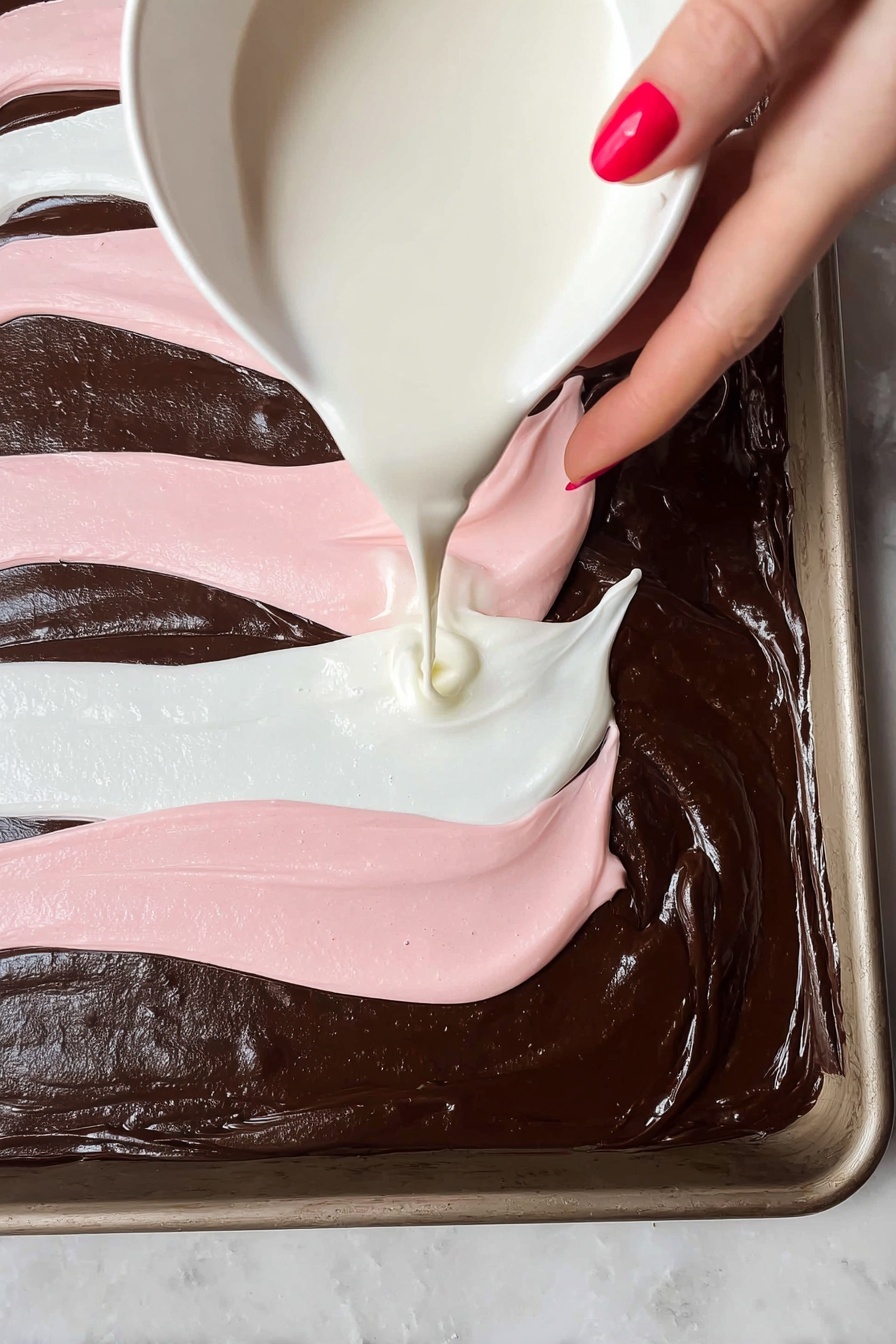
Step 4: Layer White Chocolate and Drizzle Pink Candy Melts
Pour the melted white chocolate evenly over the dark chocolate layer and spread quickly but gently. This white layer sets fast, so don’t delay or it might start to harden before you get a smooth finish.
Before the white chocolate firms up, drizzle the softened pink candy melts artistically over the top. You can go for thin lines or random drops—whatever feels festive and fun!
Step 5: Create Your Marble Magic and Add Toppings
With a toothpick, carefully swirl the pink candy melts and white chocolate to create a beautiful marble effect—just glide the toothpick gently through the white and pink layers. Try to avoid touching the dark chocolate underneath to keep the layers defined.
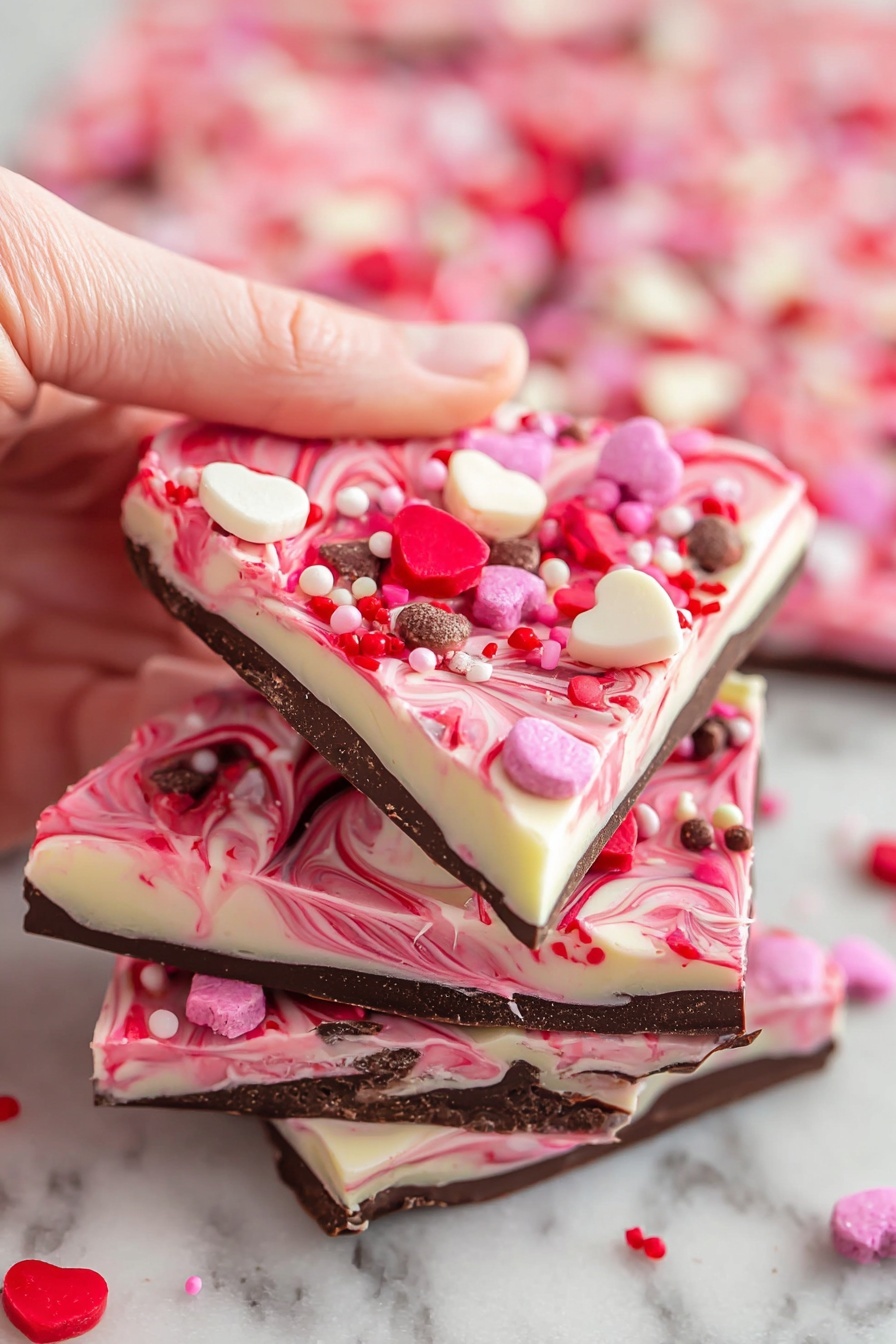
While the chocolate is still warm, sprinkle the ¼ cup Valentine’s Day candy and 2 tablespoons of themed sprinkles evenly over the top. This step adds that extra pop of color and flavor to make your bark shine.
Step 6: Chill and Serve Your Sweet Creation
Let your masterpiece cool and harden completely for about 30 minutes at room temperature. Once set, gently lift the bark out using the parchment paper overhang and break or cut it into festive-sized pieces. Now you’re ready to share or savor your Valentine’s Day Chocolate Bark with Pink Candy Melts Recipe—perfect for spreading love and sweetness!
Top Tip
These tips will help you nail the perfect texture and look for your Valentine’s Day Chocolate Bark with Pink Candy Melts Recipe, making your treat both stunning and delicious every time.
- Temperature Control: Heating your chocolate and candy melts slowly in short bursts while stirring prevents seizing and ensures a smooth, glossy finish—trust me, patience pays off!
- Layer Timing: Adding each new chocolate layer when the previous one is nearly set but still slightly soft helps layers bond beautifully without blending into a mess.
- Use Overhang: Leaving extra parchment paper hanging over the edges of your baking pan makes lifting out the bark a breeze, avoiding any breakage or frustration.
- Swirl with Care: When creating the marble effect, gently swirl only the top layers to keep the delicate pattern clean and prevent mixing with the dark chocolate base underneath.
How to Serve Valentine’s Day Chocolate Bark with Pink Candy Melts Recipe
Garnishes
Enhance the festive vibe by adding a sprinkle of edible glitter or tiny heart-shaped sugar decorations right before serving. Fresh strawberries or raspberries also make a lovely, tart contrast alongside the sweet chocolate bark.
Side Dishes
This bark shines as a standalone treat, but pairing it with a light dessert wine, a cup of rich hot cocoa, or a simple bowl of fresh strawberries offers a delightful balance. For a party, arrange it with a selection of nuts and dried fruits to create a lovely dessert board.
Make Ahead and Storage
Storing Leftovers
Store your Valentine’s Day Chocolate Bark in an airtight container at room temperature for up to 4-5 days. If your kitchen is warm, refrigeration will keep it fresh for up to 2 weeks without compromising the texture.
Freezing
For longer storage, place the bark in a freezer-safe container and freeze it for up to 4 months. Just thaw at room temperature before serving to enjoy that perfect crisp snap again.
Reheating
This chocolate bark is best enjoyed cold or at room temperature. If it softens, pop it briefly in the fridge to firm up again, but avoid reheating as it can affect the texture and shine.
Frequently Asked Questions:
Absolutely! You can choose any color of candy melts to match your occasion or preference. Just follow the same melting and swirling technique for that beautiful marble effect.
Heat the white chocolate slowly in short increments, stirring frequently. Using a microwave-safe bowl and stopping to stir every 15-20 seconds helps prevent overheating and lumping.
Yes! Feel free to sprinkle chopped nuts or dried fruits on top along with the Valentine’s candy and sprinkles. They add extra texture and flavor that complements the chocolate layers.
Add each new layer when the previous one is mostly set but still a little soft. This timing allows them to stick together but keeps the layers distinct for a lovely layered look.
Final Thoughts
Making this Valentine’s Day Chocolate Bark with Pink Candy Melts Recipe is such a joyful way to celebrate love and sweetness. It’s simple to make, visually stunning, and a guaranteed crowd-pleaser. Whether you’re gifting it to someone special or indulging yourself, every bite bursts with festive charm and deliciousness. I hope you have as much fun making it as you do sharing it!
Print
Valentine’s Day Chocolate Bark with Pink Candy Melts Recipe
- Prep Time: 10 minutes
- Chill Time: 30 minutes
- Cook Time: 15 minutes
- Total Time: 55 minutes
- Yield: 6 servings
- Category: Dessert
- Method: No-Cook
- Cuisine: American
- Diet: Vegetarian
Description
This Valentine’s Day Chocolate Bark recipe is a delightful and festive treat featuring layers of dark chocolate, white chocolate, and pink candy melts, decorated with a variety of Valentine’s Day candies and sprinkles. It’s perfect for gifting or sharing during the holiday, offering a beautiful marble effect and a satisfying crunch.
Ingredients
Dark Chocolate Layer
- 1½ cups dark chocolate chips
White Chocolate Layer
- 12 ounces (3 4-ounce) white chocolate baking bars
Pink Candy Layer
- ¾ cup pink candy melts
Toppings
- ¼ cup Valentine’s Day candy
- 2 tablespoons Valentine’s Day sprinkles
Instructions
- Prepare Baking Pan: Line a half sheet baking pan with parchment paper and set aside to ensure easy removal of the bark once hardened.
- Melt Dark Chocolate: Place the dark chocolate chips in a microwave-safe bowl. Heat for 30 seconds, stir well, then continue heating in 15-20 second increments, stirring thoroughly after each until the chocolate is completely melted and smooth.
- Spread Dark Chocolate: Pour the melted dark chocolate onto the parchment paper and spread it out into a thin, even layer using a spreading spatula.
- Set Dark Chocolate: Let the pan rest for about 10 minutes, or until the dark chocolate is mostly but not fully hardened.
- Melt White Chocolate: Break the white chocolate bars into pieces and place them in a microwave-safe bowl. Heat for 30 seconds, stir, then continue heating in short bursts while stirring until smooth and fully melted.
- Melt Pink Candy Melts: In a separate microwave-safe bowl, heat the pink candy melts starting with 30 seconds, then in 15-20 second increments, stirring well until melted and smooth.
- Apply White Chocolate Layer: Pour the melted white chocolate evenly over the dark chocolate layer and spread quickly, working fast as this layer hardens rapidly.
- Drizzle Pink Candy Melts: Before the white chocolate sets, drizzle the pink candy melts over the top.
- Create Marble Effect: Use a toothpick to gently swirl the pink and white chocolate layers to create a marble pattern, avoiding the dark chocolate layer beneath.
- Add Candy and Sprinkles: While the chocolate is still warm, sprinkle the Valentine’s Day candy and sprinkles evenly over the top of the bark.
- Cool and Harden: Allow the bark to cool for 30 minutes or until completely hardened.
- Serve: Break or cut the bark into pieces and serve as a festive treat.
Notes
- Store the bark in an airtight container at room temperature for up to 4-5 days or refrigerate for up to 2 weeks.
- For longer storage, freeze the bark in a freezer-safe container for up to 4 months.
- Adjust serving sizes by breaking the bark into smaller or larger pieces according to preference.
- Leave extra parchment paper overhang on the baking sheet to easily lift out the hardened chocolate.
- Heat chocolate slowly in short increments to prevent seizing or lumping, stirring frequently for best results.
- For best layering, add each new layer when the previous one is almost set but still slightly soft to bond them together; fully hardened layers may snap apart.
Nutrition
- Serving Size: ⅙ of recipe
- Calories: 350 kcal
- Sugar: 30 g
- Sodium: 10 mg
- Fat: 22 g
- Saturated Fat: 14 g
- Unsaturated Fat: 7 g
- Trans Fat: 0 g
- Carbohydrates: 34 g
- Fiber: 3 g
- Protein: 4 g
- Cholesterol: 10 mg


Leave a Reply